
Specifications


14 Barracuda Link Balancer Administrator’s Guide
IP address. If the latter, it should be on a different subnet than the LAN devices already on the
network. Remember that if the firewall does not recognize an address as being on the local
network it will pass it to the Barracuda Link Balancer.
If the default address of 192.168.200.200 meets this criteria, there is no need to change it.
To change the LAN/Management IP address,
Go to the
Basic > IP Configuration page and change the Management IP Address and
Subnet Mask. Click
Save Changes. If the address is on a different subnet, your
connection will terminate.
5. Power down your Barracuda Link Balancer using the power button on the front of the unit.
Step 6: Install in the Production Network
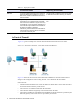
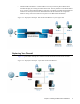
Now that the Barracuda Link Balancer is configured, install it in its permanent location and connect
it to your WAN links:
1. Mount the Barracuda Link Balancer in a 19-inch rack or place it in a stable location. To ensure
proper ventilation, do not block the cooling vents on the front and back of the unit.
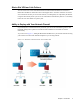
2. Connect each of the cables from the Internet links into a WAN port on the front of the Barracuda
Link Balancer. The ports are labeled WAN1, WAN2, etc. These ports correspond to the WAN
ports that you configured in the Web user interface. Be sure to connect them according to your
configuration.
3. If there is a LAN port on the front of the Barracuda Link Balancer, connect an Ethernet cable
from the outside interface of your existing network firewall to that LAN port. If there is no LAN
port on the front, connect the outside interface of your existing network firewall to the LAN
Ethernet port on the back panel of the Barracuda Link Balancer. You should see some activity
on both the yellow and green lights on the LAN port. If not, you may need to use a crossover
cable.
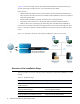
Step 7: Test Connectivity
Now you are ready to test the connectivity to your existing firewall and the systems connected to it.
There is no need to change your firewall network configuration - your network firewall should
continue to use the ISP provided gateway address.
1. Confirm that you can access the Internet from a client computer on your LAN. If this works,
continue.
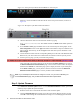
2. On the test system, log into the Web user interface using the permanent LAN IP address and go
to the
Basic > Links page. The status of each link should appear as Connected. You can see the
utilization of each link by moving the mouse over the graphic.
On the test system, generate some traffic, by, for example, opening more tabs in the browser of
the test system and downloading files from the Internet. You can FTP files from a number of
different sites or use torrent to get the traffic to flow on multiple links. Go to the
Basic > Status
page to view graphs that show the incoming and outgoing traffic for each link..
Note: If you have connectivity issues, clear the ARP caches of your existing network
components such as the firewall, routers and modems. In some cases, you may need to
reboot these devices.