
User Guide


ASSEMBLY
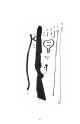
Wildcat III
Installing Prod
1. Insert spring clip into the prod housing be sure tabs are
facing down against bottom of housing.
2. Angle prod forward (as shown), insert into prod housing.
3. Line centering arrow up in the inspection hole. Twist
prod so that it seats flat against the back face of the
housing and remains seated on the spring clip.
4. Place pressure pad in front of the limb.
5. Tighten nose bolt until prod is firmly seated.
IMPORTANT Do not over tighten the nose bolt. When the
screw makes contact with the pressure plate tighten only
enough to prevent unwanted movement. Over tightening
will crush the fiberglass and permanently damage the
prod/limb.
Attaching Foot Stirrup
1. Line up mounting holes underneath the nose of the
crossbow with the foot stirrup. Attach using hex head
bolts supplied in hardware kit.
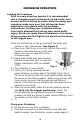
Stringing the crossbow
Important Do not attempt to string your crossbow by
exerting downward pressure on the stock or prod! This
may cause breakage and will void your warranty. Use
only the cable stringer method. Make sure the nockends
are firmly seated on prod
.
1. Place loops of the black steel cable stringer over the
prod nockends, just as you would with a bowstring.
Some hand tension may be kept on cable stringer to
keep it properly seated.
See Figure 1
2. Cock the crossbow, using the foot
stirrup for stability. The safety is n
automatically engaged.
ow
3. Insert bowstring loops through the
loops of cable stringer and seat over
nock ends.
Fi
g
. 1
4. Release safety catch.
5. Pull back firmly on the string, removing all tension from
the cable stringer.
8