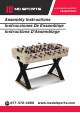
MODEL/MODELO/MODÈLE FS048Y20021 Assembly Instructions Instrucciones De Ensamblaje Instructions D'Assemblage 877-472-4296 www.medalsports.
English Español Français LIMITED 90 DAYS WARRANTY GARANTÍA LIMITA DE 90 DIAS GARANTIE LIMITEE DE 90 JOURS This product is covered by a limited warranty that is effective for 90 days from the date of purchase. If, during the limited warranty period, a part is found to be defective or breaks, we will offer replacement parts at no cost to you, the customer. The only exceptions to the warranty include mainframes, table tops, playing surfaces, batteries or tools.
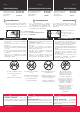
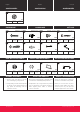
English Español Français TOOLS REQUIRED HERRAMIENTAS NECESARIAS Phillips Screwdriver - Not Included Standard (Flat Head - Not Included Screwdriver) Allen Key - Included Destornillador Phillips Destornillador de Cabeza Plana Llave Allen RECOMMENDED - No incluido - No incluido - Incluido OUTILS REQUIS Tournevis cruciforme Tournevis standard (Tête plate) Clé hexagonale RECOMENDADO Electric Screwdrivers may be helpful during assembly; however, please set a low torque and use extreme caution.
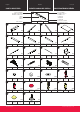
English Español PARTS IDENTIFIER Français IDENTIFICADOR DE PIEZAS 1 PART NUMBER NÚMERO DE PIEZA NUMÉRO D'ARTICLE Side Apron 3 Delantal final 6 Leg -A Pata -A Bases de pata 10 Base pied FOR FIG. 13 7 Barra de 3 agujeros 14 Tige à 3 trous FOR FIG. 6 11 Red 18 FOR FIG. 15 Rod End Cap 22 Barra de 5 agujeros 15 19 Jugador B - rojo 26 Lecteur B - rouge FOR FIG. 14 Jugador C - naranja FS048Y20021 Joueur C - orange 16 Jugador C - rojo 27 Barre transversale FOR FIG.
English Español ACCESSORIES Français Español ACCESORIOS ACCESSOIRES ACCESORIOS HARDWARE MÉTAUX 28 x2 Bola de fútbol Soccer Ball Ballon de foot HARDWARE A1 FOR FIG. 1, 3, 7 A2 FOR FIG. 1, 3, 7, 9 x16 M6x35mm Bolt Perno M6x35mm A5 Boulon M6x35mm FOR FIG. 11 Perno M8x105mm Boulon M8x105mm M6 Washer Arandela M6 A6 FOR FIG. 1 M8 Washer Arandela M8 Aro de entrada para Pelota Ouverture d'entrée du ballon BEFORE ASSEMBLY Tornillo 4x12mm A7 P2 4x35mm Screw Rondelle M8 FOR FIG.
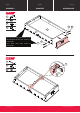
English Español ASSEMBLY Français Español MONTAJE ASSEMBLAGE ACCESORIOS FIG. 1 1 x2 Pre-installed P1 2 x2 1 Pre-installed P2 x16 2 x1 A1 x4 A2 A2 x4 A8 1 A1 x1 P1 P2 Note: Do NOT tighten the Bolts (A1) until FIG. 3. Nota: Que No apretes los Cerrojos (A1) hasta la FIG. 3. Note: Ne pas serrer à fond les boulons (A1) avant Fig. 3. FIG. 2 5 x1 2 1 5 1 Note: Playfield graphic should face down when assembling.
English Español ASSEMBLY Français Español MONTAJE ASSEMBLAGE ACCESORIOS FIG. 3 2 A1 A2 A8 x1 2 x4 1 x4 A2 x1 A1 5 1 Note: After this step, tighten the Bolts (A1) Nota: Después de este paso, apretes los Cerrojos (A1) Note: Après Boulons (A1) cette étape, serrez A2 A1 les 2 FIG. 4 8 13 A3 x1 13 x2 8 x8 A3 8 FS048Y20021 6 www.medalsports.
English Español ASSEMBLY Français Español MONTAJE ASSEMBLAGE ACCESORIOS FIG. 5 3 4 x2 x2 4 3 3 FIG. 6 14 A3 4 A3 x4 x24 14 3 4 14 A3 FS048Y20021 7 www.medalsports.
English Español ASSEMBLY Français Español MONTAJE ASSEMBLAGE ACCESORIOS FIG. 7 6 27 A1 A2 A8 27 x2 6 x4 6 x8 A1 x8 A2 x1 4 3 6 The Hole / Orificio / Orifice FIG. 8 A3 x2 6 3 4 A3 14 6 FS048Y20021 8 www.medalsports.
English Español ASSEMBLY Français Español MONTAJE ASSEMBLAGE ACCESORIOS FIG. 9 7 A2 A4 A8 x2 6 x8 3 A2 A4 x8 x1 4 7 6 4 3 7 3 Holes / 3 Agujeros / 3 trous FS048Y20021 9 www.medalsports.
English Español ASSEMBLY Français Español MONTAJE ASSEMBLAGE ACCESORIOS FIG. 10 13 A3 x4 13 7 x16 A3 FIG. 11 12 A5 A6 A8 x1 x2 x2 x1 A5 FS048Y20021 12 A6 10 A6 A5 www.medalsports.
English Español ASSEMBLY Français Español MONTAJE ASSEMBLAGE ACCESORIOS FIG. 12 16 x2 16 16 Note: Go back and make sure that all connections are tightened. Nota: Vuelva y asegúrese que todas las conexiones están apretadas. Note: Revérifiez que toutes les connexions sont bien serrées. HOLD BY THE TABLETOP / SOSTENER DE LA SUPERFICIE DE LA MESA / SOULEVER PAR LE DESSUS DE TABLE CABINET / GABINETE / MEUBLE CAUTION Two strong adults are recommended to turn over the table as shown. 1.
English Español ASSEMBLY MONTAJE FIG. 13 9 10 11 19 20 Français Español ASSEMBLAGE ACCESORIOS Note: Hole at the end of Rod designates handle location. See Arrow Location Below. x2 Nota: Agujero en el final de Barra se designa la posición de manija. Vea la Siguiente Posición de Flecha. x4 Note: L’orifice à l’extrémité d la Tige désigne l’emplacement de la poignée. Voir emplacement Flêche ci-dessous.
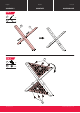
English Español ASSEMBLY MONTAJE FIG. 14 21 x13 23 x13 24 x13 25 ASSEMBLAGE ACCESORIOS Order of players (Overhead View) / Orden de jugador (Vista en General) / Placement des joueurs (Vue générale) x13 22 Français Español Note: Make sure 1 Rod Bumper and 1 Rod Washer are at each end of the Player Rods before adding Players. Nota: Haga seguro que 1 Bómper de Barra y 1 Arandela de Barra están en cada final de las Barras de Jugador antes de agregar Jugadores.
English Español ASSEMBLY Français Español MONTAJE FIG. 15 ASSEMBLAGE ACCESORIOS P4 17 x8 18 x8 18 The Hole / Orificio / Orifice Pre-installed P3 P4 x2 Pre-installed x2 17 P3 FIG. 16 15 A7 A7 15 x2 x4 15 14 R! GA JU FS048Y20021 JOUER ! RA M EN CE RA AHO R A L ESTA IST ED O ST PA !U VO M U S CO PO NT UVE Z MAINTENA OW READY T RE N OP UA LA YO Y! www.medalsports.
www.medalsports.