
Use and Care Manual


10
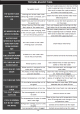
DISPLAY CONTROLS
1. Starting up: Plug in the power plug, the symbol will ash in the display window,press the ON/OFF
button on the control panel, the machine will start to make ice when the external pipe add water to reach
the standard level on the water tank through the electromagnetic water valve, then the symbol will change
to light on always in display window and symbol rotate; The ambient temperature will be displayed in the
upper left of the display window “80F” means the ambient temperature is 80F, several minutes later,the
ashing numbers will be displayed in the ambient temperature display area,the ashing number “10M”
means still need 10minutes to nish this ice making cycle.
2. Every ice making cycle nished, enter deicing process,the symbol ash, the external pipe can add
water to the water tank through the electromagnetic valve and the arrow on the symbol will ash until
the water reach the standard level, then the symbol extinguish, the unit enter the next ice making cycle.
When the water can not reach the standard level,the symbol is always bright,the unit stop working. After
water shortage,the unit needs to be restarted,otherwise it will start up automatically after 15 minutes.
NOTE: Each ice making cycle is around 11-20 minutes,the ice making time will be changed according to
the ambient temperature and the water temperature change. Especially the rst ice making cycle,the ice
making cycle will be longer because of the high water temperature in the water tank but the ice making
cycle is not over 30 minutes.
3. Adjust the ice thickness : Press the “+” “-” button on the control panel to adjust the ice thickness. The
number in the bottom left of the display window is the setting of the ice making time, default is “0”, press
“+” button one time the ice making time will add one minutes, the ice will be thicker. Press “-” button one
time the ice making time will reduce one minutes,the ice will be thinner. Restart the machine it will go back
to default “0”. NOTE: The time currently set only changes the next and subsequent ice making cycle.
4. When the symbol lights up, the machine will stop working, it will work again after you take out the ice.
5. Shut down the unit: During the unit making ice, press the “ON/OFF” button on the control panel,
the unit shut down and into standby mode. If you press “ON/OFF” longer than 5S during ice making,
then the unit enters the deicing process directly, this function can help remove the ice on the ice
plate. Press “ON/OFF” to shut down the machine. Condition display 5H, means the machine will shut
down automatically after 5 hours, the “H” in the display screen indicates that the machine currently
has timing function, and the number in front will be smaller and smaller. Until it becomes zero.
6. Timing Setting: Setting range: 1-24 hours
Time Shutdown: When the unit is running, it can set up the timing shutdown. Time on: When the unit is on
standby, you can set the unit with ON-TIMER. How to set up the timer: Press the TIMER button, the default
timing time is “1H” in display window, then press “+” button to adjust the timing time you need,every time you
press the “+” button, the time add 1 hour; Press “-” button can reduce the timing time. During the process of
time adjustment, The “H” in the lower corner of the number will ash, then after 5 seconds ashing without
pressing, the “H” letter will change from ashing to always displaying, means the timer program has been
completed. In standby condition display 5H, it means the unit will start automatically after 5 hours; In ice
making condition display 5H, it means the machine will shut down automatically after 5 hours, the “H” in
the display screen indicates that the machine currently has timing function, and the number in front will be
smaller and smaller. Until it becomes zero, the timing ends, and the machine enters the mode you need.
OPERATION