OWNER'S MANUAL HARDTOP SUNSHELTER 3 m x 3.
Warning 1. It is consumer's responsibility to comply with any building codes, ordinances, zoning limitations, or local homeowner's restrictions and obtain any required permit, before purchase and installation of the products. 2. Two persons are required for assembly. The tools required are a screwdriver, stepladder and other safety items such as gloves, safety eyewear and hardhat. To avoid injury from exposed sharp edges, it may be necessary to use the above safety equipment. 3.
A B1 Short ogee B2 Short ogee B3 Long ogee B4 Long ogee C Corner roof bar D Middle roof bar E1 Left roof side structure E2 Right roof side structure E3 Middle roof side structure G H F1 Left roof support bar F2 Right roof support bar F3 Middle roof support bar J K I Ma Left roof panel (upside)
Item Description Mb Left roof panel (downside) Na Right roof panel (upside) Nb Right roof panel (downside) Va Middle roof panel (upside) Vb Middle roof panel (downside) O Corner finishing end P Finishing end Q1 Inside roof connector Q2 Outside roof connector T1 Mosquito netting Qty Illustration Qty Illustration Hardware Kit Description Item R M6 x20 Screws 125 M6 x 20 S M5 x16 Screws 16 M5 x 16 L Hook 52 -3-
Step- 1 A x4 G · Install columns (A) on bases (G) using screws (R).
Step- 2 B1 x2 x2 B2 B3 x2 B4 x2 L 52 Make sure the tip of the hooks point toward the inside of the sun shelter. X2 · Insert 6 hooks (L) in each track of the short ogees (B1) and (B2). · Insert 7 hooks (L) in each track of the long ogees (B3) and (B4). · Attach the ogee (B1) to the ogee (B2) using screw (R).
Step- 3 You need 3 persons for this step. · Install the ogee ( B3 & B4 ) between two columns (A) using screws (R) from the outside of the columns and from the inside of the ogees. Repeat with the ogees ( B1 & B2 ).
Step- 4 H I R X4 · · Install joint covers (I) on the joint in the middle of ogees (B1 & B2) and (B3 & B4) using screws (S) on top and screws (R) under. Install corner covers (H) using screws (S).
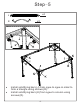
Step- 5 x4 J K · · x8 Install solidifying bars (J) from ogee to ogee in order to form a triangle using screws (R). Install solidifying bars (K) from ogee to column using screws (R).
Step- 6 x4 C Q1 · · x1 Install roof bars (C) one at a time to the inside roof connector (Q1) using screws (R). Install roof structure on top of columns (A) using screws ( R ).
Step- 7 D Q2 · x1 X6 Install roof bars (D) to the inside roof connector (Q1) using screws (R) and screw the other end to ogees using screws (R). Repeat for all bars (D). Install the outside roof connector (Q2) to the inside roof connector (Q1) using screws (R).
Step- 8 Ma x4 Na x4 F2 F1 x4 F2 F3 F2 x2 Va F1 F3 x2 One side of the roof panels is UV protected. Make sure the sun protected side faces the sun light. T side uhpis Va x4 F1 Install the small roof panels (Ma) and (Na) according to the picture. Make sure they are completely inserted in the roof bars' track. Insert roof panels (Va) from the end of the roof bars in the middle of the 12 ft. side of the shelter. Align with the other panels.
Step- 9 Mb x4 Nb x4 Vb x2 Vb T sid his eu p T side uhpis T s id h is eu p Install the roof panels (Mb) and (Nb) according to the picture. Make sure they are completely inserted in the roof bars' track. Insert roof panels (Vb) from the end of the roof bars in the middle of the 12 ft. side of the shelter. Align with the other panels.
Step- 10 · · · E1 x4 E2 x4 E3 x2 O x4 P x6 On the 12 ft side of the shelter starting from left to right: Install roof finishing bar (E1), a roof finishing bar (E3) and a roof finishing end (P) using screw (R) from the end of the roof bar (D). Repeat with (E2). Use finishing end (O) for the corners.
Step- 11 x4 T1 T1 Install the mosquito netting (T1) along the inner tracks on hooks (L). Insert small metal hook on mosquito netting through the slit in the curtain and into small hole in column (A).
Step- 12 1 In order to firmly secure your structure to the ground you need to use screws, in accordance to the surface your product will be installed upon. Install the screws in the pre-drilled holes of the bases (K) of the shelter. Screws are not included. This step is mandatory for the warranty to apply since this is a permanent structure.