EN Instructions for use and maintenance 1 2 3 COD.: 4400_U Ed.
Thank you for choosing our machine. The instructions for installation, maintenance and use found on the following pages have been prepared to ensure a long life and perfect operation of your unit. Please, do follow the instructions carefully. We have designed and built this machine using the latest innovative technologies. Now you shall take good care of it. Your full satisfaction is our greatest reward.
TRANSLATION OF THE ORIGINAL INSTRUCTION EN CONTENTS Page WARNINGS 27 1. MACHINE DESCRIPTION 28 1.1 Machine Description 28 1.2 Machine features 30 2. OPERATION 31 2.1 Control panel and relative symbols 31 2.2 Machine start-up 31 2.2.1 Start-up 31 2.2.2 Operation 32 2.2.3 Switching OFF 32 2.3 Detergent use 33 2.4 Rinse aid use 33 2.5 Drain pump system 33 2.6 Regeneration function (optional) 34 2.7 Additional Cooling Function (Optional) 35 WARNINGS 36 3.
EN WARNINGS This instruction booklet must be kept with the machine for future consultation. If this machine is sold or transferred to other users, make sure the booklet always goes with the unit so that the new owner can have all the necessary information on operations and all relevant instructions. The instruction booklet must be carefully read before installation and before starting the machine.
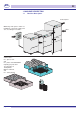
EN 1. MACHINE DESCRIPTION 1.1 Machine Description Control panel 1 2 Wall-hung main power switch: at installation serviceman supply and care, according to local laws 3 Door Control panel Control panel 1 2 3 Door 1 2 3 Door Standard equipment for machine with a 50mm rack: nr. 1 glasses rack and nr. 1 plates rack 500x500mm Capacity per plate rack: 12 soup plates or 18 flat plates Max Ø = 400 mm and nr.
EN Option D) Other standard equipment for machine with a 50mm rack: C) nr. 1 square trays rack 500x500mm or D) nr. 1 trays support 6 pcs and nr. 1 inox spatulas rack Option C) Standard equipment for machine with a 40mm rack: option A) nr. 2 square glasses racks 400x400mm or option B) nr. 2 round racks Ø 400mm nr. 1 support for round rack Option B) Standard equipment for machine with a 40mm rack: nr. 1 cutlery basket and nr.
EN To operate the machine, 3 connections are needed: • Electrical; • Water supply; • Water drain. This is a cycle machine comprising a 55°C wash cycle with detergent, a 82°C rinse cycle with injection of rinse-aid in the boiler hull. This machine is designed exclusively for washing dishes, glasses and various pots and pans with human food type of residue. Any other use is deemed improper.
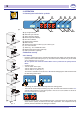
EN 2. OPERATION 2.1 Control panel and relative symbols A B C D E F G 1 2 3 H pict. 1 1 2 3 1 2 3 A) B) C) D) E) F) G) H) I) J) K) L) I J K L Cycle light indicator Selected cycle indicator Tank temperatur display Boiler temperature display ON / OFF indicator Regeneration indicator Drain indicator START push-button to start up cycle / select cycle Cool extra indicator Switching – On / STAND BY button Regeneration push-button (optional) Drain push-button (optional) 2.2 Machine start-up 2.2.
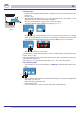
EN 2.2.2 Operation • • Insert the rack filled with dishes to wash. The plates must be correctly placed in the rack (see pict. 3). Close the door. Select the wanted washing cycle (1, 2, 3, ∞) by pushing the button "H" (see pict. 1). The display will show in sequence all available programs. Once the wanted program is displayed, do release the button. The green LED "B" of the selected cycle lights up (1, 2, 3, ∞). 1 2 pict. 3 3 • Start the cycle by pushing the button "H" for not more than 1sec (see pict.
EN 2.3 T EN G ER T DE 2.4 D RI E NS AI Detergent use The detergent shall be the NO FOAM type, suitable for industrial dishwashers, and must comply with the EN 60335-2-58/A11 norms. The use of good quality liquid detergents is recommended. The detergent must be introduced in the tank. The amount is recommended by the manufacturers according to the water hardness. By request the dishwasher can be equipped with an electric detergent dispenser (always recommended). 1cm.
EN 2.6 Regeneration function (optional) Regeneration is carried out after the flashing signal of the regeneration key indicator "F". SALT IMPORTANT: Before starting a regeneration cycle check if there is salt in the special container (max 0,500kg). Fill the special salt container with tank empty and machine off. When displaying "NO SA" (alternated to the tank and boiler temperatures and with machine on stand-by mode) add salt in the container in the wash-tank (only with optional water softener).
EN 2.7 Additional Cooling Function (Optional) This function can only be enabled if the machine is installed with the optional "Additional Cooling" function. Machine ON. Press the button "K" for at least 3 sec. After the hot rinse is completed, an additional fresh-water rinse can be made. During the wash cycle or manual draining the type of rinse selected cannot be changed. The Additional Cooling selection is displayed with the decimal point of the second display lighting up.
EN WARNINGS: • • • Do not slam the door when opening and closing. Do not put material or objects on the machine. The machine has an IPX3 protection rating against accidental water splashes and is not protected against pressurized water jets. Pressure-cleaning systems shall, therefore, not be used on this machine. • Do not dip bare hands into water containing detergent. If this should occur, wash them immediately with plenty of water. Check the safety instructions on the detergent container.
EN 3. ECOLOGICAL ASPECTS 3.1 Recommendations for optimal use of energy, water and additives Salt dosing A pre-set (by the manufacturer) quantity of salt is injected in the resins at each regeneration cycle. It is important to observe the number of regeneration cycles recommended in paragraph 2.6 "Regeneration device" in order to avoid salt spills or lime deposits. Use the machine fully loaded when possible. This shall prevent detergent, rinse aid, water and energy consumption waste.
EN 5. MAINTENANCE 5.1 Routine maintenance WARNING: The machine is not protected against pressurized water jets. Do not use pressure cleaning system against the machine. It is recommended to contact the seller of chemicals for proper cleaning instructions, in order to have detailed indications on methods and products for the correct periodical machine sanitation. Do not use bleach or chlorine based detergents. Daily cleaning is needed to ensure that the machine runs perfectly.
EN 6. MACHINE INSTALLATION 6.1 Handling 6.1.1 Handling the product The machines must be handled strictly as shown in pict. 5 regarding the grip points indicated for lifting with a lift truck. Latch the machine in a way that secures no vibration or shocks during transportation. N.B.: Slinging with ropes not recommended. After unpacking, make sure the appliance has not been damaged due to transportation. If it has been, do notify the seller about this problem.
EN A suitable omni-polar, one-way switch shall be installed and sized according to the absorption provided, with a contact opening of at least 3 mm. This switch shall be solely and exclusively used for this purpose and installed in the immediate vicinity of the machine, installed in full respect of the local laws. Always turn the machine off via this switch. This is the only model of switch that guarantees a total electrical power disconnection. 6.2.
EN 6.3.2 Electrical connection The electrical connection shall be carried out in accordance to the local laws in force. , that is meant to The machine has a connection at the back, indicated by the symbol link the steel structure and masses among different apparatuses, to prevent electro-static electrical shocks. The electrical supply cable must be new, flexible, and according to "har" H07RN-F or a local valid equivalent. The cable size is dimensioned according to the power.
EN 7. SIGNALS AND ALARMS The alarms and the signals messages are visualized, based upon their meaning . When on the display the LED "F" above the "K" key flashes, a total regeneration is needed (only with optional water softener). When flashing "NO DE" (alternated to the tank and boiler temperatures and with machine on stand-by mode), add detergent in the detergent tank (only with optional "Sensor for Chemicals Low Level").
EN 8. ENVIRONMENTAL ASPECTS 8.1 Packaging Packaging is made of the following components: • a wooden pallet; • a nylon sack (LDPE); • a multi-layer carton; • polystyrene (PS) strips; • polypropylene (PP) banding. All above materials, shall be disposed and treated in accordance with the Local Laws in force. 8.2 Disposal The symbol WEEE/RAEE used on this product indicates that it cannot be treated as domestic waste. Proper disposal of this product contributes to protecting the environment.
EN 9. TROUBLESHOOTING Type of Problem The machine does not turn on The machine does not load water. Possible Causes Main switch not ON. Water valve shut. Rinse area nozzles or solenoid-valve filter blocked and/or scaled with limestone. Defective pressure-switch. The water drains very slowly Scarce water supply pressure from the machine Rinse booster pump blocked (if installed) START button "A" flashing See chapter 7 "Alarms".
EN Instructions for installation and maintenance 1 2 3 COD.: 4400_I Ed.
Thank you for choosing our machine. The instructions for installation, maintenance and use found on the following pages have been prepared to ensure a long life and perfect operation of your unit. Please, do follow the instructions carefully. We have designed and built this machine using the latest innovative technologies. Now you shall take good care of it. Your full satisfaction is our greatest reward.
TRANSLATION OF THE ORIGINAL INSTRUCTION EN CONTENTS Page WARNINGS 22 1. MACHINE INSTALLATION 23 1.1 Rinse-aid dosing pump functioning 23 1.2 Detergent dosing pump functioning 23 1.3 Thermostop Function 23 1.4 Regeneration function (optional) 24 1.5 Pressure increase pump (optional) 24 1.6 Rinse pump (only on PLUS version) 24 1.7 Additional Cooling Function (Optional) 24 1.8 Setting the Parameters 24 1.8.1 Control panel and relative symbols 24 1.8.
EN WARNINGS PLEASE, DO NOT hand this instruction-manual over to the end user. This manual shall be kept available for the Installation/Service Personnel only. These instructions are supplied to safeguard the users in compliance with Directive 2006/95/ CE as amended and the “harmonized product Technical Standard” EN 60335-1 and EN 60335-2-58. • The connection to the electrical and water networks, for installing this unit, must be carried out by qualified operators only.
EN 1. MACHINE INSTALLATION 1.1 Rinse-aid dosing pump functioning Functioning: The dosing pump is powered by the pressure generated by the rinse pump, used to load a spring. The release of the spring generates the suction of the rinse-aid chemical from its container to the boiler. To prime the rinse-aid pump, run some wash/rinse cycles. Adjustment: The dosing pump takes a determined quantity of rinse-aid chemical at each rinse.
EN 1.4 Regeneration function (optional) The machine can be supplied with the Regeneration function. The frequency of the regeneration cycle is driven by the hardness of the water, as set on parameter "3" (see chap. 1.9.5). 1.5 Pressure increase pump (optional) The machine can be supplied with the pressure increase pump. After periods of machine inactivity, make sure the supplementary pressure increase pump rotates freely.
EN 1.9 Programming Some parameters are adjustable upon different application needs. To set the parameters you enter by a “key” into the "SERVICEMAN MENU". Machine ON. To enter the "SERVICEMAN MENU" keep pressed for a few seconds (5") both the "H" and "J" keys, after gently pressing the "J" key. The displays will show "Key". 1 2 3 By the "K" (decrease) and "L" (increase) key, select the key "15". Confirm the selection by pressing the "H" key.
EN 1.9.2 Parameter programming On entering parameter programming the message "P" and the parameter number followed by the parameter value are displayed. At this point it will be possible to: Change the parameter value with the "K" (decrease) and "L" (increase) keys; Confirm the selection by pressing the Start "H" key. Go to programming of the next parameter, by pressing the "H" key. Return to the parameter selected without changing the data by pressing the "J" key.
EN Maximum setting for rinse temperature: 85°C. The above indicated settings are valid for any cycle available on the machine. To exit the programming menu press the "J" key. 1.9.4 Set "2" parameter By the "K" (decrease) and "L" (increase) key, select the "2" TANK TEMPERATURE SETTING parameter Confirm the selection by pressing the Start "H" key. The parameter will start flashing. Set the desired wash temperature, by using the the "K" (decrease) and "L" (increase) keys.
EN Confirm the selection by pressing the Start "H" key. The parameter will start flashing. Set the desired value, by using the the "K" (decrease) and "L" (increase) keys. Confirm the selection by pressing the Start "H" key. This parameter allows the selection of the right water feed hardness to the machine.
EN To exit the programming menu press the "J" key. 1.9.7 Set "5" parameter By the "K" (decrease) and "L" (increase) key, select the "5" DRAIN PUMP parameter. Confirm the selection by pressing the Start "H" key. The parameter will start flashing. Set the desired value, by using the the "K" (decrease) and "L" (increase) keys. 0 - Deactivates the parameter 1- Activates the parameter DRAIN PUMP Default value "1". Confirm the selection by pressing the Start "H" key.
EN Controllo di Qualità - Contròle Qualitè Qualitatskontrolle - Quality Control Codice - Code - Kode - Code Matricola - Numero de Serie Fabriknunner - Serial 1 2 3 Controllo Funzionale - Controle Fonctionnel Funktiontest - Functional Control Controllo Dotazione - Controle Accessories Zubehor Kontrolle - Control of Acessories DESCRIPTION Cl/Part Power supply Ampere Controllo Qualitatsdi Qualità Codice kontrolle - Code Contròle Matricola - Kode - Quality Fabriknunn - Numero Qualitè - Code Control Controllo
EN 2. SIGNALS AND ALARMS 2.1 Signals The signal messages are displayed, based upon their meaning. When the LED "F" above the Regeneration "K" keys flashes, it means that a total regeneration is needed (only on machines equipped with the optional Water Softner). When on display "NO DE" flashes (alternated to the tank and boiler temperatures and with machine on stand-by mode), it means that the detergent level is low (only on machines equipped with the optional "Chemicals level Sensor").
EN B1 BOILER FILLING FAILED: Cause: The machine boiler fill-up was not achieved in the maximum foreseen 5 min. time limit. Check: 1. The correct water supply from the piping network. 2. If the solenoid-valve filter is clogged. Clean the filter if needed. 3. Solenoid valve Y5 failure. Change the solenoid valve. 4. The boiler pressure switch failed. Sostituire il pressostato. Replace if needed. Before replacing the pressure switch, drain the boiler completely. 5. Circuit board failure.
EN B4. TIME OUT RINSE: Cause: The set rinse time has been exceeded. Check: 1. Check the free rotation of the rinse pump. Should the impeller be blocked, rotate the motor shaft manually, by a screw-driver (see pict. 4). 2. Rinse pump damaged. Replace if needed. 3. Circuit board failure. Change the circuit board. B5. BOILER OVERHEATING: Cause: The water temperature in the boiler exceeded 105°C. Checks: 1. The boiler pressure switch failed. Replace if needed.
EN E3. TANK HEATING ALARM: Cause: The factory-set wash-tank temperature was not achieved in the maximum foreseen 60 min. time limit. Checks: 1. If the tank heating element heats properly. Check the integrity of the electrical heating element. Check the electrical connection and the safety thermostat. Check the tank coil-switch (remote control switch) protection. 2. Circuit board failure. Change the circuit board. E5. TANK OVERHEATING: Cause: The wash-tank temperature exceeded 90°C. Checks: 1.
EN Z9 REGENERATION FAILED (on machines equipped with the optional "Water Softener"): Cause: The salt sensor does not work properly. Checks: 1. Check if, when the salt container is empty, the display actually shows the "NO SA". alarm. Replace the salt-container if needed. 2. Check that the solenoid-valve Y3 (salt water dumping) is not clogged or damaged. Replace the solenoid-valve if needed.
EN 3. MAINTENANCE 3.1 Extraordinary Maintenance – by qualified Service Personnel At least once per year, the machine should be supervised by qualified Service Personnel: 1 clean the intake filter of the solenoid-valve; 2 remove scaling from the heating elements; 3 check the status and the tightness of all gaskets; 4 check the wear and tear of all components; 5 check the efficiency of the dosing pumps; 6 check the efficiency of the door safety switch.