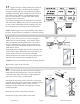
the DELUXE DOOR & PANEL Framed Continuous Hinge Door & Panel Shower Door DLXH35A A531 BECAUSE THE SHOWER IS EVERYTHING www. Bas coSh o w e rD o o r. c o m | 8 0 0 . 4 5 .
shower new QCI5230 Rev 0 Page 2 Certified 06/20/2016
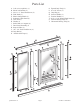
Parts List A. Curb (w/ weep holes) (1) B. Plastic wall anchor (6) C. #8 x 1 1/2” Truss Head Screw (6) D. Wall Jamb (2) E. Plastic Setting Block (2) F. Stationary Glass Panel (1) G. 180˚ Post (1) H. Header (1) I. Strike Jamb (w/ magnet) (1) J. Door Panel Assembly (1) K. Snap-in Filler (2) L. #8 x 1/4” Truss Head Screw (9) M. Drip Rail (1) N. Double Stick Tape (1) O. P. Q. R. S. T. U. V.
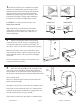
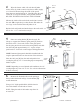
1 The Shower Enclosure is completely reversible and may be installed hinge right or hinge left. For maximum leak protection, the hinge side should be opposite the shower head. Using the illustration, determine the proper hinge side for the door. This instruction sheet depicts a hinge-right installation. Careful as to not follow the illustrations exactly. CAUTION: For safety reasons, the door must always open outward.
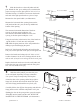
4 #8 X 1/2” SCREW Wipe the shower walls, sill, curb & wall jambs with a clean, dry cloth to remove any dust or debris. Apply a 1/4” bead of silicone along the inside of the pencil lines that were marked in Step #2. Carefully place the curb on the sill, over top the silicone, in the position marked. BE SURE THE WEEP HOLES FACE THE INTERIOR. WALL WALL JAMB SILICONE CURB Silicone the inside of the curb at both ends where it meets the wall.
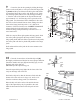
7 Slide the header over the wall jambs and 180˚ post. Plumb the 180˚ post, making sure to maintain the proper coverage over the glass panel of 1/4” to 3/4” as described in Step # 5. Mark its’ location on the header and curb with a light pencil mark or a piece of tape. Measure the door panel width.
9 Center the door in the opening by sliding the hinge jamb over the wall jamb (or 180° post) until the hinge jamb is plumb and the space between the door glass and header is even from hinge side to strike side. Drill two 1/8” holes thru the hinge jamb and into the wall jamb approximately 1” from the ends of the jambs at the top and bottom and approximately 3/8” from the edge of the open side of the hinge jamb. (see illustration) Drill a third hole in line with the first two and centered between them.
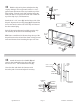
11 DRIP RAIL Hold the drip rail in place and adjust the drip vinyl by sliding it left or right until it there is a 1/16” gap between the bottom of the vinyl and the top of the snap-in-filler. Trim the vinyl flush with the hinge side of the rail and 3/8” longer on the strike side. Notch the top of the drip vinyl. (see illustration) TAPERED VINYL 1/16” SNAP IN FILLER CURB Install the #6 x 3/8” screw [P] into the hinge side of the drip rail.
13 Inspect the strips of black glazing vinyl and note the two different profiles. The flat shaped vinyl [U] is installed vertically and the crescent shaped vinyl [V] is installed horizontally. There should be a total of four (4) individual vertical and four (4) individual horizontal pieces of vinyl about a 1/2” wide each. (May need to peel apart from a wider strip). These vinyls are designed to fit tightly between the glass and metal frame.
16 Carefully silicone the seams between the walls and the wall jambs as well as the seam between the curb and shower sill on the inside of the shower. SIL ICO NE NOTE: Silicone on the exterior seam is optional. DO NOT USE the shower until the silicone is completely cured. Check the tube of silicone for the manufacturer recommended cure time.