INSTALLATION INSTRUCTIONS Unit No. 6150, 7150 Deluxe Framed Sliding Tub/Shower Enclosure QCI0023 Rev.
MAINTENANCE: Two primary materials are used to manufacture your new Basco enclosure: tempered glass and anodized aluminum. To assure a long lasting finish on the enclosure, wipe it down with a towel after each use. Never use a scouring agent to clean the aluminum. For occasional, more concentrated cleaning efforts, we find that Maintain AquaGlideXP Spray Cleaner helps minimize water stains and oxidation.
6150/7150 PARTS LIST A. B. C. D. E. F. G. H. J. K. Tub Track with Vinyl Silencer (1) Wall Jamb (2) Plastic Wall Anchor (6) #8 x 1 1/2” Truss Head Screws 2 Nylon Spacer (6) Header (1) Glazed Door Panel (2) Nylon Roller Bearing (4) #8-32 x 3/8” Hex Head Screw (4) Metal Towel Bar Trim Ring (4) L. Acrylic Towel Bar Bracket (2) M. Towel Bar (2) N. #10-24 x 7/8” Truss Head Screw (2) P. #10-24 x 1 1/8” Flat Head Screw (2) R. Acrylic Finger Pull (2) S. Basco Decal (2) T. Bottom Guide (1) U.
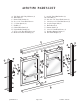
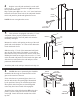
1 Measure the wall to wall opening at the center of the threshold. Cut the bottom track [A] 1/16” short of that dimension. An inexpensive miter box (available at a hardware store) will help you get a clean, square cut. WALL JAMB Place the bottom track in the desired position of the threshold, typically in the center, with the raised edge to the exterior. (see illustration) It may be necessary to file a radius on the corners of the bottom track and wall jambs to match the corners of the opening.
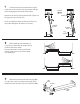
4 Replace one wall jamb and attach it to the wall with two #8 x 1 1/2” truss head screws [D] inserted into the top and bottom holes. Slip a nylon spacer [E] over a #8 x 1 1/2” truss head screw and insert it into the center hole of the wall jamb. Double check wall jamb for plumb and tighten the screws. WALL JAMB NYLON SPACER NOTE: Do not overtighten the screws. 1 1/2” TRUSS HEAD SCREW 5 This enclosure is equipped with safety “T” lock wall jambs.
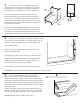
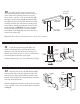
7 Lift the interior panel (textured side of glass on the same side as the top fin) into position with the rollers engaging the roller track in the header. EXTERIOR Repeat for the exterior panel (textured side of glass on the opposite side as the top fin). HEADER Check for alignment along the bottom and sides of each panel and adjust the rollers as necessary.
10 From the exterior, insert a #10-24 x 7/8” truss head screw [N] through the rail that is closest to the center of the opening of the interior panel. Then, insert a #10-24 x 1 1/8” flat head screw [P] through an acrylic finger pull [R] and then through the rail that is closest to the wall. Attach a towel bar assembly, with the open slot in the bar facing down, to the interior panel by threading the screws into the acrylic brackets. (CAREFUL as to not overtighten the screws and strip the acrylic).
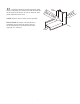
13 Carefully silicone the seam between the walls and the wall jambs, the bottom track and the threshold on the inside of the shower as well as where the wall jambs and bottom track meet. SIL QCI0023 Rev. 1 IC L I S ICO NOTE: Silicone on the exterior seam is optional. DO NOT USE the shower until the silicone is completely cured. Check the tube of silicone for the manufacturer recommended cure time.