
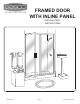
Installation Guide
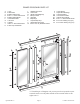
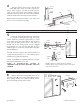
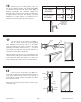

Wipe the shower walls and sill, curb [A] and
wall jambs [B] with a clean, dry cloth to remove any
dust or debris. Apply a 1/4” bead of caulk along the
inside of both of the pencil lines marked in Step #2.
Carefully replace the curb in the exact position marked.
Caulk the inside of the curb where it meets the wall.
Replace both wall jambs and attach to the walls with
six #8 x11/2” truss head screws [D].
4
#8 x 1/2”
SCREW
WALL
JAMB
CURB
CAULK
WEEP SLOT
TO INTERIOR
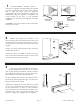
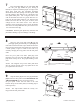
Place the setting blocks [E] in the curb [A] as
shown to support the fixed glass panel [F ]. The setting
blocks should be positioned approximately 3” from
each corner of the glass panel. Remove any protective
strips from the glass panel and set it into place. It
should rest on the setting blocks and be engaged
approximately 1/2” into the wall jamb [B]. A strip a
masking tape 1/2” from each vertical edge of the glass
will aid alignment.
Press the 180° post [G] into the curb and position to
overlap the glass panel by 1/2”. Use masking tape to
hold the post in position tem
porarily.
NOTE: To facilitate out-of-plumb walls, the 1/2” glass
bite may be varied from 1/4” to 3/4”.
NOTE: IF QUICK-N-STALL OPTION IS
ORDERED, THE SETTING BLOCKS ARE NOT
NEEDED.
5
WALL
JAMB
1/2”
GLASS
PANEL
1/2”
180
POST
L E N A P S S A L G
GLASS
PANEL
CURB
SETTING
BLOCK
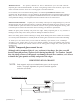
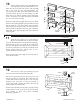
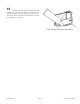
Measure the wall-to-wall opening at the top of
the wall jambs [B] and cut the header [H] to fit the
exact opening. Using a 3/16” drill bit, drill the interior
face of the header on both ends as shown.
6
ROI RE TNI
MEASURE AT TOP
OF WALL JAMB
” 8/3
1/4”
HEADER
.A I D ”
6
1/3
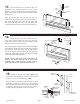
NOTE: Obscure or etched glass doors should be
installed with the rough or patterned surface of the glass
to the exterior of the unit.
QCI5004 Rev 0 Page 5 Certified 06/21/2016