
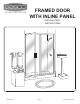
Installation Guide
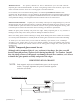
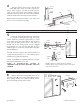
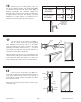

Inspect the pieces of black glazing vinyl, and
note the two different profiles. The smaller shape [EE]
is installed vertically and the larger shape [FF] is
installed horizontally. For structural strength and
maximum water resistance, these vinyls are designed to
fit tightly between the glass and framing. To speed
installation, use glass cleaner for lubrication and a
small block of wood to press the vinyl into place.
16
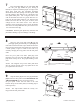
FIXED GLASS PANEL
VERTICAL
HORIZONTAL
1/4” GLASS
REQUIRES :
3/16” GLASS
REQUIRES :
V-219
V-220
V-226
V-225
NOTCH
NOTCH
STANDARD SIZES
SHIPPED WITH
4 PIECE VINYLS
(TEAR APART)
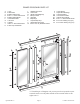
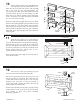
Cut four pieces of the smaller vinyl [EE] 1”
longer than the vertical opening (to prevent gapping
from shrinkage) and trim the ends on a 45° angle.
Using the masking tape guides, center the first glass
panel [F] in the frame. Cut four short (1” – 2”) pieces
of the small vinyl and press into the jamb and post on
each side to hold the glass temporarily.
Take one of the long pieces of vinyl, and starting on the
outside exterior jamb, press each end into the frame and
work toward the middle. Be careful not to stretch the
vinyl. Install the other three pieces in a
similar fashion.
17
L E NAP S S ALG
GLAZING
VINYL
WALL
JAMB
GLASS
PANEL
180
POST
45
ANGLE
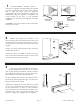
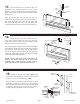
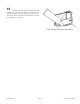
Cut four pieces of the larger vinyl [FF] 1/2”
longer than the horizontal opening and trim the ends on
a 45° angle. Install the top exterior vinyl starting at
both ends and working toward the middle. Be careful
not to stretch the vinyl.
Install the top interior vinyl and the two bottom vinyls
in the same way.
18
L E N AP S S A L G
HEADER
GLAZING
VINYL
CURB
GLASS
PANEL
SETTING
BLOCK
QCI5004 Rev 0 Page 9 Certified 06/21/2016