/4” FRAMELESS CONTINUOUS HINGE SHOWER ENCLOSURE QCI5028 Rev 0 Page 1 Certified 06/21/2016
INSTALLATION NOTES: Unpack your unit carefully and inspect for freight damage. Lay out and identify all parts using the instruction sheet as a reference. Before discarding the carton, check to see that no small hardware parts have fallen to the bottom of the box. If any parts are damaged or missing, refer to the descriptions noted in the instructions when contacting your dealer for replacements. Handle the glass panel(s) carefully and protect the edges.
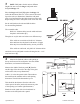
1/4” FRAMELESS DOOR PARTS A. B. C. D. E. Shower Curb (1) Glazed Door Panel Assembly (1) Clear Bottom Sweep (1) Wall Jambs (2) Plastic Wall Anchors (6) QCI5028 Rev 0 F. G. H. I. J - P. Page 3 #8 x 1 1/2” Truss Head Screws (6) #6 x 3/8” Tech Screws (self-tapping) (6) Strike Jamb w/ Magnet & Vinyl (1) Latch w/ Strike Plate & Vinyl (1) Handle Assembly (1) (see supplement Pg. 9 or Pg.
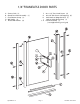
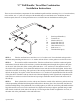
1 The 1/4” frameless door is completely reversible and may be installed hinge-right or hinge-left. Refer to the illustration to determine the best hinge position for your installation. For maximum waterproofing, the hinge jamb should always be opposite the shower head. The following instructions depict a hinge-left installation. CAUTION: For saftey purposes, the door must always open outward! NOTE: To allow for this unit to be reversible, the hinge jamb extends 9/16” beyond both ends of the door panel.
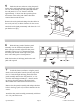
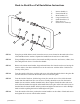
3 NOTE: Wall jambs for this unit are different lengths. Be sure to use the longer wall jamb on the designated hinge side. Place the longer wall jamb [D] against the hinge side wall with the bottom end 3/16” for the start of the raised lip on the curb (see illustration). Plumb the wall jamb with a level and mark the three hole locations on the wall. Repeat using the shorter wall jamb on the strike side wall. Set the wall jambs to the side and drill the holes for the mounting hardware.
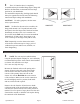
5 Inside the shower enclosure, using the pencil marks on the wall jambs from the previous step, drill two 1/8” holes through the strike jamb [H] and into the wall jamb 3/8” to 3/4” from the wall and approximately 1” down from the top and up from the bottom of the strike jamb. Drill a third hole centered between the first two. Remove the strike jamb and enlarge the three holes in the strike jamb only to allow clearance for the screws.
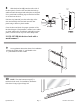
8 Slide the door latch [I] onto the strike side of the door panel. Close the door and slide the latch up and down until the magnet and strike plate are aligned. Use a pencil and/or masking tape to mark the location of the latch on the door. DOOR GLASS LATCH VINYL STRIKE PLATE Fold the vinyl material [over the strike edge of the door and carefully drive the latch onto the door panel using a rubber or plastic mallet.
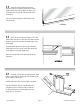
11 Align the clear bottom sweep to the bottom of the door with the deflector lip on the inside of the shower door. Mark the strike side of the bottom sweep even with the strike edge of the door. Cut the sweep leaving the notched part under the metal rail. INTERIOR 12 Place the sweep onto the bottom of the door. Stand inside the shower, close the door and mark the deflector part of the sweep at the inside edge of the strike jamb. Open the door and remove the sweep.
“C” Pull Handle / Towel Bar Combination Installation Instructions There are eleven hardware components for the combination pull/towel bar mounting: Six 1 1/4” metal washers, one towel bar, one “C” pull, two end caps with threaded studs, one stud head screw. In addition to these hardware parts, there are six clear gaskets that act as a a buffer between the hardware and the glass.
Back-to-Back Door Pull Installation Instructions J K L M N O P J Interior handle (1) Exterior handle (1) Metal washers (4) Large clear discs (4) Small clear discs (4) Hole sleeve (2) Stud screw w/ collar (2) N M M K N P L O L STEP 1 Using the provided Allen wrench, loosen the two set screws located on the under side of one of the handles near the washers. Seperate the handle from the stud screws and collars.