
Installation Guide


QCI0274 REV. 1 Page 6 Certified 10/01/10
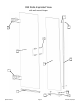
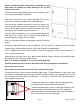
Place two 7/16” shims on the curb or threshold. These shims
must remain in place throughout the installation process.
One person must position themselves inside the shower, and
have an assistant on the outside. Together, lift the Door Panel
Glass into the opening and set the panel on the shims. Align
the panel on the threshold and wall centerlines.
Once the door is positioned, set a 1/4” clearance between the
Door Panel Glass and the wall. The door must be plumb to al-
low the hinge pins to align with one another.
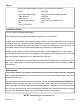
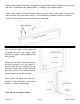
With the door panel aligned and plumbed, mark the mounting hole locations for both wall mount
hinges.
Remove the Door Panel Glass from the opening. Use the marks as a guide and drill 3/16” holes
through the tile and/or backing material. Do not drill through the wood backing.
Drill a 1/8” pilot hole into the stud to allow the screw to seat properly. Place a small amount of sili-
cone sealant into each hole.
Carefully move the Door Panel Glass back into the opening. Align the hinges with pre-drilled holes
and carefully secure with the provided screws.
If interference exists, hinges can be loosened to adjust gaps. The gap should be 3/16” on each side
of the door; 7/16” between the door and threshold at the highest point; door and panel glass flush at
top. Re-tighten all screws after final adjustment. If a hinge is scratched in the tightening process
touch up paint may be used.
Note: The screws may begin to “creak” when fully tightened.
Carefully and slowly close the door and inspect the door panel gaps for interference.
Do not force door closed.
Use Caution to prevent the drill chuck from contacting the hinge.
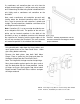
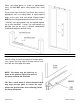
Proper structural backing is required for installation of any
door panel. An example of proper backing is two (2) 2x4
studs back to back.
Failure to ensure proper backing may lead to damage or per-
sonal injury from improper installation
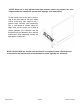
To prevent the door from sagging after final gap adjustment
the hinge maybe shimmed to prevent movement.
Remove one back plate at a time and fill gaps (marked in the
figure to the left) surrounding hinge with shims supplied in
parts pack. Make sure to shim both hinges and use combina-
tion of shim thicknesses to fill entire gap.