
Installation Sheet


QCI5298 REV. 0 Page 7 Cered 10/1/17
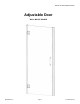
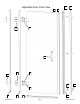
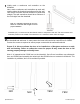
Place the SC982 Wall Jamb [2] on the wall. Using
a level, line the center of the wall jamb up with the
centerline marked in step 1 and make it plumb.
Mark the 8 holes (4 at each hinge) on the wall for
securing.
The centerline should run through the center holes.
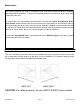
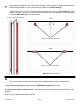
NOTE: The customer may move the location of the
mounting screws up or down 3”. The customer is
responsible for drilling new holes at the required
location. All 4 holes are required to be used. The
diamond pattern is also required.
4
3
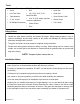
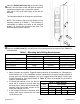
Remove the Wall Jamb [2] and drill holes for mounting screws as required. See Table 1 for
drilling details.
Table 1 - Mounting Hole Drilling Requirements
Wall Material
Any Fiberglass Tile/Other
Blocking Available In Wall YES NO NO
Finish Material Drill Diameter 3/16" 5/16" 5/16"
Blocking Drill Diameter 1/8" Not Applicable Not Applicable
Insert Required NONE Included Customer Provided
1
Total Wall Thickness All
2
¼" or less Over ¼"
2
1) Basco includes the required Toggler® brand wall plugs for installation on a fiberglass or
acrylic shower unit. If your installation surface is different the customer maybe required to
provide your own mounting hardware. Use only Toggler® brand wall plugs. Find the part
number required for your wall thickness in Table 2. These are available for purchase at
Lowe’s® and Menards®.
2) If finished wall material is over 3/4” the cus-
tomer will be required to provide their own
mounting screw. Basco recommends #8x3”
stainless steel truss head screws for fin-
ished wall material over 3/4”.
3) If wall material thickness is between thick-
nesses and require inserts use the insert
for the thinner size
Table 2 - Wall Inserts
Wall
Thickness
3
Part Number
Toggler® Lowe's® Menards®
1/8" to 1/4" TA
50275 INCLUDED
3/8" to 1/2" TB
50300 114767 2344078
5/8" to 3/4" TC
50325 114823 2344065
CL