
Installation Sheet


QCI5298 REV. 0 Page 9 Cered 10/1/17
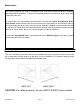
7
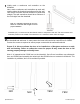
Using alcohol swabs from the Parts Pak, thoroughly clean and dry the area of the wall where
jamb will be installed on. Also clean and dry the back of the Wall Jamb [2]
Apply a continuous 3/16” to 1/4” bead of silicone inside each leg of the Wall Jamb [2] where
it meets the wall. The silicone should protrude past the leg it will contact the wall and spread
out when Wall Jamb [2] is secured in place.
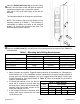
WALL
WALL
3/16” to 1/4” silicone bead
3/16” to 1/4” silicone bead
Wall Jamb secured to wall
3/16” to 1/4” silicone bead
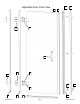
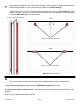
Place a small amount of silicone in each screw hole.
Use a level again to make sure the wall jamb in installed plumb and in its final position.
Using, #8 Truss Head Screw [10] secure the SC982 Wall Jamb [3] to the wall.
If using power tools to install screws: Use caution so as to not strip the insert or backing, as ap-
plicable.
Clean up any visible silicone before it dries.
8