the INFINITY BYPASS SemiFrameless Bypass Tub & Shower Door INFH05A BECAUSE THE SHOWER IS EVERYTHING www. Bas coSh o w e rD o o r. c o m | 8 0 0 . 4 5 . B A S C O QCI5022 REV.
MAINTENANCE: Two primary materials are used to manufacture your new shower enclosure: tempered glass and anodized aluminum. To assure a long lasting finish on the enclosure, wipe it down with a towel after each use. Never use a scouring agent to clean the aluminum. For occasional, more concentrated cleaning efforts, we find that Lysol Bathroom Cleaner works extremely well. Be sure that any over-spray falling on the aluminum frame is rinsed thoroughly and dried.
PARTS LIST A. B. C. D. E. F. G. H. I. J. 1 2 6 6 4 1 2 4 4 8 K. L. N. S. T. U. V. X. Y. Z.
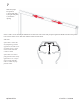
1 Measure the wall-to-wall opening at the center of the tub rim. Cut the tub track [A] 1/16” short of this dimension. An inexpensive miter box available at your local hardware store will help you get clean square cuts. WALL JAMB Position the tub track in the center of the tub rim with the tall leg to the exterior. It may be necessary to file a radius on the ends of the tub track and wall jambs to match the corners of the tub. TUB TRACK Press both wall jambs [B] into position over the tub track.
4 Replace one wall jamb [B] and attach to the wall with a #8 x 2” truss head screw [D] inserted through the center hole. Slip a nylon spacer [E] over a #8 x 2” truss head screw and install in the top hole of the wall jamb. Repeat for the bottom jamb. Check jamb for plumb and tighten screws. WALL JAMB NYLON SPACER NOTE: Do not over-tighten the jamb screws. #8 x 2” TRUSS HEAD SCREW 5 If not already, slide the anti-jump inserts to the center of the header.
7 Slide anti-jumps into position: 1) at left wall jamb 2) at right wall jamb 3) centered in opening Insert 1 SCR11 screw into the pre-drilled hole of each insert. The screws will just press against the header. DO NOT use power tools to insert these screws. DO NOT drill the header for these holes. PRO TIP! If the rollers contact the ant-jump during normal opperation, back the screw out of the insert 1/4 of a turn at a time until less contact is made.
8 Textured glass lites [G] should be installed with the textured surface to the exterior of the unit.Clear glass does not have a preferred side to face out. If your unit was purchased with AquaglideXP be sure the treated surfaces are installed to the inside of the shower INTERIOR PANEL ROLLER BEARING HANGER BRACKETS If not installed from the factory, install the hanger brackets onto the glass. On the outside panel, the roller is installed to the outside.
10 Slide one of the clear plastic discs [J], then a glass hole sleeve [K] onto the back plate [I]. Push the assembly through the hole in the glass panel, so that the glass hole sleeve is flush with the other side of the panel. Slide the other clear plastic disc onto the protruding end of the back plate, and then slide on the front plate [L]. Repeat this for the second hole on the panel. While holding the towel bar [N] in place, and screw the back plates into the towel bar.
11 Lift the interior glass panel into position with the rollers engaging the groove in the header [F]. 0 Repeat for the exterior panel. If panels are not parallel to their respective wall jambs, remove and adjust the rollers up or down in their slots to compensate. EXTERIOR HEADER INTERIOR PANEL EXTERIOR PANEL TUB TRACK Please Note: Panels will need to be very close to the center of the opening in order to be installed.
12 Locate the nylon bottom guide [S] in the middle of the tub track [A] with the glass panels in the position shown. With a 7/64” bit, drill two holes into the V-groove through the mounting holes in the guide. Install the bottom guide with two #6 x 3/8” pan head screws [T] thru the drilled holes as shown. GLAZED PANELS CENTER GUIDE TUB TRACK (2) #6 X 3/8 “ PAN HEAD SCREW INTERIOR 13 Slide the stainless steel bumper inserts [U] into the four soft vinyl jamb bumpers [V].