
Installation Guide

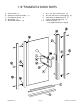
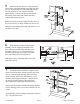

3 NOTE: Wall jambs for this unit are different
lengths. Be sure to use the longer wall jamb on the
designated hinge side.
Place the longer wall jamb [D] against the hinge side
wall with the bottom end 3/16” for the start of the raised
lip on the curb (see illustration). Plumb the wall jamb
with a level and mark the three hole locations on the wall.
Repeat using the shorter wall jamb on the strike side wall.
Set the wall jambs to the side and drill the holes
for the mounting hardware.
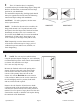
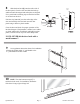
Tile or marble walls:
Drill 3/16” diameter holes into the walls and insert
the plastic wall anchors [E].
Fiberglass or acrylic units can be done two different ways:
If the walls are not reinforced, drill 3/16” diameter
holes and insert the the plastic wall anchors. (Toggle
bolts may be used instead but they are not provided).
If the walls are reinforced, only drill 1/8” diameter holes.
Attach the correct wall jamb to each wall using the #8 x 1 1/2”
truss head screw [F].
QCI5028 Rev 1 Page 5 Certified 09/19/2018
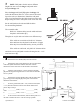
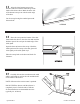
DW
EXTERIOR
OW
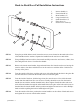
i. Measure the Door Width (DW) and write it down.
ii. Measure the wall-to-wall distances at the top and bottom
of the wall jambs and find the smaller dimension. If both
dimensions are the same then use the bottom as the smaller.
iii. Slide the strike jamb [F] over the mounted wall jamb
[B] with the magnet facing the exterior of the shower and make
sure it is plumb.
iv. Measure the Opening Width (OW) from the strike jamb
[F] to the opposite wall jamb [B] at the point of the smaller
dimension found earlier.
v. If OW is greater than (DW + 3/8”) AND less than (DW
+ 7/8”) then the mark the location of the Strike Jamb with a
pencil. Skip to Step 5.
a. ___________ (DW) + .375” > ___________ (OW)
AND
b. ___________ (DW) + .875” < ___________ (OW)
vi. If not between measurements, slide the strike jamb in or
out until it satisfies the above. Be sure to keep it plumb.
i
ii
iv
iii
B
F
B