
User Manual


Installation Instructions
Issue Date June 6, 2008
© 2008 BASO Gas Products
1
Part No. BASO-INS-H19, Rev. - www.baso.com
H19 Series BASO® Automatic Shutoff Pilot Gas Valve
Application
The H19 Series pilot valves provide safe lighting and
complete shutoff of main burne r gas and pilot gas in
the event that the flame heating the thermocouple is
extinguished (H19A_ applications only). Applications
include heaters, commercial cooking equipment and
similar applications. The H19ME valves are for use
only on catalytic heater applications.
Installation
IMPORTANT: Only qualified personnel should
install or service BASO® Gas Products products.
These instructions are a guide for su ch personnel.
Carefully follow all instructions in this document and
all instructions for the appliance.
IMPORTANT: Make all gas installation in
accordance with applicable local, natio nal, and
regional regulations.
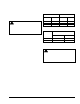
!
CAUTION: Risk of Electric Shock.
Disconnect power supply before making electrical
connections to avoid electric shock.
Note: In applications that do not require electrical
power, disregard the previous caution.
!
WARNING: Risk of Explosion or Fire.
Shut off the gas supply at the main manual shutoff
valve before installing or servicing the H19. Failure
to shut off the gas supply can result in the release of
gas during installation or servicing, which can lead to
an explosion or fire, and may result in severe
personal injury or death.
IMPORTANT: Verify that the valve is installed
only in applications where the specified maximum
ambient (surface) temperature and m aximum
operating pressures do not exceed the limits in the
Technical Specifications section.
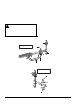
To install the H19 valve:
1. Shut off power to the appliance (if applicable).
2. Shut off the gas at the main manual shutoff valve.
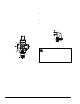
3. Ensure that the gas flows through the valve body
in the direction indicated by the arro w on the
valve body. If the valve is installed with the gas
flow in the opposite direction of the arrow,
leakage can occur.
IMPORTANT: Do not use a wrench on any
surface other than the casting flats provided at the
inlet and outlet ends of the valve body. The H19 may
be damaged in the mounting proce ss if a wrench is
used on any other surface. Using a wrench
incorrectly may void the warranty.
4. Mount the valve to the pipework. The H19 valve
may be mounted in any convenient position. Use
an approved pipe joint sealing com pound on
male threads before assembling. Remove excess
compound after mounting the valve to the
pipework. Threads of the pipe and nipples mu st
be smooth and free of tears and burrs. Steam
clean all piping to remove foreign substa nces
such as cutting oil or thread chips. A sediment
trap should also be installed in accordance with
the National Fuel Gas Code (Z223.1/NFPA 54).
See Figure 1 and Figure 2.