User Manual X3 Series (X3, X3-LCD & X3R) X3/X3-LCD X3R ATTENTION: PLEASE FOLLOW ALL ASSEMBLY INSTRUCTIONS AND READ AND UNDERSTAND THE OPERATING INSTRUCTIONS BEFORE YOU OPERATE THE CADDY, EITHER MANUALLY OR BY REMOTE CONTROL.
TABLE OF CONTENTS Page Packing List …………..…………………………………………………..……………………………………………2 1. Standard Parts (X3 & X3-LCD)………………………………………………………………………...2 2. Standard Parts (X3R)……………………………………………………………………………………...2 3. Optional Accessories………………………………………………………………………………………2 Parts Glossary………………………………………………………….………………………………………………3 1. X3 & X3-LCD…………………………………………………………………………………………………..3 2. X3R………………………………………………………………………………………………………………..4 Assembly Instructions……………………………………….………………………………………………..…...5 1.
PACKING LIST 1. Standard Parts (X3 & X3-LCD) 1 Caddy Frame 2 Rear Wheels 1 Battery Pack (Battery, Bag, Leads) 1 Charger 1 Tool Kit 1 User Manual, Warranty, Terms & Conditions 2. Standard Parts (X3R) 1 Caddy Frame 1 Anti-Tip Wheel & Pin 2 Rear Wheels 1 Battery Pack (Battery, Bag, Leads) 1 Charger 1 Tool Kit 1 Remote Control (needs 2 AAA Batteries) 1 User Manual, Warranty, Terms & Conditions 3.
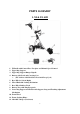
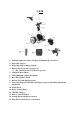
PARTS GLOSSARY 1. X3 & X3-LCD 1. 2. 3. 4. T-Handle with Control Face Faceplate and Manual Speed Control Upper Bag Support Upper Bag Support Bungee Pigtails Battery with Leads and Carrying Case (12V 26Ah or 34/35Ah Sealed Lead Acid Deep Cycle) 5. Rear Wheels (Left & Right) 6. Wheel Hub with Locking Mechanism 7. Rear Wheel Rubber Tread 8. Battery Tray with Plug Receptacle 9. Lower Bag Support and Fender with Support Strap and Tracking Adjustment Mechanism 10. Front Wheel 11. Frame Locking Hinge 12.
2. X3R 1. 2. 3. 4. T-Handle with Control Face Faceplate and Manual Speed Control Upper Bag Support Upper Bag Support Bungee Pigtails Battery with Leads and Carrying Case a) (12V 34/35Ah Sealed Lead Acid Deep Cycle) 5. 2 Identical Rear Wheels 6. Wheel Hub with Locking Mechanism 7. Rear Wheel Rubber Tread 8. Battery Tray with Plug Receptacle 9. Lower Bag Support and Fender with Support Strap and Tracking Adjustment Mechanism 10. Front Wheel 11. Frame Locking Hinge 12. 110-240V Charger 13.
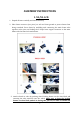
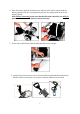
ASSEMBLY INSTRUCTIONS 1. X3/X3-LCD 1. Unpack all items carefully and check inventory. 2. Place frame structure (one piece) on soft and clean ground to protect frame from being scratched. Erect frame by unfolding and connecting the main frame tube together at the joint and locking the Y-shape lower support structure to the main frame with the frame lock mechanism. 3. Attach wheels to axles by pushing wheel locking button on the wheel hub and inserting the axle extension into the wheel.
axle extensions to be inserted all the way into the wheel so the axle sprocket locks into the hub. If not locked in, the wheel will not be connected to the clutch and will not be propelled or come off! Test the lock by trying to pull the wheel out. Attention: Make sure that the right wheel (marked) is attached to the right side and the left wheel (marked) to the left side (seen from behind in driving direction), as the wheels have built in clutches.
2. X3R 1. Unpack all items carefully and check parts inventory. 2. Place frame structure (one piece) on soft and clean ground to protect frame from being scratched. Attach wheels to axles by pushing wheel locking button on the wheel hub and inserting the axle extension into the wheel. Make sure to keep the locking button on the wheel hub pushed in during this process, in order to enable the axle extensions to be inserted all the way into the wheel.
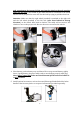
4. Place the battery pack on the battery tray and fasten the Velcro strap around the battery tightly. Insert the 3-prong battery plug into the caddy outlet so the notch aligns properly. Note: Before connecting, make sure that the Rheostat Controller is in OFF (0) position, and the remote control is stored securely! 5. Insert Anti-tip Wheel into frame holding bar and secure with pin. 6.
6. Unpack remote control and install batteries with plus and minus poles as indicated in the diagram in the receiver compartment of the unit. Now you are ready to learn and understand the functions of the manual and remote controls. OPERATING INSTRUCTIONS 1. X3 & X3R T-Handle Control Functions The ON/OFF button controls the caddy’s main power supply. Once you have connected the battery, make sure that the rheostat speed control is in OFF position (all the way counterclockwise).
When your press 20M, the trolley will run 20 Meters/Yards and stop by itself. When your press 30M, the trolley will run 30 Meters/Yards and stop by itself. Rheostat Control: Speed can be seamlessly controlled manually via the round rheostat control on the right side of the handle. Dial clockwise to get the caddy in motion and increase speed to the desired walking speed. Dial counterclockwise to decrease speed and stop the caddy.
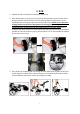
Installation of Seat Attach seat stand to seat bottom using the four small screws. Attention: Attach in such manner that the seat is parallel to the driving direction of the caddy, with the opening facing the outside when you slide it into the holding bar. Slide seat stand into holding bar as shown. Due to the spring mechanism, the seat should reach the ground when pushed down, so the weight rests solely on the ground.
Remote Control Instructions (X3R Only) Functions: A. Brake: The red button in the middle of the directional arrows should be used for braking the caddy. B. Timer: 10, 20, 30 yards, Stop (same as manual control timer function) C. Backward Arrow: Pressing the back arrow will set the caddy in backward motion. Increase backward speed by pushing multiple times. Press also to decrease forward speed/slow down the caddy D. Forward Arrow: Pushing the forward arrow will set the caddy in forward motion.
Important Notes – PLEASE READ CAREFULLY - - - Change the remote control batteries once the indicator LED gets weak The remote control uses two 1.
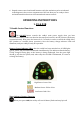
Please note: distance measurements will only be correct if you travel in a straight line to your ball. The ON/OFF button; this button controls the trolley’s power. Press and hold it for 2-5 seconds for the caddy to turn ON/OFF. The LCD Display will light up and show the battery charge level, speed indicator, and short and total distance measurement.
MAINTENANCE & ADDITIONAL INSTRUCTIONS 1. Battery Charging and Maintenance - - - PLEASE OBEY THESE PRECAUTIONS FOR BATTERY USE & CHARGING: Please do not charge the battery in a sealed container or in upside down position. It is recommended to charge the battery in a well ventilated area. Please do not charge the battery near a heater, where heat accumulation may occur, or in direct sunshine.
- Never keep your battery connected to the grid during prolonged power outages. It might be irreversibly damaged. Do not fully discharge the battery by “overplaying” it. It is recommended to recharge the battery after every 18 holes. 2. Testing Your Caddy Test Environment First, make sure that you perform your first test of the caddy in a wide and safe area, free of obstructions or valuables, such as people, parked automobiles, flowing traffic, furniture or water bodies (rivers, swimming pools etc.
3. Recommendations for Efficient and Safe Operation - Be alert and act responsibly at all times while operating your caddy, just as you would when operating a riding cart, motor vehicle, or any other type of machinery. We absolutely do not recommend the consumption of alcohol or any other impairing substances while operating our caddies.
looking its best, we advise that you wipe any mud or grass from the frame, wheels and chassis after every round with a damp cloth or paper towel. - NEVER use water hoses or high-pressure jet washers to prevent moisture entering the electronic systems, motors, or gear boxes of the caddy. - Remove the rear wheels every few weeks and clean out any debris that might cause the wheels to drag. You might also consider applying some lubricant, such WD-40, to keep moving parts smooth and corrosion-free.
Therefore, it is sealed to reduce the risk of moisture entering and impacting the electronic system. Breaking this seal increases the risk of damaging the electronics and decreasing the reliability of your caddy. DO NOT attempt to open the controller case. Doing so will void the warranty! - Battery Operation and Care: Follow battery charge and maintenance instructions. The battery comes with leads and connector and a 30 Ampere fuse. Newer models do not have a fuse anymore.
TECHNICAL SPECIFICATIONS 1. X3 Model Name X3 Standard Battery 26Ah SLA Dimensions: 8 x 5 x 6 in (20 x 13 x 15 cm) Average charge time: 4-8 hours Lifetime: ca. 150+ charges Standard Battery Duration 27-36 holes Battery Upgrade Options 34/35Ah @ $25.00 Folded Dimensions Length: 34 in (86 cm) Width: 20 in (51 cm) Height: 16 in (41 cm) Unfolded Dimensions Length: 46 in (117 cm) Width: 20 in (51 cm) Height: 39 in (99 cm) Weight Caddy 25 lbs (11.
Handle Height Adjustment N/A Materials Aluminum/SS and ABS Available Colors Oxidized Silver Complimentary Accessories Scorecard Holder (depending on promotions) Cup Holder Umbrella Holder Carrying Bag Seat Optional Accessories Rain Cover Sand Dispenser Club Cleaner see "Special Offers" Introduced (year) 2009 Warranty 1 Year on Parts and Labor 1 Year on Battery X3-LCD Model Name X3-LCD Standard Battery 26Ah SLA Dimensions: 8 x 5 x 6 in (20 x 13 x 15 cm) Average charge time: 4-8 hours Lifet
Battery charge indicator Speed Control Distance Measurement Distance/Range 15 mi (25 km)/27-36 holes Climbing Ability 30 degrees Off-Power Free-Wheeling Mode Maximum Load 66 lbs (30 kg) Charger Input: 110-240V AC Output: 12V/2A-3A Trickle Charger Motor Power: 1 x 200 Watt (200 Watt) 12V DC Electric Front Wheels Airless, rubberized tread Tracking adjustment Rear Wheels Airless, rubberized tread Quick-release mechanism Drive Train Rear Wheel Drive Gear ratio (17:1) Handle Height Adjustmen
Lifetime: ca. 150+ charges Standard Battery Duration 27+ holes Battery Upgrade Options N/A Folded Dimensions Length: 35 in (89 cm) Width: 24 in (61 cm) Height: 12 in (30.5 cm) Unfolded Dimensions Length: 42 in (107 cm) Width: 24 in (61 cm) Height: 37 in (94 cm) Weight Caddy 35 lbs (16 kg) Weight Standard Battery 25 lbs (11 kg) Total Weight (standard battery) 60 lbs (27 kg) Speed 5.4 mi/h (8.
Carrying Bag Seat Optional Accessories Rain Cover Sand Dispenser Club Cleaner see "Special Offers" Introduced (year) 2006 Warranty 1 Year on Parts and Labor 1 Year on Battery TROUBLESHOOTING GUIDE Symptom Caddy does not have power Motor is running but wheels don’t turn Caddy pulls to left or right Battery lacks power Problems attaching wheels Action - Check fuse in the battery case - Check all wiring connections and plugs - Check battery charge - Check On/Off button/switch - Check if whee
FREQUENTLY ASKED QUESTIONS (FAQs) In order to provide our customers with the most accurate and in-depth information please read below some answers to the most frequently asked questions about electric golf caddies in general and Bat-Caddy in particular. GENERAL QUESTIONS Why should I use an electric golf push cart vs.
main disadvantage of this technology was that they tended to cut corners, i.e. run into bunkers or water hazards once the operator went around them. You also needed to switch them off before you went on the green and walk back to them after putting. Today's remote control technology is more intuitive to use.
current economic climate. We are a global company represented in the US, Canada, Europe and Asia with an array of reputable retailers representing our product line. BAT-CADDY QUESTIONS Should I charge the battery once I receive the unit? Bat-Caddy: Our 12V sealed lead acid batteries come more or less fully charged, but we recommend to charge them for a full 12 hours before the first usage.
adjustment mechanism. Please open the axle screw and the tracking rod located on the right side of the front wheel. Shift the wheel as needed and tighten the screws in reverse order. During operation make sure the bag is positioned straight, the weight in your bag is evenly balanced and does not shift. Do caddies interfere with each other when playing with other Bat-Caddy carts? Bat-Caddy: No. The remote controls have slightly different frequencies, so they don't interfere with each other.