User Manual X3 Pro WARNING: PLEASE FOLLOW ALL ASSEMBLY INSTRUCTIONS AND READ AND UNDERSTAND THE OPERATING INSTRUCTIONS BEFORE YOU OPERATE THE CADDY
1.
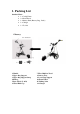
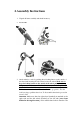
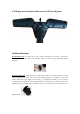
2. Assembly Instructions 1. Unpack all items carefully and check inventory. 2. FOLD STEP: 3. Attach wheels to axles by pushing wheel locking button on the outside of the wheel and inserting the axle extension into the wheel. Make sure to keep the locking button on the outside of the wheel pushed in during this process, in order to enable the axle extensions, including the two pins, to be inserted all the way into the wheel.
caddy will not move if the wheels are not on the proper side. Reverse the action to remove the wheels. 4. Place battery pack on battery tray and fasten Velcro strap around battery and fasten tightly. Insert battery plug into caddy outlet (do not fasten plug screw to prevent damage in case of the battery falling from the tray).
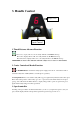
3. Handle Control Display screen Speed Control 1. Timed Distance Advance Function : Press once, display will show A , the caddy will run ca. 10 Meters and stop Press twice, display will show B , the caddy will run ca. 20 Meters and stop Press three times, display will show C , the caddy will run ca. 30 Meters and stop ATTENTION: do not use these functions when the caddy is close to water or other hazards! 2. Cruise Control and Brake Function: 1. ON/OFF Button: controls the caddy’s power supply.
4. USB plug located under handle cover for GPS or cell phone. Additional Functions Freewheeling Mode; the caddy can be easily operated without power. In order to activate the freewheeling mode, turn main power Off. The caddy now can be pushed manually without resistance. Tracking Adjustment; tracking behavior of all electric caddies is strongly dependent on equal weight distribution and slope. Test your caddy’s tracking behavior by operating it on an even surface without the bag.
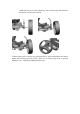
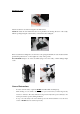
Installation of Seat Attach seat stand to seat bottom using the four small screws. Attention: Attach in such manner that the seat is parallel to the driving direction of the caddy, with the opening facing the outside when you slide it into the holding bar. Slide seat stand into holding bar as shown. Due to the spring mechanism, the seat should reach the ground when pushed down, so the weight rests solely on the ground.
MAINTENANCE & ADDITIONAL INSTRUCTIONS 1. Battery Charging and Maintenance PLEASE OBEY THESE PRECAUTIONS FOR BATTERY USE & CHARGING: - Please do not charge the battery in a sealed container or in upside down position. It is recommended to charge the battery in a well ventilated area. - Please do not charge the battery near a heater, where heat accumulation may occur, or in direct sunshine.
it from the charger after charge is complete - The battery will take approximately 2-3 rounds and charging cycles before it reaches its full operating potential. During the first couple of rounds it might still be below its optimal power. - Always keep your battery fully charged before another game - Never keep your battery connected to the grid during prolonged power outages. It might be irreversibly damaged. - Do not fully discharge the battery by “overplaying” it.
part of your bag, or shift the bag on the caddy). Also, when operating your caddy, anticipate the slope of the course in order to avoid frequent corrections in direction. In some extreme environments, such as very uneven terrain, steep hills, narrow and/or sloped cart paths, muddy areas, gravel paths, close to bunkers and hazard, around bushes and trees it is strongly recommended to operate the caddy by holding on to it to prevent any tip overs, collisions resulting in potential damage.
- Remote Control Range: We recommend not to exceed 50 yards distance. The greater the distance between you and caddy, the greater the chance of losing contact with it (only applicable for remote controlled models) - Microcomputer: The remote caddy has 3 microcomputer controls: The first is in main controller box. The second is in the remote control transmitter handset, and the third is in the receiver in the handle.
TROUBLESHOOTING GUIDE Symptom Caddy does not have power Motor is running but wheels don’t turn Caddy pulls to left or right Battery lacks power Problems attaching wheels Action - Check battery cable connections - Check all wiring connections and plugs - Check battery charge - Check On/Off button/switch - Check if wheels are secured to axle by split pin - Check right and left wheel position - Check right/left wheel clutches - Check if wheel is fitted over clutch & latched to axle - Check