
Operation Manual


11
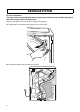
Cleaning the heat exchanger
Before any cleaning or maintenance, switch off the dryer.
Clean the heat exchanger at least every month, or whenever the heat exchanger indicator lamp
lights up (if available on your model), proceeding as follows.
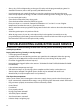
A. Open the heat exchanger flap.
B. Turn the two locking bars at the side of the heat exchanger
towards the middle, to the horizontal position, and pull the heat
exchanger out.
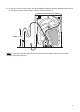
C. Hold the heat exchanger as shown in the picture. Clean it
under running water by turning it around to reach all sides,
especially in front and behind. Wipe away dust and lint from
the heat exchanger seals and plates.
Clean the inside of the heat exchanger plates under running
water, from the front side to the back.
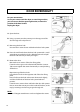
D. Remove the lint from the heat exchanger housing by hand or
with a damp cloth. Clean the entire housing from the back to
the front side, ensuring that all lint is removed.
• Fully insert the heat exchanger back into the housing (TOP or
HAUT mark upwards) and lock it again by turning the locking
bars back to their original position.
• The heat exchanger does not need to be dry when it is
reinserted after cleaning.
• Insert and latch the flap again. The flap can only be closed if the
heat exchanger is correctly positioned.
• The heat exchanger indicator lamp will switch off
automatically when you start the next drying cycle.
The heat exchanger aluminium plates may become discoloured
over time, depending on the model of your dryer.
A
B
C
D