Health & Safety, Use and Care and Installation guide www.bauknecht.
ENGLISH ..............................................................................
EN ENGLISH HEALTH & SAFETY, USE & CARE and INSTALLATION GUIDES THANK YOU FOR BUYING A BAUKNECHT PRODUCT. In order to receive a more complete assistance, please register your appliance on www.bauknecht.eu/register Index Health and Safety guide SAFETY INSTRUCTIONS. . . . . . . . . . . . . . . . . . . . . . . . . . . . . . . . . . . . . . . . . . . . . . . . . . . . . . . . . . . . . . . . . . . . . . . . . . . . . . . . . . . . 4 SAFEGUARDING THE ENVIRONMENT. . . . . . . . . . . . . . . . . . . . . . . . .
SAFETY INSTRUCTIONS IMPORTANT TO BE READ AND OBSERVED Before using the appliance carefully read these safety instructions. Keep them close at hand for future reference. These instructions and the appliance itself provide important safety warnings, to be observed at all times. The manufacturer declines any liability for failure to observe these safety instructions, for inapropriate use of the appliance or incorrect setting of controls.
EN In case not differently specified in the specific booklet of product, they can be removed, maintaining equivalent performances. C-Pentane is used as blowing agent in the insulation foam and it is a flammable gas. INSTALLATION Installation and repairs must be carried out by a qualified technician, in compliance with the manufacturer’s instructions and local safety regulations. Do not repair or replace any part of the appliance unless specifically stated in the user manual.
SAFEGUARDING THE ENVIRONMENT DISPOSAL OF PACKAGING MATERIALS The packaging material is 100% recyclable and is marked with the recycle symbol . The various parts of the packaging must therefore be disposed of responsibility and in full compliance with local authority regulations governing waste disposal.
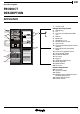
EN Use and Care guide PRODUCT DESCRIPTION APPLIANCE 2 3 4 5 7 9 10 11 12 13 14 6 8 25 15 18 19 20 21 22 16 17 23 24 1 1. Control panel Refrigerator compartment 2. LED lighting 3. Fan 4. Fan cover and antibacterial filter area 5. Shelves 6. Bottle rack 7. Cheese box + Lid 8. Multi-flow cold air area 9. Sensor cover 10. Cooler compartment (best fo meat and fish) 11. Rating plate with commercial name 12. Fruits and vegetables crisper 13. Fridge drawer divider 14. Door reversibility kit 15.
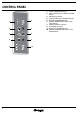
CONTROL PANEL 8 1 6 2 7 3 8 4 9 5 10 1. FRIDGE TEMPERATURE LEDs 2. PARTY MODE button /FREEZE CONTROL button 3. PRO FRESH indicator 4. STOP ALARM button /ALARM indicator 5. FREEZER TEMPERATURE LEDs 6. FRIDGE TEMPERATURE button /FAST COOL button 7. FREEZE CONTROL indicator 8. ON/STAND-BY button 9. BLACK OUT ALARM indicator 10.
EN DOOR DOOR REVERSIBILITY Note: The direction of door opening can be changed. If this operation is performed by After-sales Service it is not covered by the warranty. Is recommended to reverse door swing by two persons. Follow instruction in Installation Guide. REFRIGERATOR LIGHT The light system inside the fridge compartment uses LEDs light, allowing a better lightning as well as very low energy consumption. If the LED light system does not work, please contact the Service to replace it.
NO-FROST FREEZER COMPARTMENT No Frost freezers provide chilled air circulation around the storage areas, and prevent the formation of ice, thereby completely eliminating the need for defrosting. Frozen items don’t stick to the walls, labeling stays legible and storage space remains neat and clear.
EN HOW TO USE THE APPLIANCE FIRST TIME USE HOW TO START THE APPLIANCE After plugging the appliance to the mains, it starts the operation automatically. After starting the appliance, wait at least 4-6 hours before placing food into the appliance. When the appliance is connected to the power supply, the display lights up and all the icons appear on the display for approximately 1 second. The default (factory) values of the fridge compartment settings light-up.
DAILY USE HOW TO INCREASE FREEZER STORAGE CAPACITY • • • • • Do not block the air outlet area (on the back wall and on the bottom inside the product) with food products. All shelves and pull-out baskets are removable. • • removing the baskets to allow the storage of big products. placing the food products directly on the freezer shelves. removing additional removable accessories.
EN PRO FRESH FAST COOL This function automatically works to ensure the optimal conditions to preserve the stored food. If there are any variations, Pro Fresh immediately restores the ideal conditions. Using Fast Cool function it is possible to increase the cooling in the refrigerator compartment. The use of this function is recommended when placing a very high quantity of food in the refrigerator compartment. Press & hold for 3 sec. the Fridge °C button to activate Fast Cool function.
BLACK OUT ALARM After a power blackout, your product is designed to automatically monitor the temperature in the freezer when electricity is resupplied. If the temperature in the freezer rises above freezing level, the Black Out indicator lit the Alarm indicator blinks and the acoustical alarm sounds when electricity is re-supplied. To reset the alarm press the Reset Alarm button just once.
EN DOOR OPEN ALARM The Alarm icon lights up blinking and the acoustical alarm sounds. The Alarm is activated when the door is left open for more than 2 minutes. To disengage the door alarms close the door, or press once Stop Alarm button to mute the acoustical alarm. QUICK ICE HOW TO MAKE ICE CUBES Put the empty ice cube trays into the freezer 24 hours before using the Quick Ice feature to cool them down.
USING QUICK ICE TRAYS AS EUTETICS 16 Quick Ice trays can also be used as eutetics to help in keeping the food frozen in case of power failure. For the best usage of them, place them above food stored in the top drawer of the freezer compartment. In this position the trays can still be used to make ice cubes, however the time needed to do that may be longer.
EN FOOD-STORAGE TIPS FRIDGE COMPARTMENT The refrigerator is the ideal storage location for ready meals, fresh and preserved food, dairy products, fruit and vegetables and beverage. AIR VENTILATION The natural circulation of air in the refrigerator compartment results in zones with different temperatures. It is coldest directly above the fruits and vegetables crisper and at the rear wall. It is warmest at the top front of the compartment.
Legend TEMPERATE ZONE Suggested for the storage of tropical fruit, cans, drinks, eggs, sauces, pickles, butter, jam. COOL ZONE Suggested for storage of cheese, milk, dairy food, delicatessen, yogurt COOLEST ZONE Suggested for the storage of cold cuts, desserts FRUIT & VEGETABLE DRAWER FREEZING ZONE DRAWER (MAX COOL ZONE) Suggested to freeze fresh/cooked food.
EN FREEZER COMPARTMENT The freezer is the ideal storage location for store frozen food, make ice cubes and freeze fresh food in the freezer compartment. The maximum number of kilograms of fresh food that can be frozen within a 24-hour period is indicated on the rating plate (…kg/24h). If you have a little quantity of food to store in the freezer, we recommend to use the coldest areas of your freezer compartment, corresponding to the middle area.
STORAGE TIME OF FROZEN FOOD MEAT Beef months 8 - 12 STEWS Meat, Poultry FRUITS Apples months 12 Pork, veal 6-9 DAIRY PRODUCTS Apricots 8 Lamb 6-8 Butter 6 Blackberries 8 - 12 Rabbit 4-6 Cheese 3 Blackcurrants / Redcurrants 8 - 12 Mince/Offal 2-3 Double Cream 1-2 Cherries 10 Sausages 1-2 Ice-cream 2-3 Peaches 10 Eggs 8 Pears 8 - 12 Plum 10 POULTRY months 2-3 Chicken 5-7 SOUPS AND SAUCES Turkey 6 Soup 2-3 Raspberries 8 - 12 Giblets 2-3 Meat Sauce 2-3 Stra
EN RECOMMENDATION IN CASE OF NO USE OF THE APPLIANCE ABSENCE / VACATION In case longer absence its recommended to use up food and to disconnect the appliance to save energy. MOVING 1. Take out all internal parts. 2. Wrap them well, and fix them together with adhesive tape so that they do not bang together or get lost. 3. Screw the adjustable feet so that they do not touch the support surface. 4.
CLEANING AND MAINTENANCE WARNING Before any cleaning or maintenance operation, unplug the appliance from the mains or disconnect the electrical power supply. Never use abrasives. Never clean refrigerator parts with flammable fluids. › Periodically clean the appliance with a cloth and a solution of lukewarm water and neutral detergent specifically for refrigerator interiors. › Clean the outside of the appliance and the door seal with a damp cloth and dry with a soft cloth.
EN TROUBLESHOOTING GUIDE & AFTER-SALES SERVICE BEFORE CONTACTING AFTER-SALES SERVICE... Performance problems often result from little things you can find and fix yourself without tools of any kind. FUNCTIONAL SOUNDS Sounds coming from your appliances are normal since it has a number of fans and engines to regulate performances that switch on and off automatically. SOME OF THE FUNCTIONAL SOUNDS CAN BE REDUCED THROUGH: › Leveling the appliance and installing it on an even surface.
TROUBLESHOOTING GUIDE Problem Possible Cause Solution THE APPLIANCE IS NOT WORKING There may be an appliance power supply problem. › Check if power cable plugged into a live socket with the proper voltage. › Check if the protection devices and fuses of the electrical system in your home THERE IS WATER IN THE DEFROST PAN This is normal in hot, damp weather. The pan can even be half full. › Make sure the appliance is level so that the water does not overflow.
EN THE APPLIANCE TEMPERATURE IS TOO HIGH There could be various causes (see “Solutions”) › Make sure that the condenser (back the appliance) is free of dust and fluff. › Make sure that the door properly closed. › Make sure that the door seals properly fitted. › On hot days or if the room is warm, the motor naturally runs longer.
AFTER-SALES SERVICE BEFORE CALLING THE AFTER-SALES SERVICE 1. See if you can solve the problem by yourself with the help of the suggestions given in the TROUBLESHOOTING GUIDE. 2. Switch the appliance off and back on again to see if the fault persists IF AFTER THE ABOVE CHECKS THE FAULT STILL OCCURS, GET IN TOUCH WITH THE NEAREST AFTER-SALES SERVICE To receive assistance, call the number shown on the warranty booklet or follow the instructions on the website www.bauknecht.
EN Installation guide 2 50mm abc 4x 1x 1x 1x A B C D 1 c 2 3 4 5 b a c c 6 c c a 27
8 7 9 c a 10 11 12 c b 13 B 14 b a D B 15 A 28 b
EN 21 1 1 2 2 3 1 2 3 4 5 6 1 1 45 o 2 2 1 1 45 o 3 2 29
EN 400010868224 Bauknecht® Registered trademark of Whirlpool group of companies 30 n