TABLE OF CONTENTS GB DESCRIPTION OF THE DRYER PAGE 14 FILTER PAGE 14 BEFORE USING THE DRYER PAGE 15 PRECAUTIONS PAGE 15 PREPARING THE LAUNDRY PAGE 16 SELECTING DRYING TIME OR PROGRAMME AND OPTIONS PAGE 17 STARTING AND COMPLETING THE PROGRAMME PAGE 18 INSTALLATION PAGE 19 ELECTRICAL CONNECTION PAGE 19 VENT CONNECTION PAGE 21 DOOR REVERSIBILITY PAGE 21 MAINTENANCE PAGE 22 TROUBLE SHOOTING GUIDE PAGE 23 AFTER-SALES SERVICE PAGE 23 To get full satisfaction from your d
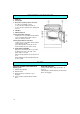
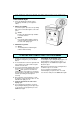
DESCRIPTION OF THE DRYER 1. Work-top 2. Contact pin 3. Door (Door opening can be reversed). See “Door reversibility” section. To open the door: pull the handle out. To close the door: push the door gently until it closes. 4. Lint filter 5. Child safety-lock 5a. For dryers with clear door Using a coin or a screwdriver turn the plastic screw counterclockwise until it snaps in. The door cannot be locked. 5b. For dryers with non-clear door Using a coin or a screwdriver turn the plastic screw clockwise by 90°.
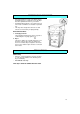
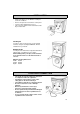
BEFORE USING THE DRYER • • • After unpacking please make sure that the dryer is undamaged. In case of doubt do not use the dryer but call a qualified technician or your retailer. Packaging material (plastic, etc.) must be kept out of the reach of children as it constitutes a potential risk. This dryer was designed for domestic use and must be used exclusively for drying laundry. Environmental hints 1.
PREPARING THE LAUNDRY Laundry preparation Check that all fastenings are closed and that pockets are empty. Turn the articles inside out. Place laundry loosely in the drum to make sure that they don’t get tangled. Max. drying weigh • • • • Cottons Cottons with Rapid option Synthetics Delicates 5,0 kg 3,5 kg (electronic dryer) 2,5 kg 1,5 kg (electronic dryer) The given weights correspond to a standard laundry load.
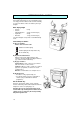
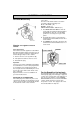
SELECTING DRYING TIME OR PROGRAMME AND OPTIONS Electronic dryer 1. Select the programme and the options as indicated in the table (see Programme Table). 2. Options (If available) To select an option, press the corresponding button before pressing the Start button. The indicator above the button lights up to confirm that a selection has been made. An alarm sounds to indicate that an incorrect selection has been made (incompatible options). Press the button again to cancel the option.
SELECTING DRYING TIME OR PROGRAMME AND OPTIONS Time-steered dryer 1. Select the drying time and the options according to the table (see Programme Table). 2. Options (if available) To select an option, press the corresponding button. Press the button again to cancel the option. Gentle Reduces the drying intensity. Suitable for delicate articles. Buzzer Pressing the button initiates a buzzer sound to signal at regular intervals, at the end of the drying cycle. 3.
INSTALLATION • • • • Install your dryer in a room which is not subject toextreme conditions. Remove the protective foil from the control panel. Level the dryer adjusting the four feet. Take care not to trap the mains cable between the dryer and the wall. Stacking kit Your dryer can be stacked on top of your washing machine, using the stacking kit AMH 542, which is available from your dealer. Building under Your dryer can be built under, using the built under kit UBS10 which is available from your dealer.
ELECTRICAL CONNECTION For Great Britain only Warning - this appliance must be A suitable alternative plug should then be fitted to the cable. The wires in the mains lead are coloured in accordance with the following code: BLUE - “NEUTRAL” (“N”) BROWN - “LIVE” (“L”) GREEN AND YELLOW - “EARTH” (“E”) 1. The GREEN AND YELLOW wire must be connected to the terminal in the plug which is marked with the letter “E” or by the Earth symbol 4 or coloured green or green and yellow. 2.
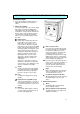
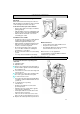
VENT CONNECTION Vent outlets are on the left, right or on the back. When delivered from the factory the vent hose with an adaptor is in the drum. It can be mounted on the left, right or the back of the dryer. To mount vent hose proceed as follows: • Remove the round cover using a screwdriver, pulling gently up. • Clip the adaptor to the hose (diagram A) and position it on the outlet desired (diagram B). • If dismounted remount the cover on the remaining open outlet.
DOOR REVERSIBILITY To change the direction of opening of the non-clear door 1. Unplug the dryer. 2. Open the door. 3. Remove the contact pin at the upper part of the door with a spanner. Turn the contact pin 90° and take it out. 4. Unscrew the 2 screws at the door hinge and remove the door. 5. To remove the door lock: • Unscrew the two screws above and below the door lock system and slide it upwards (1,5 cm) holding it from the bottom. Remove it. 6. To change the door opening: • Turn the door.
TROUBLE SHOOTING GUIDE Should your dryer operate incorrectly, check the following points before calling for a qualified service technician. Drying is too long / laundry is not dry enough: • Have you selected the correct drying time or programme ? • Was the inserted laundry too humid (Washing machine spin speed less than 800rpm)? • Is the lint filter dirty (filter indicator light on) ? After an interruption in the mains supply you must restart the dryer (Electronic dryer).