Eye-Pal Ace Plus Version 1.7 User Manual ABiSee, Inc. 30 Sudbury Rd., Unit 1B Acton, MA 01720 www.abisee.
Table of Contents Introduction 3. What's in the Box 3. The Basics 3. Reading/Zoom Cameras 3. Object Lighting 4. Speakers 4. Position 4. Buttons, Controls, Connections 4. Power and Battery 7. Power Switch Button 7. Power Indicator Light 8. Power Up 8. Standby Mode 8. Power Down 8. Checking the Battery Charge Status 8. Charging the Battery 9. Extending Battery Life 9. Battery Replacement 9. Internet Connection 9. How to Register the Device and Obtain an Email Account 10.
Deleting a Document 19. Library 19. Email 20. Address Book 22. Calendar/Reminders 22. Zoom 23. Photo Album 23. Clock/Alarm Clock 25. Settings 25. Help 26. WARRANTY 27. Appendix A: Safety Rules 28. Appendix B. Troubleshooting 29. Appendix C: Braille Display Information 31. Freedom Scientific Focus 14 Page 32. ALVA BC640 Page 34. APH Refreshabraille 18 Page 35. HIMS Braille Edge 40 Page 36. Baum SuperVario2 40 / Humanware/PDI Brailliant 40 Page 37. Humanware Brailliant bi40 Page 38.
Introduction Congratulations on choosing the Eye-Pal Ace Plus device. ABiSee’s Eye-Pal Ace Plus (hereafter referred to as the Ace Plus) is a portable electronic text-to-speech device. It is also compatible with select refreshable Braille displays, allowing nearly instant conversion of text to Braille. The Ace Plus can be used to send and receive emails, download and read Bookshare books, and also be used as a multi-tasking daily assistant for people with visual impairment and those who are blind.
front of the Ace Plus. The optimal camera-viewable area is a letter/A4 paper sized (8.5 by 11 inches). Object Lighting Both cameras automatically provide sufficient lighting when taking a snapshot. No additional light is needed even in a dark room. Speakers Any material with printed text placed in front of the Ace Plus will be read out loud using the built-in speakers. Alternatively, headphones can be plugged or the Voice Mode can be turned off for those who prefer to read silently.
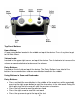
Top Panel Buttons: Home Button: A large round button located in the middle on top of the device. Press it anytime to get to the Main Menu. Volume knob: Located in the upper right corner, on top of the device. Turn it clockwise to increase the volume or counterclockwise to decrease the volume. Daisy Buttons: Located on the left side on top of the device. The Daisy Buttons have total of five buttons: four arrow buttons and one round button located in the middle.
Press the down arrow to go to the bottom of the text In this and all other modes, the center button can be pressed to hear to hear the battery status and whether you are connected or disconnected to your Network. Action Button: Located on the right side of the device above the Right Roller. Press this Button to select the desired menu option. In Reading mode – this Button is used to pause and resume reading.
corner. The audio socket can be used for plugging in external speakers or a headset. Side Connections/Power Button On the left side, toward the bottom and back, there is a set of ports aligned vertically. The first one from the bottom is for plugging in the power supply. Just above that is a round power button. Above that is a USB port, and above that is a second USB port. To summarize, in general, use the Right Roller to scroll through the menu items and the Action Button to confirm the menu selection.
Power Indicator Light The Power indicator light is located above the Power Button. The light glows steady green when the device is on; the light blinks when the device is in standby mode; the light is off when the device is turned off. It glows red when the device is off and is being charged, and glows orange when the device is on and is being charged. Power Up Press the Power Button to power up the device. The start-up process is indicated by a series of beeps and takes approximately 90 seconds.
displayed in the screen) “100%” means a fully charged battery. If the charge is below 15%, it is time to recharge. The Ace Plus can be used while it is being charged. Charging the Battery Important: Before the first use, the Ace Plus’s battery needs to be charged to full capacity which can take up to four hours. To charge it, use the power supply and power cord provided as follows: First connect the power cord end with the small prong into the port at the end of the rectangular part of the power supply.
Ability to download books from Bookshare Ability to send and receive emails attachments To use Internet functions on the Ace Plus, you need access to an available WiFi network. If the WiFi network you would like to use requires a password, you will need to know the password to connect to it. When you choose a network, such as a home wireless network that needs a password, you will be prompted to enter it.
Turn on the device Go to Settings>System Settings>Device Registration Press the Action button Wait until the registration info is retrieved Press the Home Button Go to Settings>System Settings>Network accounts>Email and make sure your Username is correct according to your registration. Follow the steps in the section below on how to enter characters and how to add and connect to a Network to send and receive emails.
place where you need to enter characters, press the Daisy Up or Down arrow to move between lowercase, uppercase, numbers, email shortcuts and symbols. For example, if you are in a mode to enter a password and you want to start with an uppercase letter, press the Up arrow until you get to the choice “Uppercase.” Use the Right Roller to scroll to the character you want and select it with the Action Button. If you enter a character in error, use the Left Arrow button to delete it.
reads printed text aloud and displays magnified text on the screen. Positioning a document The Ace Plus can scan and read a document that fits in the 8 ½ by 11-inch field directly in front of the device on a flat surface. Use the base of the device as a guide and place the long side of the paper so it is aligned with the length of the base. The orientation of the document will not influence the recognition of the text.
General Settings. Then, scroll to and select Reading Mode. Scroll to your desired option (Voice Mode or Text Mode), and set it with the Action Button. Voice Mode The Voice Mode is the default mode. Use this mode to hear the text read aloud. After the scan button is pressed, the device automatically starts reading within a few seconds. To pause/resume reading, press the Action Button. Scanned text is formatted and displayed on the screen in high contrast.
The five Daisy Buttons are used for text navigation. Pressing the left or right arrow button allows you to, respectively, move to the previous or next word. The Ace Plus reads the words aloud as you navigate. Pressing the up or down arrow buttons allows you to, respectively, move to the top or bottom of the page. Scrolling up or down with the Right Roller allows you to move, respectively, to the previous or next line.
three seconds - that way the camera will bring the item into sharp focus before taking the snap shot. Managing Documents Saving Documents and Books The Ace Plus allows you to save single-page documents, multi-page documents and books. Documents and books can be saved internally or on a USB external memory device (flash drive). When following the steps for saving documents, if a flash drive is plugged in, the documents will be saved on it.
line of the document that the document has been saved. If you were not satisfied with the voice label you recorded, press the Back Button to be prompted to record again. Saving a Multi-page Document or Book To start saving a multi-page document or book, select Scan and Read from the Main Menu. Next, press and hold the Action Button, then press the Back Button. Three options will be given: Save: Open: Delete: If the first option you hear is Save, press the Action Button.
If you select a book, you will hear, “Open Book.” Press the Action Button again, and it will open as an image and then be converted to text and read aloud for this reading. Unlike single-page documents, you can choose to convert books to text permanently so that the book will start reading faster when it is subsequently opened. To do this, follow these steps: Converting a Book to Text Select the Open option as instructed in the previous paragraph.
Press the Up arrow to go to the previous page. You will hear, for example: “Opening page two of three” Press the Down arrow to go to the next page. You will hear, for example: “Opening page three of three” Press the Left arrow to go to the previous word Press the Right arrow to go to the next word Press and hold the Center Daisy Button while repeatedly pressing the Right arrow to spell out the next word.
entry method described above under “Internet options.” Now you are ready to Download Books! To Download Books: Start at the Main Menu and scroll to and select Library. Next, select “Manage Books,” and then select “Download More Books.” You will hear “Enter search query.” Enter the book title you want to download using the entry method described above under “Internet options.” Scroll through the search results and select your choice. The book will be added to your Library, and will automatically open.
username. For your Username, please enter the username you used when registering your Ace Plus with ABiSee. B. Add an available Network to your device C. Connect to a Network D. Enter Names and Email Addresses in your Address Book To do this, from the Main Menu, scroll to and select Address Book. Next, select Add New Entry. First enter the name of the person you’d like to add using the entry process above, and press the Right Daisy arrow to save it. Next, enter their email address.
Alternatively, a person can elect to send an email without a voice or image attached as a means to simply and easily send a “Hi” signal to communicate with someone. To Check for New Email: From the Main Menu, scroll to and select Email. Next, scroll to “Check for New E-mail.” You will hear an announcement as to whether new messages were retrieved or not. If there are new messages, they will come up on the next screen with the name of the person who sent it and the subject line.
For any of the above options except “Add Reminder,” scroll through saved reminders or hear the message that there are no reminders for the selected day. When you select a reminder with the Action Button, scroll through choices of “Listen to Reminder/Delete Reminder/Change Reminder.” Select your choice and follow the prompts. To add a new reminder, select the “Add Reminder” option. Select a date using the Left Roller to change the month and the Right Roller to change the day of the month.
given as options. Scroll to the album you would like to open and select it. To magnify the picture, use the Left Roller. To move the magnified image, use the left/right and up/down arrows. Use the Right Roller to move to the next picture. To Add Photos to the Ace Plus, the photos must first be saved on a USB flash drive in a folder named “Pictures”. Insert the USB flash drive into the USB port located on the left side of the device.
Clock/Alarm Clock Select Clock from the Main Menu to hear the current time. To set the alarm time and access the set alarm mode functions, press the Action Button. To set the alarm time, select alarm time and use the Left Roller to change the hour, the Right Roller to change the minutes, and press the action button. Next, scroll to and select either One Time Alarm, Daily Alarm, or Off. If you want to turn off a previously set alarm, from the clock menu, scroll to Set Alarm Mode and scroll to and select Off.
Serial Number Network Connection Status System Settings Customize Main Menu Upgrade Software (When new software versions are released, they can be obtained from AbiSee, Inc or your local dealer and can be installed by selecting this setting) Wireless Network Settings Network Accounts Set Time and Date Device Registration Reset All Settings (Resets all to default settings). NOTE: The Ace Plus must be turned off/on after changing the Time and Date.
WARRANTY TWO YEAR WARRANTY ON ALL ABISEE, INC. PRODUCTS: ABiSee, Inc. warrants to the original purchaser that its products are free from defects in materials and workmanship (with exception of the battery) for two years from the date of purchase. The battery is warrantied against defectiveness for nine months from the date of purchase.
Appendix A: Safety Rules Handle the Ace Plus with care. Rough handling will damage the device. Be especially careful with the screen – do not touch it with sharp objects. When you carry the device outside, use a protective carrying case. If the Ace Plus is not in a standing position, do not place any heavy or sharp objects on the screen surface. Use only the Power Adapter that comes with the Ace Plus. Do not open the Ace Plus under any circumstances; it will void the warranty.
Appendix B. Troubleshooting When turning on the Ace Plus, make sure no flash drives are plugged into the device. Troubleshooting: Power/battery/connections 1. If the Ace Plus does not respond to any Button: Make sure the battery is charged. If the battery is empty, connect the power adaptor to charge the battery. If the battery is fully charged, but the device stopped responding to any Button, turn the device off, then on again. 2. If the adaptor does not power the Ace Plus: Check the connections.
Troubleshooting: Calendar Application 1. If you do not hear the reminder after you finished your recording: Make sure that the device had been turned on and was charged. Increase the volume – turn the Volume knob clockwise. Make sure that when you are talking your Ace Plus is close to the device. 2. If you think that you did not hear the reminder you have entered at the right date/time: Go to the Main Menu, and select Calendar.
Appendix C: Braille Display Information Part A: Using a refreshable Braille display with the Ace Plus (See Part B of Appendix C for details on supported Braille displays and information on which controls on each particular display corresponds to which control on the Ace Plus). To use a refreshable Braille display with the Ace Plus, turn on the Ace Plus device by pressing the power button.
can use the Right Roller or equivalent controls on your Braille display to scroll to the battery status and the Network Status. Once you have read the status, you can press the Back Button (or equivalent) to return to the screen you were on. Part B: Supported Braille Displays and Control Details This section has a picture of each of the supported Braille displays with the buttons labeled.
Table of corresponding controls for the Freedom Scientific Focus 14 Control on Ace Plus: Control on Braille Display. Right Roller Up: Right NAV Rocker Up. Right Roller Down: Right NAV Rocker Down. Left Roller Up: Left NAV Rocker Up. Left Roller Down: Left NAV Rocker Down. Action: Right Mode Button. Back: Left Mode Button. Scan: Right Selector Button. Home: Left Selector Button. Function: Control on Braille Display. Pan Display Left: Left Panning Button.
ALVA BC640 Table of corresponding controls for the ALVA BC640 Control on Ace Plus: Control on Braille Display. Right Roller Up: Smartpad Up or Thumb Key 2. Right Roller Down: Smartpad Down or Thumb Key 3. Left Roller Up: F4 + Smartpad Left. Left Roller Down: F4 + Smartpad Right. Action: Smartpad Right. Back: Smartpad Left. Scan: Center thumb key. Home: F2. Volume Down: F4 + Smartpad Down. Volume Up: F4 + Smartpad Up.
APH Refreshabraille 18 Table of corresponding controls for the APH Refreshable 18 Control on Ace Plus: Control on Braille Display. Right Roller Up: Joystick Up or SPACE+1. Right Roller Down: Joystick Down or SPACE+4. Left Roller Up: SPACE+1+2. Left Roller Down: SPACE+4+5. Action: SPACE+8. Back: SPACE+1+5 (E-chord) or SPACE+7. Scan: Joystick Press or SPACE+2+3+4 (Schord). Daisy Center: SPACE+3+4 (ST-chord). Daisy Left: SPACE+3. Daisy Right: SPACE+6. Daisy Up: SPACE+1+2+3 (L-chord).
HIMS Braille Edge 40 Table of corresponding controls for the HIMS Braille Edge 40 Control on Ace Plus: Control on Braille Display. Right Roller Up: Up on either directional pad or SPACE+1. Right Roller Down: Down on either directional pad or SPACE+4. Left Roller Up: SPACE+1+2. Left Roller Down: SPACE+4+5. Action: SPACE+8. Back: SPACE+1+5 (E-chord) or SPACE+7. Scan: SPACE+2+3+4 (S-chord). Daisy Center: SPACE+3+4 (ST-chord). Daisy Left: SPACE+3. Daisy Right: SPACE+6.
Baum SuperVario2 40 / Humanware/PDI Brailliant 40 Table of corresponding controls for the Baum SuperVario2 40 and Humanware/PDI Brailliant 40 Control on Ace Plus: Control on Braille Display. Right Roller Up: 1. Right Roller Down: 4. Left Roller Up: 1+2. Left Roller Down: 4+5. Action: 1+5 (E). Back: 1+3+4+6 (X). Scan: 2+3+4 (S). Daisy Center: 3+4 (ST). Daisy Left: 3. Daisy Right: 6. Daisy Up: 1+2+3 (L). Daisy Down: 4+5+6. Home: 1+2+3+4+5+6 (FOR). Volume Down: 2+3.
Humanware Brailliant bi40 Table of corresponding controls for the Humanware Brailliant bi40 Control on Ace Plus: Control on Braille Display. Right Roller Up: SPACE+1 or Left. Right Roller Down: SPACE+4 or Right. Left Roller Up: SPACE+1+2. Left Roller Down: SPACE+4+5. Action: SPACE+8. Back: SPACE+1+5 (E-chord) or SPACE+7. Scan: SPACE+2+3+4 (S-chord). Daisy Center: SPACE+3+4 (ST-chord). Daisy Left: SPACE+3. Daisy Right: SPACE+6. Daisy Up: SPACE+1+2+3 (L-chord).
Contact ABiSee We welcome your comments, questions and suggestions. Our business hours: Monday through Friday, 8:30 am to 5:00 pm EST. By Phone: 1-978-637-2900 or Toll Free in the U.S. at 1-855-354-4080 By Fax: 1-253-595-3623 By E-mail: Sales: sales@ABiSee.com Tech Support: support@ABiSee.com General Info: info@ABiSee.com By Mail: ABiSee, Inc. 30 Sudbury Rd.