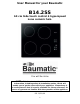
B14.
User Manual for your Baumatic B14.2SS 60 cm Side touch control 4 hyperspeed zone ceramic hob. You will be mine NOTE: This User Instruction Manual contains important information, including safety & installation points, which will enable you to get the most out of your appliance. Please keep it in a safe place so that it is easily available for future reference; for you or any person not familiar with the operation of the appliance.
Contents Environmental note 4 Important safety information 5–8 Specifications Ceramic hob layout Control panel layout 8–9 9 9 Using the ceramic hob Before first use Touch controls Turning the hob on Turning on a zone and setting a power level Turning off a zone gradually Turning off a zone instantly Turning the hob off Residual heat indicator Locking the hob top Safety cut-off Automatic pre-heating Changing the power level during automatic pre-heating Switching off automatic pre-heating 10 10 10 10 1
Environmental note o The packaging materials that Baumatic uses are environmentally friendly and can be recycled. o Please discard all packaging material with due regard for the environment.
Important safety information Your safety is of the utmost importance to Baumatic. Please make sure that you read this instruction booklet before attempting to install or use the appliance. If you are unsure of any of the information contained in this booklet, please contact the Baumatic Technical Department. General Information o This appliance is designed for domestic household use and for the cooking and frying of domestic foodstuffs.
Child Safety o Baumatic strongly recommend that babies and young children are prevented from being near to the appliance and not allowed to touch the appliance at any time. During and after use, all surfaces will become hot. o If it is necessary for younger family members to be in the kitchen, please ensure that they are kept under close supervision at all times. o Older children should only be allowed to utilise the appliance when supervised.
Cleaning o Cleaning of the hob should be carried out on a regular basis. o IMPORTANT: Before attempting to clean the appliance, it should be disconnected from the mains and cool. o Great care should be taken whilst using this appliance and when following the cleaning procedure. o You should not use a steam jet or any other high pressure cleaning equipment to clean the appliance.
o Pans should be lifted on and off the hob surface and not dragged. o Cooking zones should not be switched on without cookware placed on it. Also the cookware should not be empty. Specifications Product dimensions: Aperture dimensions: Height: Width: Depth: Height: Width: 510 mm 580 mm 40 mm 490 mm 560 mm Product specifications: o o o o o o 2 x 1.80 kW hyperspeed zones (diametre 180 mm) 2 x 1.
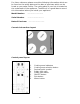
For future reference please record the following information which can be found on the rating plate and the date of purchase which can be found on your sales invoice. The rating plate of your hob is located on the underneath of the appliance. Therefore it is a good idea to record this information before you install your appliance. Model Number ………………………………. Serial Number ………………………………. Date of Purchase ………………………………. Ceramic hob surface layout Control panel layout 1. 2. 3. 4. 5. 6. 7. 8.
Using the ceramic hob Before first use IMPORTANT: You should clean the ceramic hob surface (see “Cleaning and maintenance” section). o You should switch on one cooking zone at a time, for 5 minutes at the maximum setting. This will help to eliminate any new smell that exists and evaporate any humidity that has formed on the heating elements during transit. o Do not burn off more than one zone at once. o Do not place a pan on the ceramic hob until this burn off process has been completed.
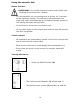
Turning on a zone and setting a power level IMPORTANT: A burner must be selected within 10 seconds of turning the hob on (see previous page). o Press the cooking zone selection button (2) for the zone that you require. o A “0” will appear on the relevant cooking zone indicator (1). o A decimal point symbol (3) will appear to show that the zone is active. o Adjust the zone between power level 1 and 9, using the plus (7) and minus (8) buttons.
Turning the hob off Once you have switched off all of the cooking zones, you should turn off the hob. o Press the ON/OFF button (6). It is possible to turn the hob off at any time by pressing the ON/OFF button (6). Residual heat indicator o After a zone is switched off, the corresponding cooking zone indicator (1) will show the letter “H”. This means that the temperature of the zone is over 60°C and is therefore high enough to cause injury.
o IMPORTANT: If the appliance is switched off whilst the safety lock feature is activated, then it will still be activated the next time that you turn the appliance on. Therefore before you can turn on a zone and set it to a power level, you will need to deactivate the safety lock by pressing the safety lock button (5). Safety cut-off o If one or more of the cooking zones are accidentally left on, a safety cut off will activate after a certain period of time.
o Finally you should select the actual power level that you want the hob to cook on, after the automatic heat up period has completed, by using the minus button (7). o The cooking zone indicator (1) will alternate between showing the actual power level and the symbol A. o Once the automatic pre-heating time period is over, only the actual power level will show on the cooking zone indicator (1).
Switching off automatic pre-heating o To switch off the automatic pre-heating mode, you firstly need to make sure that the zone you wish to take out of this mode is selected. You do this by pressing the corresponding cooking zone selection button (2). o A decimal point symbol (3) will appear to show that the zone is active. o Press the minus button (8) and hold it for ten seconds. The automatic pre-heating mode will then be cancelled and you can use the hob in normal operation once more.
o Preferably cover pans with a lid to permit cooking at a lower heat. o Always cook vegetables and potatoes, etc. in as little water to reduce cooking times. o Food or liquid that has high sugar content may damage the hob top if it comes into contact with the ceramic hob surface. Any spillages should be wiped up immediately, however this may not prevent the hob surface from becoming damaged. o IMPORTANT: The ceramic hob surface is tough; however it is not unbreakable and can be damaged.
Cleaning and maintenance Cleaning operations must only be carried out when the oven is cool. The appliance should be disconnected from your mains supply before commencing any cleaning process. Cleaning the ceramic hob top Any residues that are left on the hob top surface from cleaning agents will damage it. You should remove any residues with water and a little washing up. Abrasive cleaners or sharp objects will damage the hob surface; you should clean it using water and a little washing up liquid.
Using a ceramic hob scraper Your appliance will be provided with your appliance. The following guidelines should also be followed when using the ceramic hob scraper:- o The scraper should be placed on the ceramic surface at an angle. o Residues should be removed by sliding the blade carefully over the ceramic surface. o The ceramic surface should be wiped with a damp cloth and a small amount of washing up liquid. o Dry the appliance by rubbing the surface with a clean cloth.
Installation The installation must be carried out by a suitably qualified person, in accordance with the current version of the following. o UK Regulations and Safety Standards or their European Norm Replacements. o Building Regulations (issued by the Department of the Environment). o Building Standards (issued by the Scottish Development Department). o IEE Wiring Regulations. o Electricity At Work Regulations.
Installing the appliance o Cut a hole in the worktop that corresponds with the drawings shown above. o IMPORTANT: You must have a gap of at least 25 mm between the underneath of the appliance and any surface that is below it. o Carefully turn the hob upside down and place it on a cushioned mat. o Apply the sealing strip provided around the edge of the appliance. o The protective covering must be removed from both sides. o Do not leave a gap in the sealing agent or overlap the thickness.
(A) (B) (C) Clip Fixing bracket Screw o You should insert a clip (A) into the holes which are located in each corner of the hob. o Place the fixing brackets (B) over each hole and clip, and then place a screw (C) through the hole and fixing bracket (B). Tighten the screws a little way, so that they stay in place. IMPORTANT: Do not tighten the screws fully. o Carefully turn the hob back over and then gently lower it into the aperture hole that you have cut out.
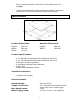
Electrical connection This appliance must be installed by a qualified person in accordance with the latest edition of the I.E.E. Regulations and in compliance with Baumatic’s instructions. Before connecting the appliance, make sure that the supply voltage marked on the rating plate corresponds with your mains supply voltage. WARNING: THIS APPLIANCE MUST BE EARTHED.
o The brass links must be positioned as marked in the appropriate diagram and once established ALL terminal screws must be tightened down firmly. o IMPORTANT: The appliance must NOT be connected to the mains supply by means of a 13A plug and socket. o The cable can be looped if necessary, but make sure that is not kinked or trapped when the hob is in position. Care must be taken to avoid the cable being in contact with hot parts of the appliance.
My appliance isn’t working correctly o The cooking zones are not functioning or will not switch on. * It has been more than 10 seconds since the appliance was switched on. You should switch the appliance on again, using the ON/OFF button. * The safety lock has been switched on (see the “Locking the hob top” section for information on how to turn off the safety lock). * Several cooking zone selection buttons have been pressed at once. You should only touch one cooking zone selection button at once.
IMPORTANT: If your appliance appears not to be operating correctly, then you should disconnect it from your mains supply and then contact the Baumatic Service Department on telephone number (0118) 933 6911. DO NOT ATTEMPT TO REPAIR THE APPLIANCE YOURSELF. Please note that if an engineer is asked to attend whilst the product is under guarantee and finds that the problem is not the result of an appliance fault, then you may be liable for the cost of the call out charge.
Baumatic Ltd. Conditions of Guarantee Dear Customer, Your new Baumatic appliance comes complete with a free 12 month guarantee covering both parts and labour costs resulting from defective materials or workmanship. Baumatic also gives you the opportunity to automatically extend the guarantee period for a further 12 months at no extra cost, giving an initial guarantee period of 24 months. The extended guarantee period applies to England, Scotland, Wales and Northern Ireland only.
Baumatic Ltd You will be mine Headquarters Baumatic Ltd. Baumatic Buildings, 6 Bennet Road, Reading, Berkshire RG2 0QX, United Kingdom Sales Telephone +44 118 933 6900 Sales Fax +44 118 931 0035 Service Telephone +44 118 933 6911 Service Fax +44 118 986 9124 Spares Telephone +44 118 933 6922 Technical / Advice Telephone +44 118 933 6933 E-mail: sales@baumatic.co.uk technical@baumatic.co.uk Http (Internet site): www.baumatic.