BCS450SS 46 cm Built-in compact touch control steam oven.
User Manual for your Baumatic BCS450SS 46 cm Built-in touch control steam oven NOTE: This User Instruction Manual contains important information, including safety & installation points, which will enable you to get the most out of your appliance. Please keep it in a safe place so that it is easily available for future reference; for you or any person not familiar with the operation of the appliance.
Contents Environmental note Important safety information 4 5–7 Specifications Product and aperture dimensions Product specifications Cooling fan Standard accessories Electrical details Description of the oven and accessories Control panel 8 – 11 8 8 9 9 9 10 11 Using your oven Initial start up and setting the time of day Cleaning your oven before first use Before first use – useful information Using your appliance for the fist time Cooking with steam Oven function selection Oven functions Setting the ti
Environmental note o The packaging materials that Baumatic uses are environmentally friendly and can be recycled. o Please discard all packaging material with due regard for the environment.
IMPORTANT SAFETY INFORMATION Your safety is of the utmost importance to Baumatic. Please make sure that you read this instruction booklet before attempting to install or use the appliance. If you are unsure of any of the information contained in this booklet, please contact the Baumatic Customer Care Department. General Information o This appliance is designed for domestic household use and can be built into a standard kitchen cabinet or housing unit.
Warning and safety instructions o This appliance complies with all current European safety legislation. Baumatic do wish to emphasise that this compliance does not remove the fact that the appliance surfaces will become hot during use and retain heat after operation. Child Safety o Baumatic strongly recommend that babies and young children are prevented from being near to the appliance and not allowed to touch the appliance at any time.
Cleaning o Cleaning of the oven should be carried out on a regular basis. o Great care should be taken whilst using this appliance and when following the cleaning procedure. o IMPORTANT: The appliance must be disconnected from the mains before following the cleaning procedure. Installation This appliance must be correctly installed by a suitably qualified person, strictly in accordance with the manufacturer’s instructions. o Baumatic Ltd.
Specifications Product dimensions Height: 450 mm Width: 595 mm Depth: 560 mm Aperture dimensions Height: 445mm Width: 560 mm Depth: 565 mm Product specifications o o o o o o o o o o o o o 4 Functions Energy efficiency class: A Gross oven capacity: 34 litres Net oven capacity: 30 litres Water jug capacity: 1 litre Preset recipes: 14 Touch control operation LCD full programmer Electronically controlled thermostat Steam clean Cooling fan Safety lock Double-glazed removable door Standard accessories o o o o
Cooling fan o A tangential cooling fan is fitted inside of this appliance, to make the internal temperature of the oven stable and the external surface temperature lower. Electrical details Rated Voltage: Supply Connection: Max Rated Inputs: Mains Supply Lead: Oven Light Bulb: 220 - 240 Vac 50 - 60 Hz 13 A (double pole switched fused outlet with 3mm contact gap) 1.90 kW 3 x 1.
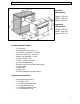
Description of the oven and accessories 1) 2) 3) 4) 5) 6) 7) 8) 9) Control panel Safety shelf Large baking tray / large perforated tray Small baking tray / small perforated tray Side rack (removable) Water jug Steam heating plate Oven door Oven door handle Accessories (Removable) Side racks Safety shelf Large baking tray / perforated tray Small baking tray / perforated tray 10
Control Panel Using your oven Initial start up and setting the time of day o When the appliance is initially connected to the power supply, the display will light up and will flash “0:00”. o First use the selection buttons to select the ‘hour’ of time. The time will scroll through 0-23 (hours). Press (“OK”) to confirm. o Then use the selection buttons to select the ‘minute’ of time. The time will scroll through 0-59 (minutes). Press (“OK”) to confirm.
Before first use This oven should be cleaned before first use and after each use thereafter. See pages 22 – 27 for full cleaning and maintenance instructions. o IMPORTANT: Before use, this appliance must have water put into its water jug. Do not use distilled water, or any other fluids. Do not fill past the ‘MAX’ mark. o Open the oven door and remove the water jug, which is located on the right of the appliance. o Remove the jug cover and pour in clean cold water.
Cooking with steam IMPORTANT: This process MUST be followed when you are using a cooking function that involves steam. o Remove the water jug from the oven and fill it with clean (tap) water, or if this is unavailable, bottled water. o Fill the water jug up to the MAX mark. DO NOT fill the jug right to the top, otherwise the water that is pumped back into the jug at the end of a cooking cycle may overflow. o Reattach the jug cover and insert the jug back into the water jug compartment.
Selecting a cooking function Manual Oven functions o Press (Function button) to manually select a function. Press the function button repeatedly to scroll through the four functions. o “H-1”, Steam function o “H-2”, Fan oven function o “H-3”, Steam and fan oven function o “H-4, Defrost function to confirm selection. The oven will start the chosen function o Press at the default time and temperature (see below).
o Once the countdown timer has ended an alarm will sound for two minutes. IMPORTANT: The oven will continue to heat until it is turned off or another function is selected. Setting the temperature Once you have selected an oven function and timer duration, you can then select your desired oven temperature. “H-1”, Steam function o Press the . and then use the selection buttons to select the temperature you want. o The temperature can be adjusted from 35-100°C.
“H-4, Defrost function o Press the and then use the selection buttons to select the temperature you want. o The temperature can be adjusted from 45-60°C. o Press to confirm, and the temperature will be set. The display will show the current temperature. Setting the delay start timer function (manual operation) This function will allow you to set a cooking duration time, and a time delay so that the oven will switch on in the future.
Preset program (14 preset recipes) Please refer to the preset recipe table on page 18. o Add the food, baking tray and/or perforated tray as outlined on the recipe table to the suggested shelf level. o Press the preset recipe program button cooking program. o Each time the program button and select your desired is pressed it will scroll through the 14 preset recipes. (See page 18 for the preset recipe table). o “A-1”, Steam function will be automatically displayed as it is the first preset recipe.
Preset recipes 18
Preset program timer delay o Press the preset program button recipe. o Press the timer button duration. o Press the timer button will be displayed and select a preset cooking which will display the default timer again (twice) and the delayed start icon o First use the selection buttons to select the ‘hour’ of time you want the oven to start. The time will scroll through 0-23 (hours). Press (“OK”) to confirm. o Then use the selection buttons to select the ‘minute’ of time you want the oven to start.
o Place baking trays in the centre of the oven (unless otherwise stated) and leave gaps between the trays to allow air to circulate. o Try to open the door as little as possible to view the dishes. o The oven light will remain on during cooking. Warnings o Keep the oven door closed when using any oven function. o Do not use aluminium foil to cover the trays supplied with the oven. o You should also never line the base of your oven with aluminium foil.
o It can also be used as a drip tray, for collecting cooking juices or fat that may be generated during the cooking process. o When cooking fatty dishes, we recommend that you place some water in the drip pan, to prevent fat from burning and producing unpleasant odours or smoke. o The shelf should be used as a support surface; it should normally be placed in the middle or upper level positions. o The perforated trays are mainly used for steam cooking fresh or frozen vegetables, fish etc.
Cleaning and maintenance Cleaning operations must only be carried out when the oven is cool. The appliance should be disconnected from your mains supply before commencing any cleaning process. o The oven should be thoroughly cleaned before it is operated for the first time and after each use. This will avoid residual food stuffs becoming baked on the oven cavity. After residues have been baked on several times, they are far more difficult to remove.
Oven cavity steam-cleaning cycle The purpose of this feature is to facilitate the removal of food and grease from the oven cavity after cooking. o Fill the water jug with clean water, either cold drinking water or bottled (softened) water. o Fill the water jug up to the mark. DO NOT fill the jug right to the top. Otherwise the water that is pumped back into the jug at the end of the cleaning cycle may overflow. o Reattach the jug cover and insert the jug into the water jug compartment.
Boiler descaling The purpose of this feature is to remove any limescale that may have built up in the steam heating dish. o If you do use your household water supply to fill the water jug with, then over a period of time, limescale may start to build in the steam heating dish. o Fill the water jug to the mark with water but DO NOT fill the jug right to the top, otherwise the water that is pumped back into the jug at the end of a cooking cycle may overflow.
Removing the side racks IMPORTANT: You can remove the side racks of the oven for ease of cleaning. You can wash the side racks with detergent and/or wash them in a dishwasher. o Pull the side racks free of their securing clips and then pull the side racks out of the oven cavity. o To replace the side racks, insert them back into the oven cavity. o Ensure that they are inserted into the correct side of the appliance, and securely slot back into the securing clamps.
Replacing the oven bulb IMPORTANT: The oven must be disconnected from your mains supply before you attempt to either remove or replace the oven bulb. o Remove all oven shelves, oven pans and drip trays, and then the side rack that is on the same side as the oven light. o Remove the light cover and the rubber seal ring by unscrewing the light cover anti-clockwise. o Place the glass cover gently on a supported surface, so that damage is not caused to it whilst the bulb is being replaced.
Removing the oven door for cleaning To facilitate the cleaning of the inside of the oven and the outer frame of the oven, the door can be removed as follows:- o The hinges have two movable bolts on them. o If you raise both of the movable bolts, then the hinges are released from the oven housing. o You should grip the sides of the door at the centre and then incline it slightly towards the oven cavity and then pull the door gently away from the oven cavity.
INSTALLATION The installation must be carried out by a suitably qualified person, in accordance with the current version of the following. o UK Regulations and Safety Standards or their European Norm Replacements. o Building Regulations (issued by the Department of the Environment). o Building Standards (issued by the Scottish Development Department). o IEE Wiring Regulations. o Electricity At Work Regulations.
Installing the oven into the kitchen cabinet Positioning the appliance o Ensure that the aperture that you will be fitting the oven into is of the size given in the above diagram. o The oven must be fitted into an oven housing with the ventilation cut-outs shown in the “Ventilation requirements” section on the next page. o Ensure that the rear panel of the furniture housing unit has been removed.
Ventilation requirements (Figure shows the ventilation and cut-out requirements for the installation of the appliance into a standard kitchen unit). (Figure shows the ventilation and cut-out requirements for the installation of the appliance into a tall housing unit). o Ensure that the oven has been securely fixed into the housing unit. The fixing of the oven into the housing is made by using two screws – on either side of the should be appliance.
My appliance isn’t working correctly o The oven isn’t coming on. * Check that you have selected a cooking function and a cooking temperature. o There appears to be no power to the oven. * Check that the appliance has been connected to the electrical mains supply correctly. * Check that the mains fuses are in working order. * Check that the operating instructions for setting the time of day have been followed. o The oven light is not working * Refer to the “Replacing the oven bulb” section on page 26.
Error Codes: Error codes occur when there is a fault with the appliance. The oven will stop working and a buzzer will sound. Error code Cause of Error E001 The water jug is empty E002 Electrical fault. E003 Oven door not closed properly. Action required Refill water jug. If water jug is full, ensure it is inserted properly into the cavity. Disconnect from electrical supply and check electrical connections. Turn on power and see if it has solved the problem.
Baumatic Consumables o BC001 Degreaser for Dishwashers (200 g) o BC002 Descaler for Washing Machines and Dishwashers (200 g) o BC003 Ceramic Hob Cleaner (250 ml) o BC004 Oven Cleaner (250 ml) o BC005 Stainless Steel Cleaner and Protector (250 ml) o BC007 E-Cloth – General Purpose Cloth o BC008 Microwave Cover To order a Baumatic consumable product please call 0123 5437 244 and quote the product code. You can also order online from eshop.baumatic.co.
United Kingdom Baumatic Ltd., Baumatic Buildings, 6 Bennet Road, Reading, Berkshire RG2 0QX United Kingdom Sales Telephone (0118) 933 6900 Sales Fax (0118) 931 0035 Customer Care Telephone (0118) 933 6911 Customer Care Fax (0118) 986 9124 Spares Telephone (01235) 437244 Advice Line Telephone (0118) 933 6933 E-mail: sales@baumatic.co.uk customercare@baumatic.co.uk spares@baumatic.co.uk technical@baumatic.co.uk Website: www.baumatic.co.uk Facebook: www.facebook.com/baumatic.
46