BF340BL/SS BF346BL/SS Frost free fridge/freezer ing
USER MANUAL FOR YOUR BAUMATIC BF340BL/BF340SS 316 Litre frost free combi fridge freezer BF346BL/SS 337 Litre frost free combi fridge freezer NOTE: This User Instruction Manual contains important information, including safety & installation points, which will enable you to get the most out of your appliance. Please keep it in a safe place so that it is easily available for future reference, for you or any person not familiar with the operation of the appliance.
Contents Environmental note 4 Important safety information 5–6 Specifications of the BF340BL/BF340SS fridge freezer Specifications of the BF346BL/SS fridge freezer Description of the appliance Description of the product features 7 8 9 10 Using your Baumatic fridge freezer Before switching on During first use Turning on the appliance and setting the thermostat 11 11 11 12 Arranging and storing food in the fridge section 13 The freezer compartment Freezing fresh food Tips on freezing Making ice cube
Environmental note Note: Before discarding an old appliance, switch off and disconnect it from the power supply. Cut off and render any plug useless. Cut the cable off directly behind the appliance to prevent misuse. This should be undertaken by a competent person. Disable the door lock to make sure that children cannot get stuck inside the appliance. o The packaging materials that Baumatic uses are environmentally friendly and can be recycled.
Important safety information Your safety is of the utmost importance to Baumatic. Please make sure that you read this instruction booklet before attempting to install or use the appliance. If you are unsure of any of the information contained in this booklet, please contact the Baumatic Technical Department. IMPORTANT: Any installation work must be carried out by a qualified electrician or competent person. Use of the appliance o Your appliance is only designed to be used in the home.
Child safety o Packaging material should be kept away from children. o Children should not be allowed to touch the controls or play with the appliance. General safety o Do not pull on the power supply cable to remove the plug from your mains supply socket. o Do not pull out or insert the plug with wet hands. o Do not attempt to use your appliance outdoors or any place where it is likely to come into contact with the elements.
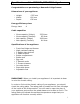
Specifications of the BF340BL/BF340SS fridge freezer Congratulations on purchasing a Baumatic fridge freezer Dimensions of your appliance o Height: o Width: o Depth: 1765 mm 600 mm 636 mm Energy efficiency class Energy class: A Cubic capacities o o o o Gross capacity (fridge): Gross capacity (freezer): Net capacity (fridge): Net capacity (freezer): 223 litres 93 litres 208 litres 81 litres Specifications of the appliance o o o o o o o o o o o o Frost free fridge and freezer Mark resistant coating
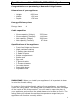
Specifications of the BF346BL/BF346SS fridge freezer Congratulations on purchasing a Baumatic fridge freezer Dimensions of your appliance o Height: o Width: o Depth: 1854 mm 600 mm 636 mm Energy efficiency class Energy class: A Cubic capacities o o o o Gross capacity (fridge): Gross capacity (freezer): Net capacity (fridge): Net capacity (freezer): 223 litres 114 litres 208 litres 97 litres Specifications of the appliance o o o o o o o o o o o o Frost free fridge and freezer Mark resistant coating
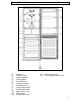
Description of the appliance 1) 2) 3) 4) 5) 6) 7) 8) 9) 10) 11) 12) Shelves Salad crisper Salad drawers Rating plate Ice cube tray Freezer drawers Adjustable foot Large bottle shelf Small bottle shelf Egg holder shelf Dairy shelf Refrigerator light 13) 14) Airflow duct vent Thermostat control knob 9
Description of the product features 1) Shelves o The shelves may be placed in any of the guide slots within the interior of the appliance. They are protected from sliding out. o To remove a shelf: Take off all of the items that are stored on the shelf that you want to remove. Then lift the front of the shelf and carefully pull it out of the grooves. 2) Salad drawer and cover o The salad drawers can be found in the bottom of your refrigerator and there is a cover that goes over them.
Using your Baumatic fridge freezer Before switching on o Make sure that it has been installed by a suitably qualified person, as per the information contained in Baumatic’s installation instructions. o After delivery, wait for eight hours before connecting the appliance to your mains supply. This will allow any refrigerant gasses that may have been disturbed during the transportation process to settle.
Turning on the appliance and setting the thermostat You switch on your appliance by connecting it to your mains supply and setting the thermostat. The thermostat control knob is located on the back wall of the fridge section. o The thermostat automatically regulates the temperature inside the fridge freezer, depending on what setting you have turned the thermostat control knob to:o LOW- This will keep the fridge at a temperature of 7°C and the freezer at a temperature of -18°C.
Arranging and storing food in the fridge section o Warm food or evaporating liquids should not be stored in your refrigerator, as this will increase the humidity inside of the appliance. o All foods should be wrapped or covered, this is particularly important if the food has a strong flavour. You should use polythene bags or sheets, aluminium foil, wax paper. Liquids should be stored in covered containers or bottles.
The freezer compartment The freezer compartment is suitable for storing and freezing food. o The freezer compartment temperature must have already reached -18 degrees centigrade (or lower) before you attempt to store food that is already frozen or freezing fresh food. o The freezer compartment is only able to freeze a certain quantity of food at one time. You should not attempt to freeze more than 7 kilograms of fresh food within a 24 hour period.
o After 24 hours you should check that the fresh food is satisfactorily frozen. If it is then the thermostat control knob should be turned back to the MIDDLE position. You can move the food to any drawer within the freezer at this point. Tips on freezing o Freezer bags, polythene wraps, aluminium foil (extra thick) and special cans for frozen foods are suitable packaging for storing frozen goods in. o Tape, rubber bands or plastic clips are suitable for sealing bags and wrappings.
Important user information IMPORTANT: Care should be taken to make sure that the airflow duct vents on the rear interior wall of the fridge and freezer sections are not blocked. IMPORTANT: If your mains power supply fails, then the food inside of the freezer section will be preserved for a 12 hour period. After 12 hours the food should be removed from the freezer section and consumed as quickly as possible.
o When cleaning is complete, dry your hands and then reconnect the plug to your mains supply. Defrosting the freezer compartment Your appliance is frost free, so you will not need to manually defrost the freezer section. However if for example the door is left open for a prolonged period of time or the door gasket is not sealing correctly, then you could get ice building in the freezer section. If this occurs, then you should follow the steps below.
o Once all the ice that has built up has melted, then the inside of the freezer compartment should be dried thoroughly. Failure to do this will result in immediate ice build when the appliance is switched back on. o With dry hands, reconnect your appliance to your mains supply. Set the thermostat control knob to the HIGH position for a 24 hour period, before returning it to the normal setting of MIDDLE.
Replacing the light bulb WARNING: PLEASE ENSURE THAT YOUR APPLIANCE IS DISCONNECTED FROM YOUR MAINS SUPPLY BEFORE ATTEMPTING TO REPLACE THE LIGHT BULB. o There is an interior light at the top of the back wall of the fridge section. o Remove the bulb cover (A) by pressing the hook on the bottom of the cover. o Press the hooks on the sides of the light cover and slide the cover off. o Change the present light bulb (B) with a new one. The replacement bulb should not have a greater rating than 15 W.
Installation IMPORTANT: Before installation and usage read all the instructions and make sure that the voltage (V) and the frequency (Hz) indicated on the rating plate are exactly the same as the voltage and frequency in your home. The rating plate can be found on the front left edge of the inside of the refrigerator.
Positioning o It is advisable that your appliance is only installed in a location where the ambient temperature of the room, corresponds with the climate classification that is stated on the rating plate of your appliance. Your appliance may not function correctly if the ambient temperature falls outside of the following ranges.
Attaching the door handles 1) You will find the two handles for the fridge freezer at the rear of the appliance, behind the condenser. You should remove this box and take out the two lengths of handle. 2) Inside of the salad drawer you will find a box containing the following components that you will need to fit the door handles. 3) Note that the brackets that go either end of each handle are marked with a T and a U.
5) There are slots at the top and bottom of each door. Insert the handles into these slots. IMPORTANT: Make sure that you have the handle the right way up; i.e. that the bracket marked with a T is at the top of the door and the bracket marked with a U is at the bottom of the door. 6) Use the allen key supplied to fully tighten the screws at the top and bottom of the handle. Repeat these steps so that both the fridge and freezer handles are connected to the appliance.
Reversing the doors IMPORTANT: Make sure you have enough room to lay the appliance on its back, without damaging or breaking the condenser coils on the rear of the fridge freezer. You should also ensure that there are no sharp or hard objects on the floor in this area. THE APPLIANCE MUST BE DISCONNECTED FROM THE POWER SUPPLY BEFORE COMMENCING THE DOOR REVERSAL PROCESS. CERTAIN SECTIONS OF THIS PROCESS WILL REQUIRE TWO PEOPLE TO COMPLETE IT.
4) Move the pin and washer that connect to the right hand hinge, from the right hand hole to the left hand hole. 5) Remove the lower door by gently sliding it downwards, away from the main body of the fridge freezer. 6) Using a star-headed screwdriver, unscrew the middle hinge and lift it out of its socket. 7) Carefully slide the upper door from the upper hinge pin (K) and then using a star head screwdriver unscrew the top hinge cover (A) and sensor cover (B).
10) Reattach the upper door to the hinge pin. IMPORTANT: The door must be supported from the underneath until step 15 has been completed. The upper door MUST NOT be allowed to hang loose whilst steps 10-15 are being followed. We recommend that one person supports the door, whilst the other person completes the steps outlined below. 11) Using a small flat-headed screwdriver, prise the covering caps from the hole in the middle of the cabinet.
Troubleshooting IMPORTANT: If your fridge freezer appears not to be operating properly, before contacting the Baumatic Service Department, please refer to the checklist below. My fridge freezer does not appear to be working/there is no power to my appliance. o Check that the plug is fully inserted into the power socket. o Check that there is power to your mains supply (e.g. that there hasn’t been a power cut or that the fuse hasn’t blown).
Republic of Ireland 01- 6266 798 United Kingdom Baumatic Ltd., Baumatic Buildings, 6 Bennet Road, Reading, Berkshire RG2 0QX United Kingdom Sales Telephone (0118) 933 6900 Sales Fax (0118) 931 0035 Service Telephone (0118) 933 6911 Service Fax (0118) 986 9124 Spares Telephone (01235) 437244 Czech Republic Baumatic CR SPOL. S.R.O. 46215, Librec The Czech Republic +4204 8357 7200 www.baumatic.cz Germany Baumatic GMBH Janderstrasse 9 Mannheim, 68199 Germany +4962 112 9190 www.baumatic.