BFD64SS Dishwasher
BFD64SS
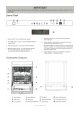
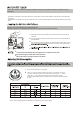
..................1 This manual contains sections of Safety Instructions,Operating Instructions, Installation Instructions and Troubleshooting Tips etc. Carefully reading it before using the dishwasher will help you to use and maintain the dishwasher properly. To review the section on Troubleshooting Tips will help you to solve some common problems by yourself and not need to ask for the help of professional technicians. Control Panel . . . . . . . . . . . . . . . . . . . . . . . .
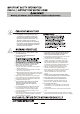
This appliance must be grounded. In the event of a malfunction or breakdown, grounding will reduce the risk of electric shock by providing a path of least resistance of electric current. This appliance is equipped with a cord having an equipment-grounding conductor and a grounding plug. The plug must be plugged into an appropriate outlet that is installed and grounded in accordance with all local codes and ordinances.
There are two ways to reduce the water hardness: one way is using water softener, the other is using detergent. The hardness of the water varies from place to place. If hard water is used in the dishwasher, deposits will form on the dishes and utensils. The appliances is equipped with a special softener that uses a salt specifically designed to eliminate lime and minerals from the water. Always use salt intended for use with dishwashers.
The dispenser must be refilled before the start of each wash cycle following the instructions provided in the" Wash Cycle Table".Your dishwashers use less detergent and rinse aid than conventional dishwashers. Generally, only one tablespoon of detergent is needed for a normal wash load. Also, more heavily soiled items need more detergent. Always add the detergent just before starting dishwasher, otherwise it could get damp and will not dissolve properly.
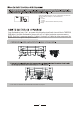
As the rinse aid diminishes, the size of the black dot on the rinse aid level indicator changes, as illustrated below. Full 3 / 4 full 1 / 2 full 1 / 4 full - Should refill to eliminate spotting Empty Your dishwasher has a 3 in 1 program which needs not salt and rinse aid but a THREE IN ONE tablet. And this dishwasher comes with a 3 in 1 tablet container as an accessory. NOTE: Only 3 in 1 program uses 3 in 1 tablet. If using 3 in 1 tablet in other programs, the appliance will not get a best performance.
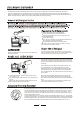
The upper rack is designed to hold more delicate and lighter dishware such as glasses, coffee and tea cup and saucers, as well as plates, small bowls and shallow pans(as long as they are not too dirty). Position the dishes and cookware so that they do not get moved by the spray of water. The upper rack can be adjusted for height by putting wheels of different height into the rails.
Silverware should be placed in the silverware basket with handles at the bottom: If the rack has side baskets, the spoon should be loaded individually into the appropriate slots, Especially long utensils should be placed in the horizontal position at the front of the upper rack.
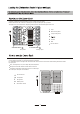
For your convenience, we have placed the drain pump and filtering system within easy reach inside the tub. There are three components of the filtering system: the main filter, the coarse filter, and the fine filter. 1 Main filter Food and soil particles trapped by this filter are pulverized by a special jet on the lower spray arm and washed down the drain. 2 Coarse filter Larger items, such as pieces of bone or glass, that could clog the drain are trapped in the coarse filter.
To clean the edge around the door, you should use only a soft warm, damp rag. To prevent penetration of water into the door lock and electrical components, do not use a spray cleaner of any kind. Also, never use abrasive cleaners or scouring pads on the outer surfaces because they will scratch the finish. Some papers towels can also scratch or leave marks on the surface. Never use a spray cleaner to clean the door panel for it could damage the door lock and electrical components.
The appliance must be connected to the water mains using new hose-sets. The old hose-sets should not be reused. Water pressure must be between 0,04 MPa and 1 MPa. If the pressure is below the minimum consult our Service Department for advice. 1 2 3 Pull The safety supply hoses completely out from storage compartment located at rear of dishwasher. Tighter the screws of the safety supply hose to the faucet with thread 3/4inch. Turn water fully on before starting the dishwasher.
Position the appliance in the desired location. The back should rest against the wall behind it, and the sides, along the adjacent cabinets or wall. The dishwasher is equipped with water supply and drain hoses that can be positioned to the right or the left to facilitate proper installation. Max 1000mm Min 400mm Insert the drain hose into a drain pipe with a minimum diameter of 40 mm, or let it run into the sink, making sure to avoid bending or crimping it.
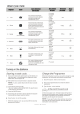
' ' Fuse blown, or the circuit breaker acted Replace fuse or reset circuit breaker. Remove any other appliances sharing the same circuit with the dishwasher Power supply is not turned on Make sure the dishwasher is turned on and the door is closed securely. Make sure the power cord is properly plugged into the wall socket. Water pressure is low Check that the water supply is connected properly and the water is turned on. Overflow The system is designed to detect an overflow.
Combination of soft water and too much detergent Use less detergent if you have soft water and select a shortest cycle to wash the glassware and to get them clean. Tea or coffee stains using a solution of 1/2 cup of bleach and 3 cups warm water to remove the stains by hand. You have to wait for 20 minutes after a cycle to let the heating elements cool down before cleaning interior; otherwise, burns will happen.
Baumatic Ltd. Conditions of Guarantee Dear Customer, Your new Baumatic appliance comes complete with a free 12 month guarantee covering both parts and labour costs resulting from defective materials or workmanship. Baumatic also gives you the opportunity to automatically extend the guarantee period for a further 12 months at no extra cost, giving an initial guarantee period of 24 months. The extended guarantee period applies to England, Scotland, Wales and Northern Ireland only.
36 Baumatic Ltd Make-up for your kitchen Headquarters Baumatic Ltd. Baumatic Buildings, 6 Bennet Road, Reading, Berkshire RG2 0QX, United Kingdom Sales Telephone +44 118 933 6900 Sales Fax +44 118 931 0035 Service Telephone +44 118 933 6911 Service Fax +44 118 986 9124 Spares Telephone +44 118 933 6922 Technical / Advice Telephone +44 118 933 6933 E-mail: sales@baumatic.co.uk technical@baumatic.co.uk Http (Internet site): www.baumatic.com Baumatic UK/cod.
23