BFW1210W Washing Machine
USER MANUAL FOR YOUR BAUMATIC BFW1210W Washing Machine You will be mine NOTE: This User Instruction Manual contains important information, including safety & installation points, which will enable you to get the most out of your appliance. Please keep it in a safe place so that it is easily available for future reference.
Contents page Environmental note 4 Important safety information 5-6 Specifications 7 Description of the appliance Control panel Program options Detergent drawer 8 9 10 11 Preparing the wash cycle Preparing your garments for washing A selection of wash care symbols Detergents and conditioners 12 12 13 14 Program table Wash program guidance Selecting a wash program At the end of the wash cycle Cancelling a wash program Changing a wash program Delay start feature Spin reduction button 15 16 17 17 18
ENVIRONMENTAL NOTE Note: Before discarding an old appliance, switch off and disconnect it from the power supply. Cut off and render any plug useless. Cut the cable off directly behind the appliance to prevent misuse. This should be undertaken by a competent person. Disable the door lock to make sure that children cannot get stuck inside the appliance.
IMPORTANT SAFETY INFORMATION Your safety is of the utmost importance to Baumatic. Please make sure that you read this instruction booklet before attempting to install or use the appliance. If you are unsure of any of the information contained in this booklet, please contact the Baumatic Technical Department. General Safety o Repairs to your appliance must only be carried out by a Baumatic engineer or one of its authorized service agents.
o Before the first use of the appliance, we advise that a 95 degree cotton wash is completed. No garments should be placed inside the machine; however a small amount of detergent must be used. During Use o It is recommended that the appliance is unplugged and the water supply is turned off after the machine is used. o This appliance is only designed to wash normal domestic washloads.
Specifications 9 15 wash programs 9 5.
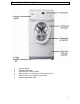
Description of the appliance 1 2 3 4 5 6 Control panel Detergent drawer Porthole door with handle Rating plate (on inside rim of porthole door) Flap in front of the drain pump filter Height adjustable feet 8
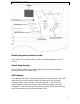
CONTROL PANEL Wash program selection knob This control knob allows you to select the wash program of your choice. Start/Stop button Once a wash program has been selected, this button should be pressed to start the wash cycle. LED display This display will show you approximately how long a wash cycle will take when you have picked a wash program with the program selection knob. Once a wash cycle has started, it will show you approximately how much time is left before the wash cycle will complete.
Program options ¾ These buttons need to be pressed after a wash program has been selected, but before the wash program has been started. Spin reduction You can reduce the spin speed from the one automatically selected by the machine for the wash program. Extra rinse The machine will add an additional rinse to the wash program that you have selected. Easy ironing Once the last spin has completed, the drum will move for several minutes. This should help to reduce creasing in the garments being washed.
Detergent drawer Pre wash section I This compartment should have detergent placed in, if you are going to select a wash program that has a pre wash as part of it. Conditioner section This compartment should be used for liquid conditioners (fabric softener, starch). They will be added to the wash load during the final rinse. Main wash section II This compartment should have detergent placed in it (you should also put a water softening agent in this section, if you use one).
Preparing the wash cycle Preparing your garments for washing o Your washing should be sorted out, according to the fabric type and the wash care symbol that is printed on the garment’s wash care label. (see separate section on wash care symbols). o Check all pockets on a garment to make sure that they are empty. o Remove any detachable metal items (badges, paperclips, safety pins etc). o Zips should be closed, duvet covers and pillow cases should be buttoned up and any loose straps should be tied up.
A selection of wash care symbols o The wash care symbols should be used to help you to select the most suitable wash program. They will also help you to sort your laundry into different loads, depending on the fabric type and the highest temperature which the garment can be washed at. o If the wash care label does not appear in the above table, then please refer to the washing machine program chart.
Detergents and conditioners The amount of detergent that you need to use in your appliance, will depend on o The degree of soiling. Lightly soiled garments in general require less detergent. o The size of the wash load. A smaller wash load will require a reduction in the amount of detergent. o The hardness of your tap water. The harder your water is, then the more detergent you will need to use.
Wash program guidance o A program option can only be selected if there is a tick next to the wash program in the program table. o If you use the “Rapid wash” and Extra rinse” program options simultaneously, then they will cancel each other out. o The washing machine automatically selects a spin speed for a particular wash program. However it is possible to reduce the spin speed by using the “Spin reduction button”.
Selecting a wash program 9 Load your laundry and put detergent in the relevant compartment of the soap drawer. 9 Close the porthole door firmly. 9 Turn the wash program selection knob to your desired wash cycle. o The LCD display will show the approximate time the chosen wash cycle will take to complete. 9 Select any relevant program options using the four buttons underneath the LED display. o Any program options that you select, will affect the length of time the wash cycle will take to complete.
Cancelling a wash program 9 To stop a wash program once a wash cycle is in progress, press the START/STOP button and keep it depressed until the READY END light comes on. o The LOCK DOOR light will remain on. A key symbol appear in the LCD display. will o After two minutes the LOCK DOOR light will go out and the key symbol will no longer appear on the LCD display. At this point it is possible for you to open the door and take out the washload.
Delay start feature Your appliance has a delay start feature, which allows you to pause the start of a wash cycle until a later time. 9 Follow the process listed under “Selecting a wash program” 9 After pressing the Start/Stop button, immediately press the Start/Stop button again. o The LCD display will show 3:00 (indicating that the wash cycle will start in three hours time). o If you hold down the Start/Stop button then the time delay will increase in one hour intervals (4H, 5H, 6H etc.).
Spin reduction button Your washing machine will automatically select an appropriate spin speed for each wash program. However it is possible to decrease the spin speed that it automatically selects, by pressing the spin reduction button. 9 Turn the wash program selection knob to the wash program that you want to use. 9 Press the spin reduction button and keep it held down until the LCD display shows the spin speed that you require.
Maintenance and cleaning In daily use 9 Once a wash cycle has completed, you should pull out the detergent drawer slightly, so it can dry out. 9 Leave the porthole door ajar for a short while after a wash cycle has completed. This should help to prevent stagnant smells and to protect the door seal. 9 Close the water tap. 9 We suggest that you disconnect the appliance from your mains supply, when it is not in use.
The washing machine drum The drum of your washing machine is constructed from stainless steel. However if there are objects that can rust placed inside the drum, then it is possible for the drum to become stained. IMPORTANT: Do not use a descaling agent, iron/steel wool or scouring agents to clean the drum of your appliance. 9 Remove any rust stains on the drum with an appropriate stainless steel cleaning agent.
Error code failure system If your appliance senses that it is not operating correctly, then an error code may appear in the LCD display. The following error codes can possibly be remedied by the customer and the steps outlined below should be followed. BEFORE COMPLETING ANY MAINTAINEANCE ON THE APPLIANCE, IT SHOULD BE DISCONNECTED FROM YOUR MAINS POWER SUPPLY. NO DISPLAY o Power failure. 9 Check that the power plug is in the mains socket correctly. 9 Check the mains fuse. E01 o The door is not closed.
E09 o The appliance has recognised a foam surplus, therefore the wash cycle completes without spinning. 9 To get the soap suds out of the clothes, the rinses and conditioning program should be selected. Do not put any detergent in the machine for this wash cycle. Once the machine has been plugged back into your mains power supply, to clear the fault code from the LCD display, you should turn on the machine and hold down the Start/Stop button for approximately 5 seconds.
General troubleshooting Water under the washing machine 9 Tighten the drain pump filter. 9 Check the drain and inlet hose and make sure that it is fully tightened. Washing machine vibrates during the spin cycle 9 Check that the transport locking devices have been removed (see installation instructions). 9 Make sure that the washing machine is installed on a flat and level floor.
Poor wash results My garments are looking grey and there are limescale deposits present in the drum of my washing machine. o There is not enough detergent being added. o The incorrect detergent is being used. o Stains are not being pre-treated. o The correct wash program or wash temperature was not selected. I have followed the advice given above, but my garments are still coming out with grey stains on them. o The garments are soiled with oils, ointments or grease and were washed without enough detergent.
Cleaning the drain pump filter IMPORTANT: Switch off your washing machine and disconnect the plug from your mains supply. You should clean out the filter approximately every twenty washes. If the drain pump filter is not cleaned regularly, then your appliance may find it difficult to pump out water efficiently.
Installation IMPORTANT: THIS INSTALLATION MUST BE COMPLETED BY A SUITABLY QUALIFIED PERSON. BAUMATIC ONLY SANCTION THE INSTALLATION GIVEN IN THIS INSTRUCTION MANUAL. YOU SHOULD KEEP THE TRANSIT PACKAGING, IN CASE YOU NEED TO TRANSPORT THE MACHINE IN THE FUTURE. Removing the transit bolts 9 Using a screwdriver, unscrew and remove the 4 outer screws (a) that are securing the transit support bar to the machine.
Positioning and leveling the appliance 9 Place the washing machine on a solid and level floor surface. 9 DO NOT PLACE THE WASHING MACHINE ON A CARPET. 9 Slacken off the lock nut on each of the washing machine feet using a spanner. 9 Adjust the feet to level off the washing machine. 9 Tighten up the lock nut on each of the washing machine feet using a spanner. IMPORTANT: When the washing machine is positioned in the location where it will be used.
Water supply 9 Connect and fully tighten the inlet hose to the top right hand corner of the washing machine. 9 Connect the other end of the inlet hose to your mains water supply 9 IMPORTANT: There should be a filter sitting inside the end of the inlet hose that connects to your mains water supply. The inlet hose may leak if this filter is missing. This filter is supplied with the appliance, you should contact Baumatic to obtain one, if it is missing.
Power supply 9 The moulded plug that is supplied with the appliance, must be placed into an earthed and insulated socket. 9 Broken power leads must only be replaced by a suitably qualified person. 9 Power lead type – H 0 V V – F 3G 1,5. 9 IMPORTANT: We do not recommend that this appliance is connected to an extension lead.
Baumatic Ltd. Conditions of Guarantee Dear Customer, Your new Baumatic appliance comes complete with a free 12 month guarantee covering both parts and labour costs resulting from defective materials or workmanship. Baumatic also gives you the opportunity to automatically extend the guarantee period for a further 12 months at no extra cost, giving an initial guarantee period of 24 months. The extended guarantee period applies to England, Scotland, Wales and Northern Ireland only.
Baumatic Ltd You will be mine Headquarters Baumatic Ltd. Baumatic Buildings, 6 Bennet Road, Reading, Berkshire RG2 0QX, United Kingdom Sales Telephone +44 118 933 6900 Sales Fax +44 118 931 0035 Service Telephone +44 118 933 6911 Service Fax +44 118 986 9124 Spares Telephone +44 118 933 6922 Technical / Advice Telephone +44 118 933 6933 E-mail: sales@baumatic.co.uk technical@baumatic.co.uk Http (Internet site): www.baumatic.