BT2385SS Cooker
Notice d'utilisation DD 08/09/2006 3
Freestanding electric cooker Dear Customer! Congratulations on your purchase. See for yourself: our products read reliability. These ample instructions have been compiled in order to help you learn how to handle the appliance. They will show you step by step what your appliance is capable of, so please read them carefully before you attempt to use your cooker for the first time. Safety warnings are listed on page 4. The first thing to do is to check if your appliance has arrived undamaged.
Safety precautions • To avoid any possible hazard, the appliance may be installed by qualified personnel only. • Any repairs by unqualified persons may result in electric shock or short circuit. In order to avoid possible injuries to your body or to the appliance, do not attempt any repairs by yourself. Such work should be carried out by qualified service personnel. • Hot grease is highly inflammable, so pay extra attention when preparing food with grease or oil.
Intended use Cooker cover This appliance is intended for use in your household. Never use the appliance for any other purpose! These instructions describe in detail all the particulars and possibilities of its use. (certain models only) The cooker cover may be coated, or made of stainless steel or glass, and may be closed only after all the hotplates are completely cooled down.
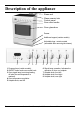
Description of the appliance Steam exit Glass ceramic hob Control panel Oven door handle Oven glass door Drawer Additional support (certain models) Adjustable legs - certain models (accessible after removing the drawer) 1 2 3 4 1 Program timer (certain models). 2 ON/OFF button and oven control knob. 3 Oven signal lamp (on during heating, off when the set temperature is reached). 4 Oven temperature regulation 5 Hotplate knob, rear left. 6 5 6 7 8 9 6 Signal lamp, operation.
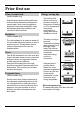
Prior first use Glass ceramic hob Energy saving tips (certain models only) Wipe the glass ceramic surface with moist cloth and some dishwashing detergent for manual wash. Never use any aggressive detergents, like powder detergents, rough dish sponges producing scratches, rust removers or stain removers. Hotplates The bottom of the dish is too thin and becomes crooked in the process of heating up. The consequence is excessive consumption of energy and uneven distribution of heat.
Tips for purchasing crockery • Good quality dishes feature thick flat bottom. Uneven bottom of the dish causes increased consumption of energy and extended cooking time. • When purchasing new crockery carefully check if the diameter quoted refers to the upper rim or the bottom. The latter is usually always smaller. • Use of pressure cookers additionally saves energy, since food is prepared in a closed dish and under pressure. Furthermore, shorter cooking time preserves the vitamin contents.
Hotplates Important warnings! • Never switch on empty hotplates, without dishes, and never use hotplates for heating the ambience! • Keep the hotplates and the cookware clean, because dirt may affect your cooking results. • Hot oil or grease is highly inflammable, so the preparation of food with large quantities of oil (chips) should be under constant surveillance at all times. Special warning for hotplates (certain models only) • Never place wet dishes or steaming lids upon the hotplate.
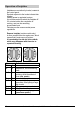
Operation of hotplates Hotplates are controlled by knobs, located at the control panel. Symbols adjacent to the knobs indicate their location. Heating power is regulated in steps. It is recommended to switch the hotplate off 3-5 minutes before the completion of cooking, and use the remaining accumulated heat. Following are the recommended power regulations. Express hotplate (certain models only) is more powerful than the regular one, which means that it heats up much quicker.
Hotplates Controlling the operation of a three ring hotplate Three ring hotplate offers the possibility to adapt the heating surface to the size and the shape of the cooking dish. The hotplate is switched on/off by the relevant control knob. • Central ring is switched on by turning the knob to the position of the double ring symbol . Then select the desired heating power. • The largest, third ring is switched on by turning the relevant hotplate knob all the way (see symbol ; a click is heard).
Oven Important warnings! • Never put aluminum foil to the bottom of the oven, and do not place any crockery upon it. The oven enamel may be damaged by the excessive heat. • Fruit juice, dripping from the baking pan, may produce stains upon the enamel, which are very hard to remove. Operation Oven is controlled by the function knob and the temperature selection knob.
Grill with ventilator Defrosting Infrared heater and ventilator operate simultaneously. This mode is appropriate for roasting and grill of larger chunks of meat or poultry at one level. It may also be used to obtain crisp skin on your roast. This is the mode with air, circulating without any of the heaters being turned on. It is used for slow defrosting of food. Lower heater and ventilator Both the lower heater and hot air ventilator are in operation. This mode is most appropriate for baking pizza.
Oven guide levels Telescopic slide guides Baking pans and accessories (oven grid, grease receptacle, baking tray, etc.) may be inserted into the oven in 5 guiding levels. Appropriate levels are indicated in the tables that follow. Always count levels from the bottom upwards! Guides may be of three types, depending on the model. Telescopic guides are inserted in nd rd th the 2 , 3 and 5 level. In case of wire guides, the grid and the baking pans must always be inserted in the guide slides.
Baking pastry Most appropriate position for baking is the application of both upper and lower heater, or the hot air. Note! Grease filter must always be removed! Warnings • When baking pastry, strictly follow the instructions regarding the selection of guide level, temperature and baking time, and do not rely on any previous experience, because information indicated in the baking tables have been determined and tested specially for this particular type of oven.
Pastry Baking Table Type of pastry Sweet pastry Raisin cake Ring cake Tree cake (tart form) Cheese cake (tart form) Fruit cake Fruit cake with icing Sponge cake* Flake cake Fruit cake, mix dough Cherrycake Jelly roll* Fruit flan Plait bun Cristmass cake Apple pie Puff paste Salted pastry Bacon roll Pizza* Bread Rolls* Cookies Caraway roll Biscuits Danish pastry Flaky pastry Cream puff Deep frozen pastry Apple pie, cheese pie Cheese cake Pizza Chips for oven* Potato fries for oven 16 Guide level (from dow
Roasting Best results are obtained with the engagement of both upper and lower, or with hot air. Best heating mode for each type of roasting pan is indicated by bold print in the Roasting Tables. Note! When roasting always insert the grease filter! • When roasting on the grill grid, place the grid in the deep roasting pan and insert both into the sliding guide. The bottom pan will intercept dripping fat. • Never leave roast to cool in the oven, as it might produce dew and corrosion of the oven.
Roasting Table Type of meat Beef Beef loin Beef loin Roastbeef, rare Roastbeef, well done Pork Pork roast with skin Flank Flank Pork loin Meat roll Pork cutlet Minced meat roast Veal Veal roll Veal knuckle Lamb Lamb prime ribs Mutton bladebone Venison Hare ribs Hare bladebone Boar ham Poultry Chicken, entire Hen Duck Goose Turkey Fish Fish, entire Fish souffle 18 Weight (in grams) Guide level (from bottom up) Temp. (°C) Roasting time (in min.) Temp. (°C) Roasting time (in min.
Grilling and browning (barbecue) • Take extra precautions when grilling. Intensive heat from infrared heater makes the oven and the accessories extremely hot. Use protective gloves and barbecue accessories! • Perforated roast may produce spurting of hot grease (sausages). Use long grill tongs to prevent skin burns and protect your eyes. • Supervise the grill at all times. Excessive heat may quickly burn your roast and provoke fire! • Do not let the children in the vicinity of the grill.
Grill table Type of meat for grill Meat and sausages 2 beefsteaks, rare 2 beefsteaks, medium 2 beefsteaks, well done 2 pork scrag fillets 2 pork chops 2 veal staeks 4 lamb cutlets 4 grill sausages 2 slices of meat cheese 1 chicken, halved Fish Salmon fillets Fish in aluminium foil Toast 4 slices of white bread 2 slices of wholemeal Toast sandwich Meat/poultry Duck Chicken Pork roast Pork scrag Pork knuckle Roastbeef/beef fillet 20 Weight (in grams) Guide level (from bottom up) Temp. (°C) Temp.
Preserving of fruit and vegetables Use the bottom heater mode together with . the fan • Prepare food for preserving and the jars in a usual manner Use the conventional jars with glass cover and rubber gasket. Never use jars with threaded or tin covers, or tins. Jars should be of the same size, filled with the same type of food and well tightened. You may place up to six oneliter jars. • Use only fresh groceries. • Pour around one liter of water into the deep roasting pan, to produce the required humidity.
Cleaning and maintenance Never clean the appliance with pressurized hot steam cleaner! Before cleaning switch the cooker off and let it cool down completely. Front side of the casing For cleaning of frontal part of the cooker use the usual cleaning agents and follow the manufacturer's instructions. Never use any aggressive cleaning agents or dish cleaning accessories which might cause scratches.
cleaning agents, so you may repeat the cleaning procedure several times. Use of aggressive cleaners and rough dish bottoms produces abrasion and black smudges upon the surface. Oven The oven may be cleaned in a traditional mode (using oven cleaners and sprays). The following procedure is recommended for regular cleaning of the oven (after each use): Turn the mode selection button to the position . Set the temperature control button of the cold oven to 50°C.
Removing wire and telescopic guide grids Telescopic guide grids or wire guides may be removed to facilitate the cleaning of the oven. Side grids are removed by swinging the bottom side inwards and unhooking them from their place. Clean the side grids and telescopic guides only with conventional detergents. Telescopic guides may not be washed in a dishwasher. Note! Never lubricate the telescopic guides! To reinsert, repeat the procedure backwards: slide them into the holes and swing downwards.
Removing oven door with a single axe hinge (certain models only) Open the door completely and turn the removable locks backwards (see fig). Then close the door slowly and let the locks fit to the notches. At an angle of about 15° lift the door slightly up and pull the door from the hinge supports (fig. 2). For reinserting the door repeat the procedure backwards. Insert the door at an angle of about 15° into the hinge supports by pushing them forward and downwards, so the hinges lock into their slots (fig.
Troubleshooting guide Any unskilled attempt to repair the appliance is extremely dangerous as it might cause electric shock and short circuit. To avoid such injuries any repairs may be performed only by qualified personnel, or after sales service. However, there are some minor faults which may be easily removed by the user, in accordance with the instructions that follow. Important! • is the mains power fuse burned? • is the temperature regulator properly set? Fuses often burn out...
Replacement of parts The oven light bulb casing is under tension. Danger of electric shock! Before replacing the oven bulb switch off the cooker and cut it from mains by removing the mains power fuse or disconnect the protective device. Remember that the bulb is regarded as consumption material and is not covered by the warranty. Other accessories Oven grid, biscuit tray, etc. may be ordered from the service center. When ordering please quote the code and the type or model of the appliance.
Instructions for installation and connection Safety precautions for the technician Anti Tilt Bracket • Installation may be carried out only by qualified personnel. • The electric installation shall be equipped with a safety device, able to disconnect the appliance from mains in all wires, with the distance between contacts of not less than 3 mm in open position. Good protection is provided by the LS-switches and/or fuses.
Leveling the appliance and extra support (certain models only) The height of the cooker with the support is 90 cm, and without support it is 85 cm. Left and right side of the support is equipped with two wheels to facilitate relocation. In the front part, on both sides there are two adjustable screws, used to level the cooker and adjust its upper edge in line with the adjacent kitchen furniture. Adjustable legs are accessible when the drawer is pulled out.
Electric connection Electric connection may be carried out by qualified service personnel only! Wrong connection may permanently damage parts of the appliance and render your warranty void! Mains voltage of the user (230 V) must be verified with the measuring device! Three separating switches should be placed in accordance with the mains connection. • Before attempting the connection, check whether the voltage indicated on the rating plate corresponds to the actual mains voltage.
Technical information Type-model Dimensions (heigh/width/depth) cm BT2385SS 85/60/60 oder 90/85-60/60 Hotplate (Ø cm/kW) HL = HI-Light heater B = fast hotplate N = normal hotplate Rear left Front left Front right Rear right Oven Tenperature regulator/ function mode switch Guide levels (telescopic guides in 3 levels-only certain models) Top/bottom heater (kW) Infrared heater/ Infrared heater with fan (kW) Oven illumination top/side (W) Function modes Top/bottom heater (kW) Infrared heater (kW) Infrared h
After sale service Repairs If you find your cooker malfunctioning and requiring repair, contact our nearest service center and quote the code and the type or model of the appliance. Attached is the list of service centers with addresses and phone numbers. Important! Before contacting the service center, check if you can repair the malfunction, using the instructions from the Troubleshooting guide section.
Baumatic Ltd. Conditions of Guarantee Dear Customer, Your new Baumatic appliance comes complete with a free 12 month guarantee covering both parts and labour costs resulting from defective materials or workmanship. Baumatic also gives you the opportunity to automatically extend the guarantee period for a further 12 months at no extra cost, giving an initial guarantee period of 24 months. The extended guarantee period applies to England, Scotland, Wales and Northern Ireland only.
− Filters, fuses, light bulbs, external hoses, damage to bodywork, paintwork, plastic items, covers, baskets, trays, shelves, burner bases, burner caps, decals, corrosion, rubber seals. In the course of the work carried out it may be necessary to remove the appliance from it operating position. Whilst all reasonable care will be taken, Baumatic Ltd cannot accept responsibility for damage sustained to any property whatsoever in this process.
Notice d'utilisation 3
143003/en (08-06) 36 Instructions for use, installation and connection
Notice d'utilisation 3
19