BTM25.
User Manual for your Baumatic BTM25.7SS 25 Litre combination microwave oven with grill NOTE: This User Instruction Manual contains important information, including safety & installation points, which will enable you to get the most out of your appliance. Please keep it in a safe place so that it is easily available for future reference; for you or any person not familiar with the operation of the appliance.
Contents Environmental note 4 Important safety information 5–8 Specifications Product dimensions Product specifications Electrical details Description of the appliance Control panel The turntable LED display 9 – 13 9 9 9 10 - 11 11 12 12 - 13 Using your microwave Setting the clock Before first use Microwave cooking Microwave power level chart Time setting chart Quick start function Convection / Combination cooking Convection / Combination chart Convection cooking table Grill / Combination cooking Gril
Environmental note o The packaging materials that Baumatic uses are environmentally friendly and can be recycled. o Please discard all packaging material with due regard for the environment.
IMPORTANT SAFETY INFORMATION Your safety is of the utmost importance to Baumatic. Please make sure that you read this instruction booklet before attempting to install or use the appliance. If you are unsure of any of the information contained in this booklet, please contact the Baumatic Customer Care Department. General Information o This appliance is designed for domestic household use. It can NOT be used as a built in microwave and must be freestanding.
o Any damage caused by the appliance being installed in contravention of this temperature limit, or by placing adjacent cabinet materials closer than 4mm to the appliance, will be the liability of the owner. o For use in leisure accommodation vehicles, please refer to the appropriate information given in the installation instructions for this appliance. o The use of this appliance for any other purpose or in any other environment without the express agreement of Baumatic Ltd.
o DO NOT switch the appliance on if there is no food or liquid inside of the microwave. If you run the microwave whilst it is empty, there is a chance that it will overload. o The door seals and the door surfaces should ALWAYS be kept clean and free from debris. Child Safety o Baumatic strongly recommend that babies and young children are prevented from being near to the appliance and not allowed to touch the appliance at any time.
Cleaning o Cleaning of the oven should be carried out on a regular basis. o Great care should be taken whilst using this appliance and when following the cleaning procedure. o IMPORTANT: The appliance must be disconnected from the mains before following the cleaning procedure. Installation This appliance must be correctly installed by a suitably qualified person, strictly in accordance with the manufacturer’s instructions. o Baumatic Ltd.
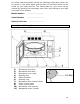
Specifications Product dimensions Height: Width: Depth: 303 mm 509 mm 472 mm Product specifications 8 functions: o o o o o o o o o o o o Rice / Pasta Fresh vegetables Frozen vegetables Popcorn Beverages Potatoes Pizza Fish 5 power levels LED full programmer with temperature and function display Pushbutton operation Internal light Quick start function Safety lock Stainless steel interior Defrost by weight Capacity: 25 litres Microwave output: 900 W Grill output: 1000 W Hot air output: 1300 W Standard a
For future reference please record the following information which can be found on the rating plate and the date of purchase which can be found on your sales invoice. The rating plate for your oven can be located by opening the microwave oven door and looking on the right hand side of the chassis. Model Number ………………………………. Serial Number ………………………………. Date of Purchase ……………………………….
IMPORTANT: You should NEVER remove the waveguide cover. Control panel 1) 2) 3) 4) 5) 6) 7) 8) Instant Start button Stop.Clear button Preset.clock button Convection combi / grill combi button Microwave power button Auto cooking button Auto defrost button Weight.Time.
The turntable o Never place the glass tray upside down. o The glass tray and turntable ring assembly MUST always be used during cooking. o All food and food containers must ALWAYS be placed on the glass tray during cooking. o If the glass tray or turntable ring assembly cracks or breaks, it must be replaced immediately. Genuine Baumatic parts can be obtained from the Baumatic Spares Department.
Indicates which oven temperature has been selected WARNING: The accessible surface may be hot during operation and for a period of time afterwards. Using your microwave Setting the clock o When your appliance is connected to the power supply for the first time, the " : " on the LED display will flash. o Press the Preset.Clock button (3) once. o Use the Auto Defrost button (7) or Weight.Time.Temp button (8) to set the correct hour. o Press the Preset.Clock button (3) again to confirm.
Microwave cooking o Use the door release button to open the door of the microwave. o Check that the turntable shaft, turntable ring assembly and glass tray are correctly assembled in the cavity. o Place whatever you are cooking in the centre of the microwave cavity. o Press the Stop.Clear button (2) once when the colon flashes on the LED display. o Select the required microwave power by pressing the microwave power button (5) repeatedly. o You can then set the desired cooking time by pressing the Weight.
Microwave power level chart Power level 100P High power 100% microwave power 80P Medium high power 80% microwave power 60P Medium power 60% microwave power 40P Medium low power 40% microwave power 20P Low power 20% microwave power Suggested use For quick and thorough cooking such as meat and vegetables. For medium express cooking, such as eggs, fish, rice and soup. For steaming food. For defrosting food. For keeping food warm.
Quick Start cooking function. The Quick Start function allows the user to heat food instantly, without using preset conditions. This function will cook whatever is placed inside the oven on full power for as long as specified. o Use the door release button to open the door of the microwave. Check that the turntable shaft, turntable ring assembly and glass tray are correctly assembled in the cavity. o Place whatever you are cooking in the centre of the microwave cavity. o Press the Stop.
o Press the Instant Start button (1) to confirm. o Set the required cooking time or preheating time. In most cases the oven has to be preheated for about 15 minutes before placing food in the microwave in order to achieve best results. Use the Weight.Time.Temp button (8) to decrease and the Auto Cooking button (6) to increase the cooking time. IMPORTANT: Preheating is not recommended in combination programs. You should only preheat when using convection only.
Convection / Combination chart Cooking Program C C1 C2 Description Convection – The convection elements will be utilised during operation time. In this mode, hot air is circulated throughout the microwave cavity to brown and crisp foods quickly and evenly. Combination of convection and microwave cooking – The combination of these 2 methods produces juicy meats, as well as tender poultry with the right level of browning and crispness. Meats and poultry are best when cooked directly on the rack.
o You can then set the desired cooking time by pressing the Weight.Time.Temp button (8) to decrease and the Auto Cooking button (6) to increase. o Close the microwave oven door and press the Instant Start button (1) to begin cooking. The LED display will count down to show the remaining cooking time. IMPORTANT: It is not necessary to preheat the oven for grill cooking. o If you turn the food during the cooking process, press the door release button to access the food.
Auto defrost o Use the door release button to open the door of the microwave. o Check that the turntable shaft, turntable ring assembly and glass tray are correctly assembled in the cavity. o Place whatever you are defrosting in the centre of the microwave cavity. o Press the Stop.Clear button (2) once when the colon flashes on the LED display. o Select the required defrost function by pressing the Auto Defrost button (7). o Press the Instant Start button (1) to confirm.
Defrost program chart Defrost program D1 D2 D3 2.0, 1.0, 0.5, 3.0, 2.0, 1.0, 0.9, 0.4, Weight options (kg) 1.8, 1.6, 1.4, 1.2, 0.9, 0.8, 0.7, 0.6, 0.4, 0.3, 0.2, 0.1 2.8, 2.6, 2.4, 2.2, 1.8, 1.6, 1.4, 1.2, 0.8, 0.6, 0.4, 0.2 0.8, 0.7, 0.6, 0.5, 0.3, 0.2, 0.1 Suggested use For defrosting meat with a weight range between 0.1 kg and 2.0 kg. For defrosting poultry with a weight range between 0.2 kg to 3.0 kg. For defrosting seafood with a weight range between 0.1 kg to 0.9 kg.
o o Press the Instant Start button to continue defrosting. After the defrost time, stand the food covered with aluminium foil for 5-30 minutes. Auto Cooking The oven has a default cooking menu for simple operation. You should choose the appropriate menu according to the food type and weight. Please refer to the table below when making your selection as choosing the incorrect menu can largely influence the result. o Use the door release button to open the door of the microwave.
Auto cooking chart Display Category o o Rice / Pasta o o o o Fresh vegetables o Frozen vegetables o o Popcorn o Beverage o Potato o Pizza o o Fish o Directions Wash the rice or pasta and soak for 30 minutes. Place the rice or pasta in a deep and large bowl. For 100g of rice use 180ml water, for 200g use 330ml, for 300g use 480ml and cover the bowl. For 100g of pasta, use 300ml water, for 200g use 600ml, for 300g use 900mil and do not cover.
Delay start function If you do not wish for the cooking process to be started immediately, you can preset the cooking function and time and the microwave will begin at your set time. o Use the door release button to open the door of the microwave. o Check that the turntable shaft, turntable ring assembly and glass tray are correctly assembled in the cavity. o Place whatever you are cooking in the centre of the microwave cavity. o Press the Stop.
o IMPORTANT: The inside of the microwave and the food that you have been cooking may be extremely hot. So care should be taken when removing items from the microwave. We would recommend that you use an oven glove. o After the food has been removed from the microwave, you should make sure that the door is closed. Multi-sequence cooking To obtain the best cooking result, some recipes require different cooking functions and times. You can program the microwave to follow one program after another.
o If you wish to remove the food before the preset time, you must press the Stop.Clear button (2) once to clear the preset program to avoid unintended operation during next use. o At the end of the cooking time, the LED display will show “End” and 3 beeps will sound to prompt you to remove the food from the microwave. If you do not press the Stop.Clear button (2) once or open the door, the beep will sound every 3 minutes.
o When heating baby food, the bottle or jar containing the food should NEVER have a top or lid on. After cooking, to ensure that the food has been heated uniformly, you should stir or shake the food. IMPORTANT: You must check the temperature of the food before feeding it to a child. o When heating food in a microwave, it will transmit the heat to the container that the food is in or on. You should ALWAYS use oven gloves when removing items from the microwave.
Glassware Oven cooking bags Paper plates and cups Paper towels Parchment paper Heat-resistant oven glassware only. Make sure there is no metallic trim. Do not use cracked or chipped dishes. Follow the manufacturer’s instructions. Do not close with a metal tie. Make slits in the bag to allow steam to escape. Use for short-term cooking/warming only. Do not leave the oven unattended whilst cooking. Use to cover food for reheating and absorbing fat. Use under supervision and for short-term cooking only.
Utensils table Cookware Heat-resistant glass Non heatresistant glass Heat-resistant ceramics Microwave-safe plastic dish Kitchen paper Metal tray Metal rack Aluminium foil and foil containers Microwave Yes Grill Yes Combination* Yes No No No Yes Yes Yes Yes No No Yes No No No No Yes Yes Yes No No No No * Combination mode applies to microwave + grill and microwave + convection modes. Cleaning and maintenance Cleaning operations must only be carried out when the oven is cool.
o DO NOT use abrasive cleaners or sharp objects to clean the inside of the microwave. Turntable and turntable support o The glass tray and turntable ring assembly should be removed from the microwave for cleaning purposes after each use. o Clean the glass tray and turntable ring assembly in warm water mixed with a little washing up liquid. General cleaning advice o IMPORTANT: Any condensation should be wiped up with a soft cloth as soon as you have finished using the microwave.
Installation The installation must be carried out by a suitably qualified person, in accordance with the current version of the following. o UK Regulations and Safety Standards or their European Norm Replacements. o Building Regulations (issued by the Department of the Environment). o Building Standards (issued by the Scottish Development Department). o IEE Wiring Regulations. o Electricity At Work Regulations. Electrical connection YOUR MICROWAVE IS INTENDED FOR FITTED AND PERMANENT INSTALLATION.
o As the colours of the wires in the appliance’s mains lead may not correspond with the coloured markings identifying the terminals in your spur box, please proceed as follows: The brown wire must be connected to the terminal marked “L” (live), or coloured red. The blue wire must be connected to the terminal marked “N” (neutral), or coloured black. The green and yellow wire must be connected to the terminal marked “E” (earth), or by the earth symbol, or coloured green and yellow.
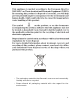
Fitting the distance limiter IMPORTANT: The distance limiter MUST be fitted to the appliance, to prevent it from being pushed up against the wall surface behind it. o Push the distance limiter in the direction shown in the diagram above. o Ensure that Clamp A is secured to Hole A. o Insert Clamp B and Clamp C into their respective square holes.
Troubleshooting o The microwave will not switch on. * Check that the appliance has been connected to the mains supply correctly. * Check that the fuse in the moulded plug has not blown. * Check that the fuses in your fuse box have not blown. * If fuses blow on a regular basis, then we would recommend that you consult with a qualified electrician. * Check that there has not been a power cut. o The microwave will not start cooking. * Check that the door is properly shut.
o I am getting condensation in my oven * Steam and condensation are a natural by product of cooking in a microwave. * Do not leave food in the oven to cool after it has been cooked and the oven has been switched off. * Use a covered container, where practical, when cooking to reduce the amount of condensation that forms. * You should wipe over any condensation that has formed, as soon as the food has stopped cooking.
Baumatic consumables o BC001 Degreaser for Dishwashers (200g) o BC002 Descaler for Washing Machines and Dishwashers (200g) o BC003 Ceramic Hob Cleaner (250ml) o BC004 Oven Cleaner (250ml) o BC005 Stainless Steel Cleaner and Protector (250ml) o BC007 E-Cloth – General Purpose Cloth o BC008 Microwave Cover To order a Baumatic consumable product please call 0123 5437 244 and quote the product code. You can also order online from eshop.baumatic.co.
United Kingdom Baumatic Ltd., Baumatic Buildings, 6 Bennet Road, Reading, Berkshire RG2 0QX United Kingdom Sales Telephone (0118) 933 6900 Sales Fax (0118) 931 0035 Customer Care Telephone (0118) 933 6911 Customer Care Fax (0118) 986 9124 Spares Telephone (01235) 437244 Advice Line Telephone (0118) 933 6933 E-mail: sales@baumatic.co.uk customercare@baumatic.co.uk spares@baumatic.co.uk technical@baumatic.co.uk Website: www.baumatic.co.uk Facebook: www.facebook.com/baumatic.