PCE9220SS 90cm Multi-function twin cavity cooking theatre y 1
User Manual for your Baumatic PCE9220SS 90 cm Multi-function twin cavity cooking theatre NOTE: This User Instruction Manual contains important information, including safety & installation points, which will enable you to get the most out of your appliance. Please keep it in a safe place so that it is easily available for future reference; for you or any person not familiar with the operation of the appliance.
Contents Environmental note 4 Important safety information 5–9 Specifications Thermostat control knob (main oven) Oven function selector knob (main oven) Oven function and thermostat control knob (secondary oven) Oven programmer/timer Oven programmer/timer display 9 – 10 11 11 11 12 12 Setting and using the oven programmer/timer Selecting manual operation mode Setting the time of day Setting the minute minder function Setting the duration function Setting the end cook function Setting the start and en
Environmental note o The packaging materials that Baumatic uses are environmentally friendly and can be recycled. o Please discard all packaging material with due regard for the environment.
Important safety information Your safety is of the utmost importance to Baumatic. Please make sure that you read this instruction booklet before attempting to install or use the appliance. If you are unsure of any of the information contained in this booklet, please contact the Baumatic Technical Department. General Information o This appliance is designed for domestic household use and for the cooking of domestic foodstuffs.
Warning and safety instructions o This appliance complies with all current European safety legislation. Baumatic do wish to emphasise that this compliance does not remove the fact that the appliance surfaces will become hot during use and retain heat after operation. Child Safety o Baumatic strongly recommend that babies and young children are prevented from being near to the appliance and not allowed to touch the appliance at any time. During and after use, all surfaces will become hot.
o Do not place heavy objects on the oven door or lean on the oven door when it is open, as this can cause damage to the oven door hinges. Nobody should be allowed to sit or stand on any part of the cooker. o Do not store chemicals, food stuffs, pressurised containers in or on the cooker or in cabinets immediately above or next to the cooker. o Do not heat up unopened food containers, as pressure can build up which may cause the container to burst.
o Do not attempt to lift or move cooking appliances by using the oven door or handle, as this may cause damage to the appliance or result in injury to the person lifting the appliance. Cleaning o Cleaning of the oven should be carried out on a regular basis. o Great care should be taken whilst using this appliance and when following the cleaning procedure. o IMPORTANT: The appliance must be disconnected from the mains before following the cleaning procedure.
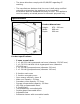
o The above directives comply with 93/68/EEC regarding CE marking. o The manufacturer declares that the oven is built using certified materials and requires the appliance to be installed in accordance with the standards currently in force. This appliance must be used by a trained person for domestic purposes only. Specifications Product dimensions: Height: Width: Depth: 870 - 920 mm 898 mm 600 mm Product specifications: o 5 zone ceramic hob: o 1 x 1.40/2.
Standard accessories: o o o o Removable side racks 3 x Safety shelves 2 x Enamelled drip trays without handle 2 x Trivet Optional extras: o BPS1 Pizza stone Electrical details Rated Voltage: Supply Connection: Max Rated Inputs: Mains Supply Lead: Oven Light Bulb: 230 Vac 50 Hz 32 A (double pole switched fused outlet with 3mm contact gap) 12.
Control Panel Thermostat control knob (main oven) o Use this control knob to control the temperature in the oven. Oven function selector knob (main oven) o Use this control knob to select the oven function and turn on the oven light in the main oven. Oven function and thermostat control knob (secondary oven) o Use this control knob to select the oven function and turn on the oven light in the secondary oven.
Oven programmer/timer Oven programmer/timer display 7) 8) 9) “Auto” function symbol “Minute minder” symbol “Manual operation” symbol. Setting and using the oven programmer/timer Selecting manual operation mode After your appliance is connected to your mains supply for the first time, the numbers on the timer display will flash. Before you can select a cooking function or set a temperature, you must set the appliance into “manual operation” mode.
Setting the minute minder function (main and secondary oven) You are able to set the minute minder at any time, regardless of whether an oven function has been selected. You can set a period of time using the minute minder function and an alarm will sound when this period of time has elapsed. o Press the “minute minder” button (1), the display will show a value of 00:00. Set the period of time that you wish the minute minder to countdown for, by using the “minus” (5) and “plus” (6) buttons.
Setting the duration function (main oven only) This function will allow you to set a countdown time similar to the minute minder function. However the oven will no longer continue to heat, once the countdown period has elapsed. o Use the thermostat control knob to set the temperature that you require. The manual operation symbol (9) will appear on the display. o Use the oven function selector knob to select the mode of cooking that you require.
Setting the end cook function (main oven only) This function is similar to the duration function, however instead of selecting a period of time that you wish the oven to switch off after. You select the time of day that you wish the oven to switch off at. o Use the thermostat control knob to set the temperature that you require. The manual operation symbol (9) will appear on the display. o Use the oven function selector knob to select the mode of cooking that you require.
Setting the start and end time function (main oven only) This function will allow you to set a time in the future that the oven switches on at and a time that the oven will switch off at. o Use the thermostat control knob to set the temperature that you require. The manual operation symbol (9) will appear on the display. o Use the oven function selector knob to select the mode of cooking that you require. o Press the “duration” button (2) and the display will show a value of 00:00.
Selecting a cooking function and temperature Selecting manual operation mode After your appliance is connected to your mains supply for the first time, the numbers on the timer display will flash. Before you can select a cooking function or set a temperature, you must set the appliance into “manual operation” mode. o To select manual operation mode, press the “manual operation” button (4) on the control panel.
There are eight cooking functions available on your appliance: OVEN LIGHT: Separate light control which allows the light to be switched on, even when the oven is not heating. DEFROST MODE: The fan runs without heat to reduce the defrosting time of frozen foods. The time required to defrost the food will depend on the room temperature, the quantity and type of food. Always check food packaging for the defrosting instructions.
Thermostat control knob (main oven) The oven thermostat control knob should be turned clockwise and it sets the required temperature of the oven. It is possible to regulate the temperature within a range of 60 - 250°C. Selecting an oven function and temperature (secondary oven) If you turn the control knob clockwise, it will automatically select the oven light function first. If you continue turning the control knob, you will select the conventional oven function.
Cooking guidelines o Please refer to the information given on food packaging for guidance on cooking temperatures and times. Once familiar with the performance of your appliance, temperatures and times can be varied to suit personal preference. o If you are using the fan oven function, then you should follow the information given on the food packaging for this particular mode of cooking.
o Important: Be careful when opening the door, to avoid contact with hot parts and steam. o IMPORTANT: In case of fire, close the main valve of the gas supply and switch off the electricity supply to the appliance. NEVER pour water onto burning oil. Using and assembling the rotisserie o Place the food on the spit (L), making sure that it is placed centrally between the two forks (F). Otherwise excess strain will be placed on the motor (R).
o Turn the Oven function and thermostat control knob (secondary oven) to the button. symbol and then press the Rotisserie On/Off o To rotate the spit in the opposite direction, whilst wearing a protective oven glove, turn the rotation knob (A). o Make sure that you press the Rotisserie On/Off button, then turn the Oven function and thermostat control knob (secondary oven) to 0 before attempting to remove the spit (L).
o You should select a control knob position that is suitable for the particular cooking that you are carrying out. See the table on the next page for guidance on the most appropriate control knob position. o When you have finished cooking on a particular zone, it is important to make sure that the control knob is turned back to 0 (the off position). o The warning light on the control panel will inform you if a cooking area is turned on or off.
o When you have finished cooking on a particular zone, it is important to make sure that the control knob is turned back to 0 (the off position). o A warning light on the control panel will inform you if a cooking area is turned on or off. Hob guidelines o The first few times the hob top is used, it may give off an acrid, burning smell. This smell will disappear completely with repeated use. o The worktop is fitted with cooking areas of different diametre and power.
o Food or liquid that has a high sugar content may damage the hob top if it comes into contact with the ceramic hob surface. Any spillages should be wiped up immediately, however this may not prevent the hob surface from becoming damaged. o IMPORTANT: The ceramic hob surface is tough; however it is not unbreakable and can be damaged. Especially if pointed or hard objects are allowed to fall on it with some force. o DO NOT USE THE HOB IF THE SURFACE BECOMES BROKEN OR CRACKED.
o If you use any form of oven cleaner on your appliance, then you must check with the manufacturer of the cleaner that it is suitable for use on your appliance. o Any damage that is caused to the appliance by a cleaning product will not be fixed by Baumatic free of charge, even if the appliance is within the guarantee period. Cleaning the ceramic hob top Any residues that are left on the hob top surface from cleaning agents will damage it.
Using a ceramic hob scraper It is possible to purchase a specialist ceramic hob scraper from supermarkets and/or hardware stores. You should follow the instructions given by the manufacturer of the ceramic hob scraper. However following general guidelines should be followed when using the ceramic hob scraper:- o The scraper should be placed on the ceramic surface at an angle. o Residues should be removed by sliding the blade carefully over the ceramic surface.
o Unscrew the bulb and remove it from its holder. o Replace the bulb with a 15 W/300°C, screw type pigmy. o Do not use any other type of bulb. o Screw the lamp cover back into its original position. Removing the oven door for cleaning o Open the oven door fully. o The hinges (A) are provided with two movable hooks (B). o Rotate the hooks into the slot (C).
Removing the inner door glass for cleaning o To facilitate cleaning, the inner door glass can be lifted out of the oven door. o Open the door halfway, you will see two screws on the top edge of the door. You should use a screwdriver to remove the screws and the strip that goes along the top of the oven door. o Using both hands pull the inner door glass out of the oven door. o IMPORTANT: When the inner door glass is removed from the door, then the door springs will be under higher tension than normal.
o IMPORTANT: Do not attempt to remove the door glass only using one hand. o IMPORTANT: Care must be taken when cleaning between the door glasses, and inside the inner frame as some of the edges maybe sharp due to the manufacturing process. Installation The installation must be carried out by a suitably qualified person, in accordance with the current version of the following. o UK Regulations and Safety Standards or their European Norm Replacements.
o The cooker is designed to slot in between 600 mm deep cabinets, which are spaced approximately 940 mm apart. o It can also be used as freestanding, with a cabinet to one side, in a corner setting or with its back to a wall. o IMPORTANT: It should not be installed at the end of a run of cabinets, if there is a cabinet at immediate right angles to the cooker door.
o The cooker is fitted with four legs that can be adjusted to match the height of your kitchen cabinets. o To assemble them it is necessary to raise the cooker and to screw the four legs into position, on each corner of the base of the appliance. o IMPORTANT: They must be screwed clockwise into position and not just slotted into the holes on each corner. You must screw them through the brackets that are also provided.
Connecting the mains supply cable IMPORTANT The wires in the mains lead are coloured in accordance with the following code: GREEN AND YELLOW BLUE BROWN EARTH NEUTRAL LIVE o Open the mains terminal block cover as shown, unscrew the cable clamp (A) and unscrew (not fully) the screws in the mains terminal block (L, N, E) which secure the three wires of the mains cable. o Fit the cable and refit the cable clamp (A).
My appliance isn’t working correctly o The oven isn’t coming on. * Check that the oven is in manual operation mode. * Check that you have selected a cooking function and a cooking temperature. o There appears to be no power to the oven and grill. * Check that the appliance has been connected to the electrical mains supply correctly. * Check that the mains fuses are in working order.
o The oven light is not working * Refer to pages 27 - 28 and follow the “Replacing the oven bulb” section. o I am getting condensation in my oven * Steam and condensation is a natural by product of cooking any food with high water content, such as frozen food, chicken etc. * You may get condensation in the oven cavity and forming between the oven door glasses. This is not necessarily a sign that the oven is not working correctly.
Czech Republic Baumatic CR spol s.r.o. Amperova 495 46215, Librec Czech Republic United Kingdom Baumatic Ltd., Baumatic Buildings, 6 Bennet Road, Reading, Berkshire RG2 0QX United Kingdom +420 800 185 263 www.baumatic.cz Slovak Republic Baumatic Slovakia, s.r.o.