PHC620SS 60 cm/ PHC720SS 77 cm Front touch control ceramic hob
User Manual for your Baumatic PHC620SS 60 cm PHC720SS 77 cm Front touch control 4 hyperspeed zone ceramic hob. NOTE: This User Instruction Manual contains important information, including safety & installation points, which will enable you to get the most out of your appliance. Please keep it in a safe place so that it is easily available for future reference; for you or any person not familiar with the operation of the appliance.
Contents Environmental note 4 Important safety information 5–8 Specifications Ceramic hob surface layout Control panel layout Cooking zone indicators and neon’s 8–9 10 10 11 Using the ceramic hob Before first use Touch controls Turning the hob on Turning on a zone and setting a power level Turning on the dual circuit zones Turning off a dual circuit’s outer section Turning off a zone gradually Turning off a zone instantly Turning the hob off Residual heat indicator Locking the hob top Safety cut-off A
Environmental note o The packaging materials that Baumatic uses are environmentally friendly and can be recycled. o Please discard all packaging material with due regard for the environment.
Important safety information Your safety is of the utmost importance to Baumatic. Please make sure that you read this instruction booklet before attempting to install or use the appliance. If you are unsure of any of the information contained in this booklet, please contact the Baumatic Technical Department. General Information o This appliance is designed for domestic household use and for the cooking and frying of domestic foodstuffs.
Child Safety o Baumatic strongly recommend that babies and young children are prevented from being near to the appliance and not allowed to touch the appliance at any time. During and after use, all surfaces will become hot. o If it is necessary for younger family members to be in the kitchen, please ensure that they are kept under close supervision at all times. o Older children should only be allowed to utilise the appliance when supervised.
Cleaning o Cleaning of the hob should be carried out on a regular basis. o IMPORTANT: Before attempting to clean the appliance, it should be disconnected from the mains and allowed to cool. o Great care should be taken whilst using this appliance and when following the cleaning procedure. o You should not use a steam jet or any other high pressure cleaning equipment to clean the appliance.
o Pans should be lifted on and off the hob surface and not dragged. o Cooking zones should not be switched on without cookware placed on it. Also the cookware should not be empty. Specifications PHC620SS Product dimensions Height: Width: Depth: 510 mm 580 mm 40 mm Aperture dimensions Height: Width: 495 mm 565 mm Product specifications: o 1 x 0.75/2.20 kW double hyperspeed zone (diametre 120/210 mm) o 1 x 1.10/2.00 kW oval hyperspeed zone (diametre 170/265 mm) o 2 x 1.
PHC720SS Product dimensions Height: Width: Depth: 510 mm 770 mm 40 mm Aperture dimensions Height: Width: 490 mm 750 mm Product specifications o 1 x 0.75/2.20 kW double hyperspeed zone (diametre 120/210 mm) o 1 x 1.10/2.00 kW hyperspeed rectangular zone (diametre 140/240 mm) o 1 x 1.80 kW hyperspeed zone (diametre 180 mm) o 1 x 1.
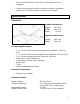
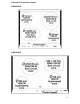
Ceramic hob surface layout PHC620SS PHC720SS 10
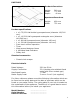
Control panel layout PHC620SS PHC720SS 1. 2. 3. 4. 5. 6. 7. 8. 9. 10. 11. 12. 13.
PHC720SS Using the ceramic hob Before first use IMPORTANT: You should clean the ceramic hob surface (see “Cleaning and maintenance” section). o You should switch on one cooking zone at a time, for 5 minutes at the maximum setting. This will help to eliminate any new smell that exists and evaporate any humidity that has formed on the heating elements during transit. o Do not burn off more than one zone at once. o You must place a saucepan filled half full with cold water on each zone as you burn it off.
Turning the hob on o Press the ON/OFF button (1) o The cooking zone indicators (6) will all read “0”. o The decimal point symbols (7) will flash on and off. Turning on a zone and setting a power level IMPORTANT: A zone must be selected within 10 seconds of turning the hob on. o Press the plus (4) button for the zone that you want to use. o Adjust the zone between power levels 1 and 9, using the plus (4) and minus (5) buttons.
Turning off a zone instantly o Press the minus button (5) and the plus button (4) simultaneously. o The zone will switch off immediately. o An “H” will show in the cooking zone indicator (6), alternating with “0”. (See the section on the “residual heat indicator” below). Turning the hob off Once you have switched off all of the cooking zones, you should turn off the hob. o Press the ON/OFF button (1). It is possible to turn the hob off at any time by pressing the ON/OFF button (1).
o Use the plus (4) or minus (5) buttons of the dual circuit zone that you wish to use and select a power level between 1 and 9. o The central section of the duel circuit zone will switch on. o If you wish to also activate the outer section of a duel circuit zone, you should press the dual circuit ON/OFF button (8). The dual circuit indicator neon (9) will light. Turning off a dual circuit’s outer section o Both zones of the dual circuit most be switched on. o Press the dual circuit ON/OFF button (8).
Locking the hob top o The whole hob top can be locked by pressing the safety lock button (2) whilst the appliance is turned on. o The safety lock neon (3) will light to show that the safety lock feature has been switched on. o When the safety lock feature is activated, it will disable any of the other buttons on the control panel, except the ON/OFF button (1). o To disable the safety lock feature, you should press the safety lock button (2) again.
Automatic pre-heating o This feature will set a cooking zone to maximum power and will then automatically set the cooking zone to a power level that you have selected after a certain period of time. o Press the minus button (5) once and power level 9 appears on the cooking zone indicator (6), then release the minus button. o Press the plus button (4) once and a flashing decimal point symbol will appear on the cooking zone indicator (6), then release the plus button.
Increasing the power level during automatic pre-heating o If a zone is already within automatic preheating mode and you wish to adjust the power level. Make sure that the decimal point symbol (7) is present in the cooking zone indicator. o Increase the power level by pressing the plus button (4). o The pre-heating time will be adjusted. It will take into account the amount of time that has already elapsed.
o After selecting the timer, a zone must be selected within 10 seconds by pressing one of the plus (4) or minus (5) buttons. You should use these buttons to select your desired power level. o The zone will switch on and start to heat, the timer neon (13) will switch on next to the relevant cooking zone indicator (6). o Use the plus (10) and minus (11) buttons to adjust the time that appears in the timer display (12). o Once the minus or plus buttons are released, the countdown will start immediately.
o The positions where the heat will radiate from are clearly marked on the hob top. The saucepans must be positioned exactly on these zones for efficient heating to occur. Pans should have the same diametre as the cooking zone that they are being used on. o You should not use saucepans with rough bottoms, as this can scratch the ceramic surface. o Before use, make sure that the bottoms of the saucepans are clean and dry.
Cleaning and maintenance Cleaning operations must only be carried out when the hob is cool. The appliance should be disconnected from your mains supply before commencing any cleaning process. Cleaning the ceramic hob top Any residues that are left on the hob top surface from cleaning agents will damage it. You should remove any residues with warm water mixed with a little washing up liquid.
Using a ceramic hob scraper Your appliance will be provided with a hob scraper. The following guidelines should also be followed when using the ceramic hob scraper:- o The scraper should be placed on the ceramic surface at an angle. o Residues should be removed by sliding the blade carefully over the ceramic surface. o The ceramic surface should be wiped with a damp cloth that has been placed in warm water mixed with a small amount of washing up liquid.
Positioning The adjacent furniture must be able to withstand a minimum temperature rise of 85°C above the ambient temperature of the room it is located in, during periods of use. This appliance is classified as Class 3 and therefore is to be built into a kitchen unit (depending on size) or 600 mm worktop, providing the following minimum distances are allowed: o 700 mm between the hob surface and the underside of any horizontal surface above it.
o IMPORTANT: You must have a gap of at least 25 mm between the underneath of the appliance and any surface that is below it. o Carefully turn the hob upside down and place it on a cushioned mat. o Apply the sealing strip provided around the edge of the appliance. o The protective covering must be removed from both sides. o Do not leave a gap in the sealing agent or overlap the thickness. o IMPORTANT: Do not use a silicon sealant to seal the appliance against the aperture.
o Place the fixing brackets (B) over each hole and clip, and then place a screw (C) through the hole and fixing bracket (B). Tighten the screws a little way, so that they stay in place. IMPORTANT: Do not tighten the screws fully. o Carefully turn the hob back over and then gently lower it into the aperture hole that you have cut out. o On the underneath of the hob, locate the fixing brackets (B) and turn them so that they locate on the underneath of the worktop and the hob.
Connecting the mains supply cable o The mains terminal block is located on the underside of the hob and the terminals are accessible by removing the terminal block cover by removing the cover screw. o The cable connections must be in accordance with the diagram located on the bottom of the hob. o 1, 2 and 3 are the live connection, 4 and 5 are the neutral connection and the remaining one is the earth connection. o The live wire MUST be placed in connection number 1.
Replacing the mains supply cable If the mains supply cable is damaged, then it must be replaced by an appropriate replacement. The mains supply cable should be replaced in accordance with the following instructions: o Switch the appliance off at the control switch. o Open the terminal block on the underside of the hob. o Unscrew the terminal screws fixing the cable. o Replace the cable with one of the same length and in accordance with the specification given on page 25.
o The residual heat indicator has not come on after I have switched a cooking zone off. * The cooking zone has only been turned on for a short period of time; therefore it did not go above 60°C. * IMPORTANT: If the cooking zone does appear to be hotter than 60°C and the residual heat indicator has not come on, you should call the Baumatic Service Department. o A humming sound is heard when a cooking zone is selected. * This is normal; the sound will disappear when the zone heats up.
IMPORTANT: If your appliance appears not to be operating correctly, then you should disconnect it from your mains supply and then contact the Baumatic Service Department on telephone number (0118) 933 6911. DO NOT ATTEMPT TO REPAIR THE APPLIANCE YOURSELF. Please note that if an engineer is asked to attend whilst the product is under guarantee and finds that the problem is not the result of an appliance fault, then you may be liable for the cost of the call out charge.
Czech Republic Baumatic CR spol s.r.o. Amperova 495 46215, Librec Czech Republic +420 800 185 263 United Kingdom Baumatic Ltd., Baumatic Buildings, 6 Bennet Road, Reading, Berkshire RG2 0QX United Kingdom www.baumatic.cz Sales Telephone (0118) 933 6900 Sales Fax (0118) 931 0035 Service Telephone (0118) 933 6911 Service Fax (0118) 986 9124 Spares Telephone (01235) 437244 Technical Advice Telephone (0118) 933 6933 +421 255 640 618 E-mail: sales@baumatic.co.uk technical@baumatic.co.uk Website: www.
2