User’s Operating Instructions & Important Warranty Information Ecogen 24/1.0 Gas Fired Wall Mounted Condensing Boiler and Power Generator Please keep these instructions in a safe place. If you move house, please hand them over to the next occupier.
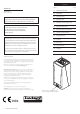
Contents Section Natural Gas Page 1.0 Quick Reference Guide 3 2.0 Introduction 4 3.0 The Programmers 5 4.0 Setting the Time 6 5.0 Setting the Central Heating Times 7 6.0 Setting the DHW Times 9 7.0 Mode Selection/Temp Adjustment 11 8.0 Contents of Other Functions 14 9.0 Resetting the Boiler 16 10.0 Clearance 17 11.0 Error Codes 18 The default time for this action is monday 8am every week. 12.
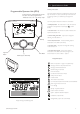
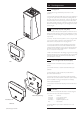
1.0 Quick Reference Guide The Easy menu button Programmable Operator Unit (POU) 24 hour time bar for central heating and domestic hot water - shows active programme times - Default 6am - 9am, 11am - 12pm & 15pm - 22pm Commonly required functions are available more quickly via the easy menu button. To access, press the easy menu button and scroll through confirm your selection by pressing the dial button. Commonly required functions are shown in order below: 1.
2.0 Introduction 2.1 Description 1. The appliance incorporates a Stirling engine which is capable of generating between 0.4 – 1.0 kW of electrical power depending on the running conditions of the heating system. High return temperatures especially above 65°C will reduce the power generation. It is therefore in the interests of the householder to ensure that the central heating system is maintained and working as efficiently as possible.
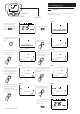
3.0 The Programmers 3.1 Getting Started 1. Ensure that both gas and electricity are turned on to the appliance. 2. The Gas Safe registered installer will have set-up the appliance to a programme of your choice and it should be providing heat and hot water in line with your requirements. These can be altered via the wall-mounted room unit or the programmer on the product fascia, both of which are shown in this section. Section 4.0 and 5.
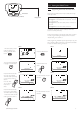
4.0 Setting the Time 04. November Tuesday 2008 08:50 4.1 The time, day, date and year can be adjusted using the POU/PRU as shown below. Menu Button Dial Knob Display Screen STEP 1 The basic display is shown. If the basic display is not showing, press the MENU button. until the basic display is shown Time Setting STEP 2 Press the MENU button. 04.
5.0 Setting the Central Heating Times 04. November Tuesday 2008 08:50 5.1 Programming the Central Heating Times The programmar enables control of up to three periods a day, seven days a week. Menu Button Dial Knob Display Screen There are 3 time programs preinstalled to aid reprogramming:Time program 1 is the default with 3 time periods - Mon-Sun, 6-9, 11-12 and 15-22. Time program 2 has two time switch periods - Mon-Sun, 6-9 and 15-22. Time program 3 has one time switch period 6-22.
5.0 Setting the Central Heating Times 04. November Tuesday 2008 08:50 5.1 Programming the Central Heating Times (cont) Menu Button Easy Menu Button Dial Knob Display Screen STEP 9 Press the Dial Knob and the ‘1st Time ON’ time will flash. Turn the Dial Knob to the required time. Press Dial to select. STEP 10 Time central heating CH1 Mon - Sun: 1st Time ON 08:00 Turn the Dial Knob one click clockwise and then press the Dial Knob. The ‘1st Time OFF’ time will flash.
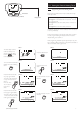
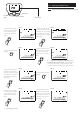
6.0 Setting the DHW Times 04. November Tuesday 2008 08:50 6.1 Programming the Domestic Hot Water Times The programmar enables control of up to three periods a day, seven days a week. Menu Button Dial Knob Display Screen There are 3 time programs preinstalled to aid reprogramming:Time program 1 is the default with 3 time periods - Mon-Sun, 6-9, 11-12 and 15-22. Time program 2 has two time switch periods - Mon-Sun, 6-9 and 15-22. Time program 3 has one time switch period 6-22.
6.0 Setting the DHW Times 04. November Tuesday 2008 08:50 6.1 Programming the Domestic Hot Water Times (cont) Menu Button Easy Menu Button Dial Knob Display Screen STEP 9 Press the Dial Knob and the ‘1st Time ON’ time will flash. Turn the Dial Knob to the required time. Press Dial to select. STEP 10 Time hot water Mon - Sun: 1st Time ON 06:30 Turn the Dial Knob one click clockwise and then press the Dial Knob. The ‘1st Time OFF’ time will flash. Turn the Dial to the required time.
7.0 Mode Selection/Temp Adjustment 04. November Tuesday 2008 08:50 7.1 Menu Button Easy Menu Button Dial Knob STEP 1 The basic display is shown. If the basic display is not showing, press the MENU button. until the basic display is shown 04. November Tuesday 2008 08:50 STEP 2 --------------------------------------------------Information Set time and date 3. To select the mode required: - from the main screen press the menu button. 4. Turn Dial to ‘Temps / mode CH1’.
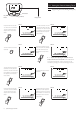
7.0 Mode Selection/Temp Adjustment 04. November Tuesday 2008 08:50 7.3 Menu Button Easy Menu Button Dial Knob DOMESTIC HOT WATER MODE STEP 1 - Press the MENU button and then turn the Dial Knob clockwise to highlight ‘Domestic hot water’. Selecting the Domestic Hot Water (DHW) mode 1. There are 2 DHW modes: Off - heating operates to keep the domestic (Protection) hot water cylinder above 8°C continuously.
7.0 Mode Selection/Temp Adjustment 04. November Tuesday 2008 08:50 7.6 1. Holiday - When the holiday mode is activated the ‘protection’ mode is activated for the selected period see section 7.1 Menu Button Easy Menu Button Holiday mode Dial Knob 2. The Holiday mode is activated by using the menu button scroll down to ‘Holiday heating CH1’, press the dial HOLIDAY MODE 3. Press again to set the month scroll and select – (the display will start at 01,01) set the day scroll and select.
8.0 Contents of Other Functions 8.1 Selecting Information The following information is also available by pressing the menu button and selecting ‘information’ by pressing the Dial Knob, any error is displayed first then : 1. Room temperature – ?C (PRU only). 2. Boiler temperature – ?C. 3. State burner – 1+2 (1=engine, 2= supplementary burner on). 4. Power – Watts. 5. Energy to date – kWh. 6. Head temp actual value (of the Stirling engine) – ?C. 7. Room temperature min (PRU only) 8.
8.0 Contents of Other Functions 8.5 Selecting Time hot water The following information is also available by pressing the menu button and selecting ‘Time hot water’ by pressing the Dial Knob. 1. Select days 2. Mon-Sun,Mon-Fri,Sat-Sun,Mon,Tue,Wed,Thu,Fri,Sat,Sun. 3. Select default timings – programmes 1/2/3 4.1st Time ON -- hrs/mins 5.1st Time OFF -- hrs/mins 6. 2nd Time ON -- hrs/mins 7. 2nd Time OFF -- hrs/mins 8. 3rd Time ON -- hrs/mins 9. 3rd Time OFF -- hrs/mins 10.
9.0 Resetting the Boiler 04. November Tuesday 2008 08:50 9.1 Menu Button Easy Menu Button 1. In exceptional cases, the display will show an error screen see diagram opposite. Error 20:Boiler sensor 1 Dial Knob 04. November Tuesday POU/PRU 5 LED Reset Type ERROR Light Flashes Auto ERROR Light Flashes User ERROR Light Out Service 2008 Exceptional conditions 08:50 2.
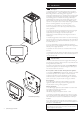
5mm Min 60mm Min 10.0 Clearances 450mm 300mm Min 10.1 For your Safety 1. This appliance must have been installed in accordance with the manufacturer’s instructions and the regulations in force. 2. Any modification that may interfere with the normal operation of the appliance without express written permission from the manufacturer or his agent could invalidate the appliance warranty. In GB this could also infringe the Gas Safety (Installation and Use) Regulations.
In the table below: - PCB = Main Control Board, BCU = Burner Control Unit. UR = User Reset, AR = Automatic Reset, ARP = Automatic Reset after Power Down 11.0 Error Codes 11.1 List of Error Codes NOTE: An automatic reset is only done if the fault condition has cleared.
11.0 Error Codes UR = User Reset, AR = Automatic Reset, ARP = Automatic Reset after Power Down 11.1 List of Error Codes (cont) NOTE: An automatic reset is only done if the fault condition has cleared.
12.0 Care of the Boiler Warning ! 12.1 Cleaning the Outer case The painted panels should be wiped with a damp cloth and then dried completely. DO NOT USE ABRASIVE CLEANING AGENTS.
13.0 Legislation 13.1 Installation, Commissioning, Service & Repair 1. This appliance must be installed in accordance with the manufacturer’s instructions and the regulations in force. Read the instructions fully before installing or using the appliance. 2. In GB, this must be carried out by a competent person as stated in the Gas Safety (Installation & Use) Regulations. 3.
14.
14.
Please complete the boxes below Serial Number Date of Installation D D M M Y Y Installer Details (name, address and contact number(s)) Information Label All descriptions and illustrations provided in this leaflet have been carefully prepared but we reserve the right to make changes and improvements in our products which may affect the accuracy of the information contained in this leaflet. All goods are sold subject to our standard Conditions of Sale which are available on request.