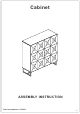
Cabinet ASSEMBLY INSTRUCTION Date last updated:9-15-2021 1
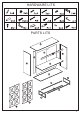
HARDWARE LITS PARTS LITS 2
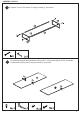
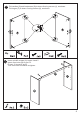
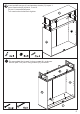
ASSEMBLY STEPS Fix parts 11 and 12 to parts 10 using screws (I), as shown. Fix wall bracket (N) and hardware (E) to part 1 using screw (M) and (R), as shown.
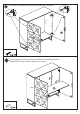
Fix handles (O) and hardwares (Q) to doors 8 using screws (J), as shown. Fix hinges (F) to doors 8 using screws (H), as shown. Insert quickfit screws (A) to part 4 and 5. Insert cam locks (B) to part 13. Fit part 13 to part 4 and 5. Turn cam locks clockwise to tighten.
Fix part 6 to part 3 using screws (D). Insert wooden dowels (C) to part 3. Fit assembled part 4 and 5 to part 3, secured using screws (D), as shown. Slide part 7 into grooves between part 4 and 5.
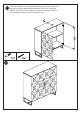
Insert quickfit screws (A) and wooden dowels (C) to part 1. Insert cam locks (B) to part 4, 5 and 6. Fit part 1 to assembled parts. Turn cam locks clockwise to tighten. Fix assembled feet to part 3 using screws (K), as shown. Secure part 13 to part 1 using screws (D), as shown.
Fix doors 8 to assembled unit using screws (H), as shown. Fit shelf supports (G) into desired position in the assembled unit. Place shelf 2 on top of shel supports, as shown.
For extra stability, it is recommended that you fix your cabinet to the wall using the additional hardwares (P and D), as shown. Should you choose not to affix the product to the wall, serious injury may be caused if the product tips over.