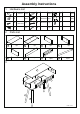
Assembly Instructions 1 Hardware List 12pcs B D 4pcs E G M3x14mm 1pc H 1pc K A 6x30mm J C 12pcs M4x30mm 2pcs F 2pcs M4x30mm I 2pcs 12pcs 1pc 1pc Parts List 2 1 1pc 2 1pc 3 1pc 4 1pc 5 1pc 6 1pc 7 2pcs 8 4pcs 3 4 1 6 5 7 2 3 7 8 8 8 8 PAGE 1 OF 5
STEP 1 X2 Attach handle (F) to Part (7) by securing with screw(E). 7 X2 E F X2 STEP 2 X12 Secure male camlock (B) to Part (1)(2) using a screwdriver as below instruction.
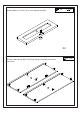
STEP 3 X4 Ⅱ D X2 C 3 C A C A B C 5 7 C D Ⅰ X4 C A A 2 Firstly, connect Part (7) with Part(3)(5)by inserting (D). Secondly, attach Part(3)(5) to Part(2) by inserting wooden dowel(A) and securing with female camlock (C). STEP 4 X2 Firstly, connect Part (7) with Part(4)(5)by inserting (D). Secondly, attach Part(4) to Part(2) by inserting wooden dowel(A) and securing with female camlock (C).
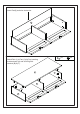
STEP 5 Insert Part(6) as below instruction. 6 STEP 6 X6 Attach Part (1) to Part (3)(4)(5) by inserting wooden dowel (A) and securing with camlock (B)& (C) .
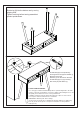
STEP 7 Rotate leg (8) into the bottom one by one by aligning hole. Tighten each leg before turning assembled product upside down. 8 8 8 8 STEP 8 I J G IH K K K Fix wall strap (K) to the product by securing with screw (G) and washer (I) Drill hole on the wall Hammer (J) into the hole on the wall. Fix wall strap (K) to (J) by securing with screw (H) and washer (I). TOPPLING FURNITURE WARNING: • It is strongly recommended that this product is permanently fixed to the wall.