Installing and Operating BayStack ARN Routers Part No.
4401 Great America Parkway Santa Clara, CA 95054 8 Federal Street Billerica, MA 01821 Copyright © 1998 Bay Networks, Inc. All rights reserved. Printed in the USA. October 1998. The information in this document is subject to change without notice. The statements, configurations, technical data, and recommendations in this document are believed to be accurate and reliable, but are presented without express or implied warranty.
USA Requirements Only Federal Communications Commission (FCC) Compliance Notice: Radio Frequency Notice Note: This equipment has been tested and found to comply with the limits for a Class A digital device, pursuant to Part 15 of the FCC rules. These limits are designed to provide reasonable protection against harmful interference when the equipment is operated in a commercial environment. This equipment generates, uses, and can radiate radio frequency energy.
Taiwan Requirements Bureau of Commodity Inspection Quarantine (BCIQ) Statement Bureau of Commodity Inspection Quarantine (BCIQ) Statement Warning: This is a Class A information technology product. In a domestic environment, this product may cause radio interference, in that case, the user may be required to take appropriate measures.
the Software or user manuals, in whole or in part. The Software and user manuals embody Bay Networks’ and its licensors’ confidential and proprietary intellectual property.
Bay Networks copyright; those restrictions relating to use and disclosure of Bay Networks’ confidential information shall continue in effect. Licensee may terminate this license at any time. The license will automatically terminate if Licensee fails to comply with any of the terms and conditions of the license. Upon termination for any reason, Licensee will immediately destroy or return to Bay Networks the Software, user manuals, and all copies.
Contents Preface Before You Begin ............................................................................................................xvii Text Conventions ........................................................................................................... xviii Acronyms .........................................................................................................................xix Bay Networks Technical Publications ...............................................................
Connecting to the ISDN Interface ..........................................................................1-18 Connecting to the 56/64K DSU/CSU Interface ......................................................1-19 Connecting to the FT1/T1 DSU/CSU Interface ......................................................1-20 Connecting to the E1/FE1 DSU/CSU Interface ......................................................1-21 Connecting to the Integrated V.34 Modem ......................................................
Chapter 3 Operating the ARN Understanding the ARN LEDs ........................................................................................3-1 Base Module LEDs ..................................................................................................3-2 Diagnostic LEDs ................................................................................................3-2 Ethernet 10BASE-T LEDs .................................................................................
Appendix A Configuring the ARN for Netboot and Directed Netboot Using the ifconfig Command ......................................................................................... A-2 Configuring an IP Serial or 56/64K DSU/CSU Interface for Netbooting .................. A-2 Configuring an Ethernet Interface for Network Booting ........................................... A-4 Configuring a Token Ring Interface for Network Booting ........................................
FT1/T1 DSU/CSU Connections ............................................................................ C-13 X.25 PAD Connections .......................................................................................... C-15 RJ-11 Interface (for V.34 Modem) ......................................................................... C-16 Local Console Connections .................................................................................. C-16 Service Modem Connections ..................................
Figures Figure 1-1. Accessories in the ARN Shipping Container ...........................................1-3 Figure 1-2. Options for Attaching Flange Brackets to Rack-Mount the ARN ..............1-7 Figure 1-3. Installing the ARN in an Electronic Enclosure Rack ................................1-8 Figure 1-4. ARN Module Locations ............................................................................1-9 Figure 1-5. Connecting an AUI Cable .......................................................
xiv Figure 3-2. ARN Power Switch .................................................................................3-11 Figure 3-3. ARN Reset Button ..................................................................................3-12 Figure 3-4. Removing an ARN Flash Memory Card ................................................3-13 Figure 3-5. Memory Card Read/Write Protect Switch ..............................................3-14 Figure 4-1. Location of Adapter Module Slots 1 and 2 ..............
Tables Table 1-1. Installation Space Requirements .............................................................1-5 Table 1-2. V.34 Front-Panel Modem Adapter Module Defaults Table 1-3. Console Parameters ..............................................................................1-28 Table 1-4. Console Modem Defaults .....................................................................1-29 Table 2-1. Summary of Initial Startup Options ........................................................
xvi Table C-2. Network Interfaces Available on ARNs ................................................. C-4 Table C-3. AUI Pin Assignments .............................................................................. C-6 Table C-4. 10BASE-T and 10/100BASE-Tx Interface Pin Assignments .................. C-7 Table C-5. Token Ring STP Interface Pin Assignments ........................................... C-8 Table C-6. Token Ring UTP Interface Pin Assignments ..........................................
Preface The BayStack™ Advanced Remote Node™ (ARN™) router is part of the Bay Networks® BayStack line of communications products. The ARN provides two WAN adapter slots to support a broad array of primary and backup connectivity options. In addition, the ARN supports up to two LAN and five serial interfaces. This guide describes installing, starting, and operating an ARN router.
Installing and Operating BayStack ARN Routers Text Conventions This guide uses the following text conventions: angle brackets (< >) Indicate that you choose the text to enter based on the description inside the brackets. Do not type the brackets when entering the command. Example: If the command syntax is: ping , you enter: ping 192.32.10.12 bold text Indicates command names and options and text that you need to enter. Example: Enter show ip {alerts | routes}. Example: Use the dinfo command.
Preface italic text Indicates file and directory names, new terms, book titles, and variables in command syntax descriptions. Where a variable is two or more words, the words are connected by an underscore. Example: If the command syntax is: show at valid_route is one variable and you substitute one value for it. screen text Indicates system output, for example, prompts and system messages. Example: Set Bay Networks Trap Monitor Filters separator ( > ) Shows menu paths.
Installing and Operating BayStack ARN Routers xx CTS clear to send DCD data carrier detect DCE data communications equipment DCM Data Collection Module DLCMI Data Link Control Management Interface DSR data set ready DSU data service unit DTE data terminal equipment DTR data terminal ready EIA Electronic Industries Association FDL facility data link HDLC high-level data link control IEEE Institute of Electrical and Electronic Engineers IP Internet Protocol ISDN Integrated Servi
Preface PCMCIA Personal Computer Memory Card International Association PPP point to point protocol PVC permanent virtual circuit RIP Routing Information Protocol RLSD received line signal detection RMON remote monitoring RTS request to send SMDS switched multimegabit data service SNMP Simple Network Management Protocol STP shielded twisted-pair SQE signal quality error TCP/IP Transmission Control Protocol/Internet Protocol TNV telecommunications network voltage UTP unshielded twi
Installing and Operating BayStack ARN Routers • The “Guides/Books” section lists books on technical topics. • The “Technical Manuals” section lists available printed documentation sets. Make a note of the part numbers and prices of the items that you want to order. Use the “Marketing Collateral Catalog description” link to place an order and to print the order form.
Chapter 1 Installing the ARN This chapter describes how to install the BayStack ARN router, as follows: Topic Page Preparing to install the ARN 1-2 Installing the ARN 1-5 Understanding the ARN module locations 1-9 Connecting communications cables 1-10 Connecting a management console 1-25 Connecting back-panel modem interfaces 1-29 Connecting the power cables 1-32 Installing the flash memory card 1-33 Where to go next 1-34 Note: The installation instructions in this chapter assume that w
Installing and Operating BayStack ARN Routers Preparing to Install the ARN Verify the following before beginning the installation, as explained in the sections that follow: • • • • Your shipment is complete and undamaged. You have the proper equipment and tools. Your installation site meets physical, electrical, and environmental requirements. You have the communications devices and the cabling that you need to attach to the ARN.
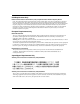
Installing the ARN Figure 1-1 illustrates the ARN hardware accessory items. Power Cable Console/Modem Cable (DB-9 Receptacle to DB-25 Plug Cable) DB-25 Receptacle Null Modem Adapter Two Flange Brackets Eight #6 Phillips Screws Four Cage Nuts Four #10 Cagenut Screws and Washers Four Rubber Feet ARN0048B Figure 1-1.
Installing and Operating BayStack ARN Routers Additional Equipment To install the ARN, you may need some additional items that are not part of the ARN accessory package. Before installing the ARN hardware, ensure that you obtain all the cables, tools, and other equipment that you need. Cables Unless they were specifically ordered, the cables necessary for your network configuration are not part of the ARN accessory package.
Installing the ARN Verifying Site Requirements The installation site must provide a certain amount of free space around the ARN to dissipate heat, as detailed in Table 1-1. Table 1-1. Installation Space Requirements Width Depth (minimum) Depth (for servicing) 22.5 in. (57.2 cm) 15 in. (38.1 cm) 25 in. (63.5 cm) In addition, the installation site must meet the electrical and environmental specifications listed in Appendix C. Caution: You must use grounded electrical power outlets with the ARN.
Installing and Operating BayStack ARN Routers Rack-Mounting the ARN For this procedure, you need: • Two flange brackets and eight #6 Phillips screws (shipped with the ARN) • A Phillips screwdriver • An electronic enclosure rack. If the rack does not have threaded rail holes, you must attach the four cage nuts shipped with the ARN. • Four #10 cagenut screws and washers (shipped with the ARN) To rack-mount the ARN: 1. Determine how you want the ARN to fit in the equipment rack.
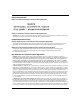
Installing the ARN B1 ISDN BRI withNT1 1 2 Screws (4 places) DD B1 B2 ISDN BRI withNT1 1 Screws (4 places) RLSD 2 DD B2 RLSD Front panel 1 2 Front panel ARN0004B Figure 1-2. Options for Attaching Flange Brackets to Rack-Mount the ARN 3. 114200-D Rev 00 If the holes in the rack’s vertical supports are not threaded for cagenut screws, insert a cage nut in four locations (Figure 1-3).
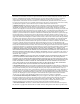
Installing and Operating BayStack ARN Routers U 1 ISDN BRI withNT1 D B1 DD B2 Tx 10BaseT AUI Rx RLSD3 COM3 RLSD4 COM4 COM5 Cl RLSD5 COM 2 Ethernet 2 Serial RLSD Tx Serial 10BaseT AUI Rx Cl Run Pwr Boot RPS Adapter1 DCM Fail Fan Adapter2 PCMCIA Base Ethernet 1 Expansion BayStack Advanced Remote Node Cagenut Screw (4 Places) Rail without Threaded Holes Use Cage Nut ARN0005A Figure 1-3. 1-8 Installing the ARN in an Electronic Enclosure Rack 4.
Installing the ARN Understanding the ARN Module Locations The ARN is designed to scale to your needs. In addition to either an Ethernet or token ring base module, the ARN can contain an optional LAN expansion module and up to two WAN adapter modules (Figure 1-4).
Installing and Operating BayStack ARN Routers Connecting Communications Cables Gather the communications equipment and cabling that you will attach to the ARN. If you do not have the proper cables, contact your network administrator or see the Cable Guide. Note: For cable interface descriptions, see Appendix C.
Installing the ARN Connecting to the AUI The AUI interface provides broadband, baseband, fiber, and shielded twisted pair (STP) support, depending on the transceiver and cables you use. Caution: Connecting the ARN AUI interface directly to the AUI interface on an Ethernet station violates IEEE 802.3 standards. The AUI interface is designed only for connection to a transceiver.
Installing and Operating BayStack ARN Routers Connecting to the UTP Interface To connect an unshielded twisted-pair (UTP) cable to the base module or expansion module Ethernet interface, insert the UTP jack into the RJ-45 receptacle connector, as shown in Figure 1-6 and Figure 1-7.
Installing the ARN Connecting to the Fiber Interface To connect a fiber cable to the base module or expansion module Ethernet interface, insert the fiber cable jack into the interface as shown in Figure 1-8.
Installing and Operating BayStack ARN Routers Connecting to a Token Ring Interface You can connect a token ring cable to any ARN base module or expansion module that contains a token ring interface option. Each of these interface options offers two token ring interface types: an STP interface or a UTP interface. Note: You can use only one token ring interface on an ARN base or expansion module at any time.
Installing the ARN Connecting to the UTP Interface To connect a token ring UTP cable to the expansion module token ring interface, insert the RJ-45 connector into the UTP interface, as shown in Figure 1-10.
Installing and Operating BayStack ARN Routers Connecting to a Serial Interface You connect 44-pin serial cables to the connectors on ARN adapter and expansion modules. Each serial interface supports multiple WAN protocols at a transmission rate of 1200 b/s to 2.048 Mb/s. To connect to the serial interface: Locate the serial interface cable. 1. The serial interfaces automatically configure the desired electrical interface when used with standard keyed cables.
Installing the ARN U Tx D 1 10BaseT B1 Rx ISDN BRI withNT1 DD B2 Cl Ethernet 2 COM 2 Tx 10BaseT RLSD Rx Cl Ethernet 1 To RS-232, RS-422, RS-530, V.28, V.35, or X.21 interface ARN0066A Figure 1-12. Connecting a Serial Cable to the Serial Adapter Module Serial adapter modules, labeled COM, can be in position 1 or 2. These interfaces are COM1 and COM2. 114200-D Rev 00 3. Secure the cable to the interface using the capture screws on the cable. 4.
Installing and Operating BayStack ARN Routers Connecting to the ISDN Interface You connect ISDN service to the connector on an installed ISDN BRI U or ISDN BRI S/T adapter module. Modules with an S/T interface provide dialup connection to the ISDN network through a terminal adapter. Modules with a U interface allow you to connect directly to the ISDN network switch.
Installing the ARN Connecting to the 56/64K DSU/CSU Interface You connect 56/64K DSU/CSU service to the connector on an installed 56/64K DSU/CSU adapter module. To connect to the 56/64K DSU/CSU interface: Insert the 56/64K DSU/CSU cable connector into the DSU/CSU interface labeled DDS (Figure 1-14). 1. S/T 1 Tx 10BaseT Rx ISDN BRI Cl Ethernet 2 DDS 2 56K/64K DSU/CSU TxD CD RxD Test Tx 10BaseT Rx Cl Ethernet 1 To Digital line wall jack ARN0065A Figure 1-14. 2.
Installing and Operating BayStack ARN Routers Connecting to the FT1/T1 DSU/CSU Interface You connect FT1/T1 DSU/CSU service to the connector on an installed FT1/T1 DSU/CSU adapter module. To connect to the FT1/T1 DSU/CSU interface: Insert the RJ-48C cable connector into the FT1/T1 DSU/CSU interface on the adapter module (Figure 1-15). 1. S/T 1 Tx 10BaseT Rx ISDN BRI Cl Ethernet 2 Compiles with FCC Rules Part 68 Reg.
Installing the ARN Connecting to the E1/FE1 DSU/CSU Interface You connect E1/FE1 service to the connector on an installed E1/FE1 adapter module. To connect to the E1/FE1 interface: 1. Insert the RJ-48C cable connector into the E1/FE1 interface (Figure 1-16). 1 E1/FE1 G.703 Local Alarm Loop Remote Alarm Sync 2 ARN0090B Figure 1-16. 2. 114200-D Rev 00 Connecting the E1/FE1 Cable Connect the other end of the cable to a FE1communications device.
Installing and Operating BayStack ARN Routers Connecting to the Integrated V.34 Modem You connect dial services to the connector on an installed V.34 Modem adapter module. To connect a telephone cable to the integrated V.34 modem: Connect the RJ-11 telephone cable to the V.34 modem interface (Table 1-17). 1. Front-panel V.34 Modem Interface COM 1 Tx 10BaseT Rx RLSD Cl Serial Ethernet 2 Telco Tx 2 V.
Installing the ARN Table 1-2. 114200-D Rev 00 V.34 Front-Panel Modem Adapter Module Defaults Modem Signal/Parameter Default Value Clear To Send (CTS) On Data Terminal Ready (DTR) Depends on the modem type. Set the modem to answer incoming calls when DTR is active. Data Carrier Detect (DCD) or received line signal detection (RLSD) On while carrier is present (the ARN uses DCD to detect modem connect and disconnect).
Installing and Operating BayStack ARN Routers Connecting to the X.25 PAD Interface To support X.25 PAD applications, the ARN router requires the following hardware: • ARN X.25 PAD adapter module • Breakout box To connect X.25 PAD services: Position the X.25 breakout box above the ARN in one of the following ways: 1. • Attach the rubber feet that came in the shipping container to the four raised areas on the bottom of the breakout box chassis; then, place the box on top of the ARN (Figure 1-18).
Installing the ARN Connecting a Management Console You can use the back-panel console ports to connect one or both of the following management devices: • PC or terminal • External modem or telephone connection to optional integrated V.34 modem Using a local console, you can monitor the results of the ARN startup diagnostics and set the boot configuration. Using an attached modem, you can enable remote dial-in access for various management tasks.
Installing and Operating BayStack ARN Routers Console Modem Console/modem cable ARN0083B Figure 1-19. 4. Connecting the Console/Modem Cable Attach the null modem crossover adapter to the other end of the console cable (Figure 1-20). Console cable connector Rotate to tighten screw Null modem crossover adapter Screw receptacle AN0010A Figure 1-20. 1-26 Attaching the Null Modem Crossover Adapter 5.
Installing the ARN UL Redundant Power 100-240~ 1.2A 50-60Hz UL Modem PC cable Null modem adapter Console cable ARN0056A Figure 1-21. Connecting a PC Console to an ARN Connecting a Terminal Console To connect a terminal console to the ARN, you need both of these pieces in the ARN console/modem cable kit (Order No. 110310): • Serial console/modem cable with 9-pin receptacle to 25-pin plug connectors (Order No.
Installing and Operating BayStack ARN Routers 1. Turn on and configure the terminal, using the parameters in Table 1-3 and the terminal user guide. Table 1-3. Console Parameters Parameter Value Baud Rate 9600 Data Bits 8 Stop Bits 1 Parity None 2. Turn off the terminal. 3. Insert the 9-pin receptacle end of the console cable into the ARN Console connector. 4. Attach the null modem crossover adapter to the 25-pin connector.
Installing the ARN Connecting a Console Modem A modem provides a system administrator with remote access to the ARN. It is a good idea to connect a modem in case the ARN experiences system problems. Note: To use the Netboot, Directed Netboot, or Local Boot software configuration options, you must connect a console the first time you power up the ARN. Refer to Chapter 2, “Starting the ARN,” for details.
Installing and Operating BayStack ARN Routers Connecting an External Console Modem To connect an external modem to the ARN back panel, you need an AT or Hayes compatible modem and the modem cable (Order No. 110307) that came in the ARN console/modem cable kit. Note: Do not use the null modem crossover adapter (Order No. 110308) in the ARN cable kit to connect to a modem. Complete the following steps: 1. Configure the modem, using the parameters in Table 1-4.
Installing the ARN Connecting to an Integrated V.34 Console Modem Module If your ARN contains an optional V.34 Console Modem module, you can connect the RJ-11 jack from the telephone line directly to the V.34 Console Modem interface. Table 1-4 on page 1-29 provides the default parameter settings for the V.34 Console Modem. Back-panel V.34 Modem Interface Console Modem Tx Rx RLSD DTR Modem To RJ-11 telephone receptacle ARN0072A Figure 1-24.
Installing and Operating BayStack ARN Routers Connecting the Power Cable Danger: Be sure that the power switch on the ARN back panel is in the OFF (0) position before you connect the power cable. To connect the power cable to the ARN, complete these steps: 1. Connect the power cable to the power connector on the left side of the ARN back panel (Figure 1-25). Power switch (off) UL Redundant Power 100-240~ 1.2A 50-60Hz UL To power outlet To redundant power supply Figure 1-25. 2.
Installing the ARN Installing the Flash Memory Card Bay Networks ships the router software on a PCMCIA flash memory card (Figure 1-26). The flash memory card provides storage for the Nonvolatile File System (NVFS) in the ARN. INSERT AN0060A Figure 1-26. Flash Memory Card Before starting the ARN, install the flash memory card supplied with the router: 1. Position the card with the label facing up and the INSERT arrow pointing toward the card receptacle. 2.
Installing and Operating BayStack ARN Routers Where to Go Next Use the following table to determine where you want to go next.
Chapter 2 Starting the ARN This chapter describes how to start the BayStack ARN router, as follows: Topic Go to Understanding the startup process 2-1 Starting the ARN for the first time 2-4 Using EZ-Install 2-5 Using Netboot, Directed Netboot, or Local Boot 2-6 Where to go next 2-16 Understanding the Startup Process To operate, the ARN requires two files: a software image and a configuration file. Each time you start the ARN, it completes a process to load these files.
Installing and Operating BayStack ARN Routers When you start the ARN for the first time, it completes an initial startup procedure to boot and connect to the network using either a default configuration file or one already customized and available on the network. You use one of four boot options to complete the initial software startup. Table 2-1 summarizes the four options; the sections that follow provide steps for completing each option. Table 2-1.
Starting the ARN You may not be able to use all methods described in this chapter to boot over some interfaces on your router. For example, you cannot netboot over an FT1/T1 interface. In some cases, you may use one interface to boot your router and then switch to a different interface (such as the FT1/T1 DSU/CSU) to establish your initial IP network connection to the management workstation. Table 2-2 lists supported boot options by interface type. Table 2-2.
Installing and Operating BayStack ARN Routers Starting the ARN for the First Time The ARN factory defaults are set to find the image file and configuration file from the following locations: • Image file -- on the local PCMCIA flash memory card • Configuration file -- over the network These default settings work with the default EZ-Install procedure.
Starting the ARN Using EZ-Install EZ-Install is the default installation option provided by Bay Networks. This option requires that your network administrator has set up the network so that you can start the EZ-Install procedure. In addition, this option requires that you: • Install a flash memory card. For instructions, see “Installing the Flash Memory Card” on page 1-33. • Connect at least one serial (COM) interface to the network. For instructions, see “Connecting Communications Cables” on page 1-10.
Installing and Operating BayStack ARN Routers Using Netboot, Directed Netboot, or Local Boot When you netboot or local boot the ARN, you must use a command line interface that accesses the router software. To use a command line interface, you can: • Wait for the ARN to local boot (that is, wait for the router to fail EZ-Install and then attempt to boot using its local configuration file). After the ARN boots locally, you can log in to the Technician Interface and redefine the boot process.
Starting the ARN 2. While the router is running the EZ-Install procedure, issue a break sequence from the management console. The ARN monitor login prompt appears. Note: Be sure to issue a break sequence before the boot process completes. Break sequences can vary, depending on the console type. Some management consoles have specific “Break” keys on their keyboards; other require a key sequence to issue a break (for example, Cntrl-C or ~ #).
Installing and Operating BayStack ARN Routers Continuing with Netboot Note: Continuing with the netboot option requires that you have already logged in to either the ARN monitor or Technician Interface command line software. For instructions, see “Logging in to the Command Line Software” on page 2-7. To use the netboot option, you must have at least one serial, Ethernet, or token ring interface connected to the network.
Starting the ARN The getcfg command shows the source location, either local or network, of the boot image file and the network configuration file. It also shows the interface configuration settings that you specified using the ifconfig command. If getcfg displays the correct information, continue to the next step. Otherwise, reenter the correct ifconfig command. If you need assistance, contact your network administrator. 3.
Installing and Operating BayStack ARN Routers Continuing with Directed Netboot Note: Continuing with the netboot option requires that you have already logged in to either the ARN monitor or Technician Interface command line software. For instructions, see “Logging in to the Command Line Software” on page 2-7. You must have at least one serial, 56/64K DSU/CSU, Ethernet, or token ring interface connected to the network to use the directed netboot option.
Starting the ARN To use the directed netboot feature: 1. At the command line prompt, enter the ifconfig command provided to you by your network administrator and press the Return key. The following is a sample command: ifconfig com1 9.0.0.2 255.0.0.0 9.0.0.3 For more information about the ifconfig command, see “Using the ifconfig Command” on page A-2. 2. Enter the bconfig commands provided by your network administrator and press the Return key.
Installing and Operating BayStack ARN Routers $ getcfg Boot Options boot image = network boot config = network host IP address = 192.32.5.8 image pathname = "/usr/arnstartup/krnl_arn.exe" config pathname = "/usr/arnstartup/config" Netboot Parameters: MAU1...None XCVR2..None COM1...IP=9.0.0.2, Mask=255.0.0.0, Next Hop=9.0.0.3 COM2...EZ-Install (disabled) COM3...EZ-Install (disabled) COM4...EZ-Install (disabled) COM5...EZ-Install (disabled) ARN0080A Figure 2-1.
Starting the ARN When the ARN boots, its LEDs flash in a particular order. To ensure that the installation was successful, see “Ensuring a Successful Installation” on page 3-9. 6. Ensure that the ARN is successfully connected to your network. To verify that the ARN is now connected to the network, contact your network administrator. To troubleshoot any problems, your network administrator can refer to Configuring BayStack Remote Access.
Installing and Operating BayStack ARN Routers To use the local boot feature: 1. At the command line prompt, type the following command and press the Return key to configure the ARN to use its local config file: bconfig config local Note: Since the default setting for finding the software image is local; you do not have to change this setting for the local boot option. 2.
Starting the ARN 5. Enter the following command and press the Return key to run the Quick-Start script: run inst_arn.bat The Quick-Start script begins running. 6. Using your completed Quick-Start worksheet from Appendix B, enter the appropriate network information as the prompts appear. The ARN uses this information to configure interfaces to the network. For sample Quick-Start screen output and for information on using Quick-Start commands, see Appendix B. 7.
Installing and Operating BayStack ARN Routers Where to Go Next Use the following table to determine where you want to go next.
Chapter 3 Operating the ARN This chapter describes how to operate the BayStack ARN router, as follows: Topic Page Understanding LED descriptions 3-1 Ensuring a successful installation 3-9 Powering on and off the ARN 3-11 Resetting the ARN 3-12 Removing a flash memory card 3-13 Protecting memory card files 3-14 Where to go next 3-15 Understanding the ARN LEDs Light-emitting diodes (LEDs) on the ARN provide information about how the ARN is operating.
Installing and Operating BayStack ARN Routers Base Module LEDs The base module includes diagnostic LEDs and LAN interface LEDs, visible on the front panel of the ARN. Diagnostic LEDs The base module diagnostic LEDs (Figure 3-1) indicate the status of the ARN itself. All of these LEDs light briefly when you turn on the ARN power switch.
Operating the ARN Table 3-1. Base Module Diagnostic LEDs (continued) LED Meaning Pwr Lights and remains on when the ARN is on and receiving power. RPS Lights and remains on when the redundant power supply (optional) is operating. Fan Lights and remains on if one or more ARN cooling fans stop operating. Base Lights and remains on when the base module is operating properly. Flashes slowly to indicate that the module is running its diagnostic tests.
Installing and Operating BayStack ARN Routers Ethernet 10/100BASE-Tx LEDs Table 3-3 describes the base module Ethernet 10/100BASE-Tx LEDs. Table 3-3. Base Module Ethernet 10/100BASE-Tx LEDs LED Meaning TX (Transmit) Lights when the Ethernet interface transmits data. RX (Receive) Lights when the Ethernet interface receives data. CL (Collision) Lights when the Ethernet interface detects a collision. Link Lights when the Ethernet interface has an established link.
Operating the ARN Expansion Module LEDs When the ARN has an installed expansion module, its interface LEDs are visible on the front panel. For the location of the optional ARN expansion module, see Figure 1-4 on page 1-9. Note: The ARN base module boots to a fully operational state before bringing up expansion module interfaces. Ethernet LEDs Table 3-6 describes the expansion module LEDs for the second Ethernet2 interface. Table 3-6.
Installing and Operating BayStack ARN Routers Serial LEDs Table 3-8 describes the expansion module serial interface LEDs. Table 3-8. Expansion Module Serial LEDs LED Meaning RLSD3 (Received Line Signal Detection 3) Lights when Received Line Signal Detection is active on COM 3. RLSD4 (Received Line Signal Detection 4) Lights when Received Line Signal Detection is active on COM 4. RLSD5 (Received Line Signal Detection 5) Lights when Received Line Signal Detection is active on COM 5.
Operating the ARN ISDN BRI LEDs (S/T or U Interfaces) Table 3-10 describes the ISDN adapter module LEDs. Table 3-10. ISDN BRI LEDs LED Meaning S/T Interface Unlabeled LED Lights when the ARN is using the D-channel. U Interface D (D-channel; 16-KB Management Channel) Lights when the ARN is using the D-channel. DD (Data Detect) Lights when the ISDN-BRI interface detects connection to an external device (that is, a switch).
Installing and Operating BayStack ARN Routers FT1/T1 and FE1/E1 DSU/CSU LEDs Table 3-12 describes the FT1/T1 and FE1/E1 DSU/CSU adapter module LEDs. Table 3-12. FT1/T1 and FE1/E1 DSU/CSU LEDs LED Meaning Red ALM Lights when the port is in a red alarm state. Yellow ALM Lights when the DSU/CSU receives a yellow alarm signal from the network. Loop Lights when you set the interface to loopback mode. Synch Lights when the port is synchronized with the T1/E1 network. X.
Operating the ARN Table 3-14. V.34 Modem LEDs LED Meaning TX (Transmit) Lights when the V.34 modem interface transmits data over the network. RX (Receive) Lights when the V.34 modem interface receives data from the network. RLSD (Received Line Signal Detection) Lights when the modem activates. DTR (Data Terminal Ready) Lights when the V.34 modem interface is ready to transmit data.
Installing and Operating BayStack ARN Routers • After completing the diagnostic testing procedure, the boot process begins. The Run and Boot LEDs indicate the boot status as shown in Table 3-15. Table 3-15.
Operating the ARN Powering On and Off The ARN power switch is located on the back panel (Figure 3-2). Power switch UL Redundant Power 100-240~ 1.2A 50-60Hz UL Console Modem ARN0019A Figure 3-2. ARN Power Switch To power on an ARN, press the power switch to the ON position (1). Verify that air is flowing by placing your hand next to the fan vents.
Installing and Operating BayStack ARN Routers Resetting the ARN The Reset button is set inside the ARN back panel and resides next to the flash card slot, as shown in Figure 3-3. UL Redundant Power 100-240~ 1.2A 50-60Hz UL Console Modem Reset button ARN0052A Figure 3-3. ARN Reset Button To press the Reset button, insert a small pointed object (for example, a paper clip) into the Reset button hole.
Operating the ARN Removing a Flash Memory Card To remove a memory card from an ARN: 1. Press the eject button next to the card receptacle on the back panel. The card pops out slightly. 2. Pull the memory card out of the card receptacle. See Figure 3-4. Caution: Do not remove the flash memory card while the router is operating. Removing the memory card interferes with current networking operations. UL 100-240~ 1.2A 50-60Hz Redundant Power UL Console 2 Modem 1 ARN0053A Figure 3-4.
Installing and Operating BayStack ARN Routers Protecting Memory Card Files Bay Networks ships each memory card with its read/write protect switch in the unprotected position (Figure 3-5). After successfully loading the configuration file and saving your configuration, you may want to write-protect the memory card for backup purposes. Note: You typically do not operate the ARN with a write-protected memory card.
Operating the ARN Where to Go Next Use the following table to determine where you want to go next.
Chapter 4 Installing a WAN Adapter Module This chapter describes how to install a wide area network (WAN) adapter module in the ARN. Topic Page Preparing for Installation 4-1 Installing an Adapter Module 4-6 What to Do Next 4-8 Note: This chapter provides generic instructions that apply to all ARN WAN adapter modules. For specific information about the module you are installing, this document refers to a module-specific Supplement, which ships in the adapter module upgrade kit.
Installing and Operating BayStack ARN Routers Downloading New Boot and Diagnostic Code When installating an adapter module as an upgrade to your existing hardware configuration, you must verify that the ARN contains the minimum required version of programmable read-only memory (PROM) code for the module you are installing. BayRS release media includes the latest boot and diagnostic code at the time it is shipped, but if your upgrade requires newer code, you must manually download it to the router PROM.
Installing a WAN Adapter Module 4. Determine which of the two front-panel adapter module slots to use (Figure 4-1). ARN front panel 1 Telco 2 DSU/CSU Tx RLSD Rx DTR ARN0076A Figure 4-1. 5. Location of Adapter Module Slots 1 and 2 Remove the installed adapter module or the slot filler panel. • To install the adapter module in an empty slot, go to “Removing the Filler Panel” on page 4-3. • To replace an installed adapter module, go to “Removing an Adapter Module” on page 4-5.
Installing and Operating BayStack ARN Routers Metal tab on filler panel 1 2 Telco Tx RLSD DSU/CSU Rx DTR ARN0077A Figure 4-2. Removing the Filler Panel from Slot 1 2. Grasp the metal tab on the filler panel and pull forward to remove the panel. 3. Set the filler panel aside. To operate the ARN without an adapter module in this slot, you must reinstall the filler panel. 4. 4-4 Skip the next section and go to “Installing an Adapter Module” on page 4-6.
Installing a WAN Adapter Module Removing an Adapter Module To remove a WAN adapter module: 1. 1 Using a Phillips screwdriver, remove the screw that secures the adapter module you want to remove (Figure 4-3). ISDN DSU/CSU 2 ARN0033A Figure 4-3. 2. Removing the Adapter Module Screw Pull the adapter module toward you to detach it from the base module connector in the ARN chassis. Grasp the adapter module’s metal tab, or insert a thin tool (such as a flathead screwdriver) in the slot on the tab.
Installing and Operating BayStack ARN Routers Installing an Adapter Module To install a WAN adapter module: 1. Hold the adapter module with the components facing up (Figure 4-4). Base module connector ARN0038A Figure 4-4. 2. Adapter Module Ready for Installation Slide the adapter module into the slot, making sure that the slot guides engage both sides of the adapter module (Figure 4-5). ARN0032A Figure 4-5.
Installing a WAN Adapter Module 3. Push the adapter module in until its connector pins align with the base module connector socket in the ARN chassis. 4. Using a Phillips screwdriver, insert and tighten the screw (Figure 4-6). 1 ISDN DSU/CSU 2 ARN0033A Figure 4-6. Securing the Adapter Module to the Front Panel 5. Remove the antistatic wrist strap. 6. Connect the appropriate WAN cabling to the new interface.
Installing and Operating BayStack ARN Routers What to Do Next Before you can use the WAN adapter module after installation, you must start the router on the network and modify its configuration file to include the new interface. See your module-specific Supplement for a list of software installation tasks and related documentation. Please note the following: 4-8 • BayRS recognizes the ARN WAN adapter module interfaces by their front-panel slot number.
Appendix A Configuring the ARN for Netboot and Directed Netboot This appendix describes how to configure the BayStack ARN router for Netboot and Directed Netboot, as follows: Topic Page Using the ifconfig command A-2 Using the bconfig command A-7 Verifying your configuration A-8 The ifconfig and bconfig commands configure the ARN for netboot and directed netboot. • Use the ifconfig command to configure the router initial IP interface to the network.
Installing and Operating BayStack ARN Routers Using the ifconfig Command A router interface cannot communicate in an IP network without an IP address. Because an ARN netboots over one of its serial, 56/64K DSU/CSU, Ethernet, or token ring links, the netboot interface must have a valid IP address. You use the interface configuration command ifconfig to do the following: • Configure the router’s initial IP interface to the network.
Configuring the ARN for Netboot and Directed Netboot Table A-1 describes the ifconfig command settings for configuring a COM interface. Table A-1. Setting COM Interface ifconfig Command Settings Description Default Setting -d Resets the router IP interface settings to the default values. This setting tries four WAN configurations in the following order until it finds the correct type for the router connection to the network: 1.
Installing and Operating BayStack ARN Routers Table A-1. COM Interface ifconfig Command Settings (continued) Setting Description Specifies the IP subnet mask of the interface you set with . Provide this address in dotted decimal notation. Specifies the IP address of the next-hop router. Provide this address in dotted decimal notation. Specify this address only if there are intermediate routers between the router and the BootP server.
Configuring the ARN for Netboot and Directed Netboot Configuring a Token Ring Interface for Network Booting To configure an ARN token ring interface for network booting, use the following command format: ifconfig [-d] [ -r ] [ []] Table A-3 describes the ifconfig command settings for configuring the router token ring interface. Table A-3.
Installing and Operating BayStack ARN Routers Enabling and Disabling Interfaces with ifconfig To enable or disable an ARN interface for the network boot process, use the following command formats: ifconfig -disable ifconfig -enable Table A-4 describes the ifconfig command settings for enabling and disabling interfaces for network booting. Table A-4.
Configuring the ARN for Netboot and Directed Netboot Using the bconfig Command You use the bconfig command to configure the boot option. • To use netboot, you use the boot configuration command bconfig to specify that the ARN software image file or configuration file resides on the network. • To use directed netboot, you use the bconfig command to specify the IP address of the server and the full pathname to the software image and configuration file.
Installing and Operating BayStack ARN Routers Examples of bconfig Commands 1. Configure the default netboot procedure. Use a local image file and look for the configuration file over the network using BootP. bconfig -d image (or bconfig image local) bconfig -d config (or bconfig config network) 2. Use netboot for both the image file and the configuration file. bconfig image network bconfig config network 3. Use a local configuration file and use directed netboot for the software image file.
Configuring the ARN for Netboot and Directed Netboot The following sample response shows the settings for an ARN with one Ethernet, one token ring, and five serial interfaces: Boot Options boot image=local boot config=network Netboot Parameters: MAU1...None XCVR2..None COM1...EZ-Install COM2...EZ-Install COM3...EZ-Install COM4...EZ-Install COM5...
Appendix B Using Local Boot (the Quick-Start Procedure) This appendix describes how to complete a local boot by running the Quick-Start script, as follows: Topic Page Prepare to run Quick-Start B-2 Understand Quick-Start connector names and numbers B-2 Fill out Quick-Start sample worksheets B-4 Run the Quick-Start script B-16 This appendix explains how to local boot the ARN and create an initial Internet Protocol (IP) interface using the Quick-Start procedure to get the ARN router up and running
Installing and Operating BayStack ARN Routers Before You Run Quick-Start To aid you in answering Quick-Start prompts, some sample worksheets are provided. Fill them out with assistance from your network administrator. The worksheets contain options that appear at each prompt when configuring a serial interface, and space for you to enter your own information. If you are configuring an interface other than the serial interface, the prompts will differ from what is shown in the sample worksheets.
Using Local Boot (the Quick-Start Procedure) Expansion module Adapter modules U 1 ISDN BRI withNT1 D B1 DD B2 COM3 RLSD3 COM4 COM5 RLSD4 RLSD5 Serial COM 2 Tx RLSD Serial 10BaseT AUI Run Pwr Boot RPS Adapter1 DCM Fail Fan Adapter2 Base Expansion PCMCIA Rx Cl BayStack Ethernet 1 Advanced Remote Node Base module Figure B-1. ARN0006A ARN Module Locations Table B-1 provides the connector names and numbers you should use during the Quick-Start procedure. Table B-1.
Installing and Operating BayStack ARN Routers Filling Out the Worksheets The inst_arn.bat script provides many options for configuring the ARN on a network. Since typical remote access uses a serial interface over a wide area connection, this sample describes only the options involved with a serial configuration. Note: This section provides worksheets only for a serial interface configuration over a wide area connection. It does not contain worksheets for LAN configuration options.
Using Local Boot (the Quick-Start Procedure) Global Information Worksheet This section contains the prompts and possible options relating to all ARN serial configurations. Write your selection in the “Your Response” column. Global Information Worksheet Step Requested Information Options Your Response 1 Enter the module number [1]: The script lists the available modules that you can use to connect the router’s IP network interface to Site Manager.
Installing and Operating BayStack ARN Routers Global Information Worksheet (continued) Step Requested Information Options Enter connector number [1]: If there is only one connector on the module you chose, the script automatically assigns a connector number and bypasses this prompt. Otherwise, the script lists the available connectors. For example, for an ARN with five serial connectors, the options are 1. 2. 3. 4. 5. Your Response COM1 COM2 COM3 COM4 COM5 Enter clock source number [2]: 1.
Using Local Boot (the Quick-Start Procedure) Global Information Worksheet (continued) Step Requested Information Options Your Response 3 Enter IP address in dotted decimal notation: Enter the IP address for the COM interface. Enter IP subnetwork mask in dotted decimal notation: Enter the subnetwork mask for the COM interface IP address. Is the router connected to the same local area network as the Site Manager workstation? (y/n) [n]: y(es) n(o) Press the Return key.
Installing and Operating BayStack ARN Routers Global Information Worksheet (continued) Step Requested Information Options 6 Do you want to enable TI TELNET (y/n) [n]: y(es) n(o) Your Response Enabling TELNET is optional. 7 Do you wish to save this configuration to a file? (y/n) [y] y(es) n(o) Press the Return key. Enter filename [startup.cfg]: We recommend using the default filename. Press the Return key.
Using Local Boot (the Quick-Start Procedure) RIP Worksheet (continued) Requested Information Options Specify the version of RIP. The default is to run RIP1. Rip2 runs RIP2 without the automatic aggregation of subnets that RIP1 provides. RIG2_AGGR provices the automatic aggregation of subnets for RIP2. 1. RIP1 2. RIP2 3.
Installing and Operating BayStack ARN Routers OSPF Worksheet (continued) Requested Information Options Enter OSPF MTU size selection [1]: 1. Default 2. Ethernet size (Bay Networks Series 5 compatible) 3. User Defined MTU Enter OSPF interface type selection [1]: 1. 2. 3. 4. 5. Your Response Broadcast NBMA Point-to-Point Point-to-Multipoint (Proprietary) Point-to-Multipoint (Per OSPF Standard) Note: When using a wide area protocol other than Bay Networks Proprietary PPP, you should select NBMA.
Using Local Boot (the Quick-Start Procedure) OSPF Worksheet (continued) Requested Information Options Enter decimal value in seconds for Poll Interval [120]: Enter the largest number of seconds allowed between Hello packets that the router sends to an inactive NBMA neighbor. (For NBMA only) Your Response The router suggests a 120-second interval. Enter IP address of neighbor in dotted decimal notation or enter q to quit: Enter addresses for all NBMA neighbors you want the router to communicate with.
Installing and Operating BayStack ARN Routers Static Route to Site Manager Worksheet (continued) Requested Information Options Follow the default route for unknown subnets? (y/n) [n]: y(es) n(o) Your Response The default route does not apply for subnets unless you enter y at this prompt. Wide Area Protocol Worksheets This section contains requested information and possible options relating to wide area protocol choices on the Global Worksheet.
Using Local Boot (the Quick-Start Procedure) Bay Networks Proprietary PPP Worksheet (continued) Requested Information Options Enter Remote Address selection [3]: 1. DCE 2. DTE 3. EXPLICIT Your Response Note: Reverse local and remote address values when configuring the device at the other end of the circuit. (Exception: When connecting to a Series 5 router that uses DCE/DTE addressing, use the SAME local address value.
Installing and Operating BayStack ARN Routers PPP Standard Worksheet Requested Information Options Enter Remote IP address in dotted decimal notation: Enter the IP address of the peer connection. Do you wish to turn on the PPP echo function? (y/n) [n]: y(es) n(o) Enable PAP (Password Authentication Protocol)? (y/n) [n]: y(es) n(o) Your Response Note: If you answer y(es), the router requests a PAP ID and password for this interface.
Using Local Boot (the Quick-Start Procedure) PPP Standard Worksheet (continued) Requested Information Options Enable use of the Remote Peer router’s LQR Timer? (y/n) [y]: y(es) n(o) (For LQR Protocol only) Note: If the LQR timer is enabled, the remote peer router maintains its own LQR timer for this interface. When the LQR timer is disabled, the AN is responsible for maintaining the timer for this interface.
Installing and Operating BayStack ARN Routers SMDS Worksheet Requested Information Options Enter 10-digit individual address: Enter the individual address assigned to you by your SMDS service provider. Enter 10-digit group address: Enter the group address assigned to you by your SMDS service provider. Enter 10-digit arp address: Enter the Address Resolution Protocol (ARP) address assigned to you by your SMDS service provider.
Using Local Boot (the Quick-Start Procedure) 5. Type the following command and press the Return key: run inst_arn.bat 6. Follow the script online, using your worksheets when responding to its prompts. The list of commands in Table B-2 describe how to interact with the Quick-Start script. Table B-2. Quick-Start Commands Task Action Details Accept a default value Press Return Your console displays default values in brackets; for example, [E11].
Installing and Operating BayStack ARN Routers 7. Name and save the configuration file. The script begins to test the configuration on the new IP interface (Figure B-2). Testing local IP interface ping -IP 192.32.00.000 -r5 IP ping: 192.32.00.000 is IP ping: 192.32.00.000 is IP ping: 192.32.00.000 is IP ping: 192.32.00.000 is IP ping: 192.32.00.
Appendix C ARN Technical Specifications This appendix provides technical specifications and a product overview of the ARN and its interface options, as follows: Topic Page Physical specifications C-1 Electrical specifications C-2 Environmental specifications C-2 Hardware communications options C-3 Physical Specifications The dimensions and weight of the ARN are as follows: • • • • Height: 2.8 in. (7.1 cm) Width: 17.25 in. (43.8 cm) Depth: 12.5 in. (31.8 cm) Weight: 15 lb (6.
Installing and Operating BayStack ARN Routers If you are installing your ARN in an electronic equipment rack, make sure that the rack meets the following specifications: • • • • Heavy-duty steel construction Electronic Industries Association (EIA) standard hole-spacing Width of 19 in. (48.26 cm) Depth of 24 in. (60.96 cm) Electrical Specifications Your installation site must meet the following power requirements: • • • Proximity to wall receptacle: within 6 ft (1.
ARN Technical Specifications Hardware Communications Options The ARN is designed to scale to your needs. In addition to either an Ethernet or token ring base module, you can add an optional expansion and up to two optional adapter modules to the ARN.
Installing and Operating BayStack ARN Routers • One ISDN BRI U interface • One V.34 modem interface • One 56/64K DSU/CSU interface • One FE1/E1 DSU/CSU interface • One FT1/T1 DSU/CSU interface • One X.25 PAD interface Table C-2 describes each interface. Table C-2. Network Interface Ethernet and Second Ethernet Network Interfaces Available on ARNs Description Supports the Ethernet and IEEE 802.3 standards that provide LAN connectivity.
ARN Technical Specifications Table C-2. Network Interfaces Available on ARNs (continued) Network Interface Description Serial Provides WAN connectivity. ARN models can have up to five serial ports (three on an expansion module and up to two adapter modules). Each port can operate independently with RS-232, RS-422, RS-449, RS-530, V.28, V.35, and X.21 cables. Serial capability allows internal or external clocking. ISDN BRI Supports an S/T or U interface.
Installing and Operating BayStack ARN Routers Ethernet Attachment Unit Interface (AUI) The ARN Ethernet 10BASE-T base module, Ethernet expansion module, and Ethernet/tri-serial expansion modules contain a 10BASE-T standard 802.3 AUI DB-15 receptacle with a slide lock. Note: The AUI is designed only for connection to a transceiver. Connecting the AUI directly to an AUI on an Ethernet station (without a transceiver) violates IEEE 802.3 standards.
ARN Technical Specifications Ethernet 10BASE-T and 10/100BASE-Tx Interfaces The Ethernet 10BASE-T and 10/100BASE-Tx interfaces provide UTP support. Table C-4 identifies the pin locations and function assignments for these interfaces. Table C-4. Pin Assignment 12345678 114200-D Rev 00 10BASE-T and 10/100BASE-Tx Interface Pin Assignments Pin No.
Installing and Operating BayStack ARN Routers Token Ring STP Interface The token ring STP interface provides shielded twisted-pair support. The ARN token ring base module, token ring expansion module, and token ring/tri-serial expansion modules contain this standard 802.5 DB-9 receptacle. Table C-5 shows the pin assignments for the standard 9-pin STP receptacle on the ARN base or expansion module and identifies its pin locations. Table C-5.
ARN Technical Specifications Token Ring UTP Interface The token ring UTP interface provides unshielded twisted-pair support. The ARN token ring expansion module and token ring/tri-serial expansion modules contain this receptacle. Table C-6 shows the RJ-45 pin assignments for the UTP interface and identifies the pin locations. Table C-6. Pin Assignment 12345678 Token Ring UTP Interface Pin Assignments Pin No.
Installing and Operating BayStack ARN Routers • RS-422 connections (Order No. 7318) • RS-232 connections (Order No. 7826) • RS-530 connections (Order No. AE0018012) Table C-7 shows the signal and pin assignments for these connectors. Table C-7. Serial Interface Pin Assignments Pin Assignment Pin No. Signal Name Pin No.
ARN Technical Specifications ISDN BRI U Interface The ARN supports the BRI standard for ISDN using an optional ISDN/BRI adapter module. The integrated ISDN BRI functionality allows you to connect directly to the ISDN network, through a U interface, as opposed to connecting over a terminal adapter. This solution reduces equipment costs and simplifies connection to an ISDN switch. The BRI implementation supports two dial service applications: dial-on-demand and dial backup.
Installing and Operating BayStack ARN Routers ISDN BRI S/T Interface The ARN supports the BRI standard for ISDN using an optional ISDN/BRI adapter module. The integrated ISDN BRI functionality allows you to connect to the ISDN network over a terminal adapter through an S/T interface. The BRI implementation supports two dial service applications: dial-on-demand and dial backup. Configuring Dial Services describes these services and how to configure them for connection to an ISDN network.
ARN Technical Specifications 56/64K DSU/CSU Interface The ARN supports direct synchronous access to either a 56K dataphone digital service (DDS) or 64K Clear Channel dedicated services using an optional 56/64K DSU/CSU adapter module. The 56/64K DSU/CSU interface uses an 8-pin RJ-45 connector as shown in Table C-10. Table C-10 lists the 56/64K DSU/CSU interface pin assignments. Table C-10. Pin Assignment 12345678 56/64K DSU/CSU Interface Pin Assignments Pin No.
Installing and Operating BayStack ARN Routers Table C-11 lists the ARN FT1/T1 DSU/CSU connector pinouts. Table C-11. RJ-48C Connector Pinouts Pin Assignment 12345678 C-14 Pin No.
ARN Technical Specifications X.25 PAD Connections The ARN provides X.25 PAD functions that enable the router to access X.25 services through the 8 ports of an attached breakout box. The PAD establishes and maintains links with the packet switch network, assembles and disassembles packets, communicates with the character terminal, and handles special control processes for the character terminal. You connect the X.25 ports using an RS-232-D serial connection as shown in Table C-12. Table C-12. X.
Installing and Operating BayStack ARN Routers RJ-11 Interface (for V.34 Modem) The ARN supports a V.34 modem connection using an optional V.34 modem adapter module. The V.34 functionality allows you to connect directly to a phone line, as opposed to connecting over an external modem. This solution reduces equipment costs and simplifies connection to a wide area network. Table C-13 lists the V.34 interface pin assignments. Table C-13. Pin Assignment 123456 V.34 Interface Pin Assignments Pin No.
ARN Technical Specifications The connector pin assignment described in Table C-14 shows signal and pin assignments for the Console port. Table C-14. Local Console Port DB-9 Pin Assignments Pin Assignment Pin 1 Pin 9 Pin No.
Installing and Operating BayStack ARN Routers The connector pin assignment described in Table C-15 shows signal and pin assignments for the modem port. Table C-15. Service Modem Port DB-9 Pin Assignments Pin Assignment Pin 1 Pin 9 C-18 Pin No.
Appendix D Requirements for European Operation This appendix provides information required for operating the ARN in Europe, cabling requirements for synchronous (serial) connection, and information about using the serial adapter module (Order No. CV0004001) and ISDN BRI adapter module (Order No. CV0004002) in Europe. ARN Ethernet Base Model Safety Status Table D-1 lists the safety status of interconnection points to the connection of other equipment. Table D-1. 114200-D Rev 00 Safety Status (Order Nos.
Installing and Operating BayStack ARN Routers ARN 10/100BASE-T Ethernet Base Model Safety Status Table D-2 lists the safety status of interconnection points to the connection of other equipment. Table D-2. Safety Status (Order Nos. CV1001011, CV1001012, CV1001013, CV1001014, CV1001015, CV1001016, CV1001017, CV1001018, CV1001019, CV1001020) Port Location Port Description Type of Circuit UTP Ethernet 10/100BASE-T SELV Console V.
Requirements for European Operation ARN Expansion Modules Safety Status ARN expansion modules are upgrade options that provide an additional synchronous interface. These options can be installed in any ARN model. Table D-4 lists the safety status of the interconnection point (COM3, COM4, COM5, COM6, COM7, COM8, and COM9) provided by each of the expansion modules (Order Nos. CV0004011, CV0004012, CV0004013, CV0004014, CV0004015, CV0004026, and CV0004027) to the connection of other equipment. Table D-4.
Installing and Operating BayStack ARN Routers 15 Feet 1 Pin 15 16 Pin 30 31 Pin 44 Pin 1 Pin 13 Pin 14 Pin 25 25-position D-Sub plug with M-3 jack screws (ground shield connected to backshell) 44-position D-Sub plug with screw locks (ground shield connected to backshell) CAB0069B Figure D-1. Cable 7837 (V.28 Compliant) Table D-5. WAN Interface (Order No.
Requirements for European Operation 15 ft (4.57 m) Pin 1 Pin 25 Pin 1 Pin 13 Pin 26 Pin 50 Pin 14 Pin 25 50-position 0.8-mm plug (ground shield connected to internal shell) 25-position D-sub plug with screw locks (ground shield connected to backshell) CAB0073A Figure D-2. Cable 7934 (V.28 Compliant) Table D-6. WAN Interface (Order No.
Installing and Operating BayStack ARN Routers 15 Feet Pin 1 Pin 15 Pin 16 Pin 30 Pin 31 Pin 44 44-position D-Sub plug with screw locks (ground shield connected to backshell) A C E H P S U W Y AA 34-position V.35 plug with screw jack retainers (ground shield connected to backshell) B D F J R T V X CAB0043A Figure D-3. Cable 7220 (V.35 Compliant) Table D-7. V.35 Interface (Order No.
Requirements for European Operation Table D-7. V.35 Interface (Order No.
Installing and Operating BayStack ARN Routers 15 ft (4.57 m) Pin 1 Pin 25 Pin 26 Pin 50 B D F R T V X Y 50-position 0.8-mm plug (ground shield connected to internal shell) A C E H P S U W AA 34-position V.35 plug with screw jack retainers (ground shield connected to backshell) CAB0070A Figure D-4. Cable 7932 (V.35 Compliant) Table D-8. V.35 Interface (Order No.
Requirements for European Operation Table D-8. V.35 Interface (Order No.
Installing and Operating BayStack ARN Routers 15 Feet Pin 1 Pin 15 Pin 16 Pin 30 Pin 31 Pin 44 Pin 1 Pin 8 Pin 9 Pin 15 15-position D-Sub plug with locking posts (ground shield connected to backshell) 44-position D-Sub plug with screw locks (ground shield connected to backshell) CAB0068A Figure D-5. Cable 7224 (X.21 Compliant) Table D-9. X.21 Interface (Order No.
Requirements for European Operation 15 ft (4.57 m) Pin 1 Pin 25 Pin 26 Pin 50 50-position 0.8-mm plug (ground shield connected to internal shell) Pin 1 Pin 8 Pin 9 Pin 15 15-position D-sub plug with M-3 jack screws (ground shield connected to backshell) CAB0074A Figure D-6. Cable 7936 (X.21 Compliant) Table D-10. X.21 Interface (Order No.
Installing and Operating BayStack ARN Routers Serial Adapter Module Requirements The serial adapter module (Order No. CV0004001) is approved only for installation in a host, and with host attachments, which are either type approved for such apparatus or, if supplied after 1st March 1989, are marked with or supplied with a statement that the host is supplied under the terms of General Approval Number NS/G/1234/J/100003. Installation of the serial adapter module in any BayStack ARN chassis (Order Nos.
Requirements for European Operation ISDN BRI Adapter Module Requirements The ISDN BRI adapter module (Order No. CV0004002) is approved only for installation in a host, and with host attachments, which are either type approved for such apparatus or, if supplied after 1st March 1989, are marked with or supplied with a statement that the host is supplied under the terms of BABT General Approval Number NS/G/1234/J/100003. Installation of the ISDN BRI module in any BayStack ARN chassis (Order Nos.
Installing and Operating BayStack ARN Routers Power Requirements for ISDN BRI and Serial Adapter Modules The ISDN BRI and serial adapter modules obtain power from the host chassis and have the power requirements shown in Table D-14. Table D-14. ISDN BRI Power Requirements Voltage Amperage +5 V 1A +12 V 0.15 A -12 V 0.15 A The power drawn from the host chassis combined with that required for any other cards and accessories must be within the power rating of the host chassis.
Requirements for European Operation ISDN Module Typical host chassis X Y X Y Baseboard SELV cards AN0060A 114200-D Rev 00 Figure D-7. Clearance and Creepage Distances for ISDN BRI and Serial Adapter Modules Table D-15. Clearance and Creepage Distances for ISDN BRI and Serial Adapter Modules Clearance (X) Creepage (Y) Voltage used or generated by other parts of the host or expansion card 2.0 mm 2.4 (3.8) mm Up to 50 V RMS or V DC 2.6 mm 3.0 (4.8) mm Up to 125 V RMS or V DC 4.0 mm 5.
Installing and Operating BayStack ARN Routers The creepage distances apply to the normal office environment. When the local environment within the host chassis is subject to conductive pollution or dry nonconductive pollution that could become conductive due to condensation, the creepage distances shown in parentheses in Table D-15 apply.
Index Numbers 10/100BASE-Tx pin assignments, C-7 100BASE-Fx, 1-9 interface, connecting to, 1-13 10BASE-T interface, connecting to, 1-12 7934, 50-pin to RS-232 cable, D-5 A acronyms, xix adapter modules connecting to DSU/CSU interfaces, 1-19, 1-20, 1-21, 1-24 ISDN interfaces, 1-18 serial interfaces, 1-17 V.34 interface, 1-22 DSU/CSU LEDs, 3-7, 3-8 interface options, 1-9, C-3 ISDN LEDs, 3-7 locating, 1-9 serial LED, 3-6 V.
base module (continued) serial LEDs, 3-6 token ring interface, 1-9 token ring LEDs, 3-4 Bay Networks Proprietary PPP protocol, worksheet for, B-12 Standard protocol, A-3 B-channel #1 (B1) LED, 3-7 B-channel #2 (B2) LED, 3-7 bconfig command default netboot settings, A-8 described, 2-10 directed netboot, A-8 examples, A-8 format, A-7 local boot, A-8 using, A-7 boot command directed netboot, 2-12 local boot, 2-14, B-16 netboot, 2-9 getcfg command display, A-9 interrupting, 2-6 options, described, 2-2 Boot LED,
configuration file default locations, 2-4 D configuring DSU/CSU interfaces, A-2 Ethernet interfaces, A-4 serial interfaces, A-2 token ring interfaces, A-5 data collection module (DCM) LED, 3-3 connecting 100BASE-Fx cables, 1-13 10BASE-T cables, 1-12 AUI cables, 1-11 communications cables, 1-10 DSU/CSU cables, 1-19, 1-20, 1-21, 1-24 Ethernet cables, 1-10, 1-12, 1-13 ISDN cables, 1-18 management console cables, 1-25 to 1-26 modem cables back panel, 1-30 front panel, 1-22 PC console cables, 1-25 power cabl
electronic enclosure rack installing in, 1-6 specifications, 1-4, C-2 environmental specifications, C-2 Ethernet base module LEDs, 3-3 interface types 10/100BASE-Tx, 1-9 10BASE-T, 1-9 AUI, 1-9 base module, 1-9 expansion module, 1-9 interfaces configuring, A-4 connecting to, 1-10, 1-12, 1-13 ifconfig settings, A-4 pin assignments 10/100BASE-Tx, C-7 AUI, C-6 European operating specifications, D-1 to D-16 Expansion LED, 3-3 expansion module Ethernet interface 10BASE-T, 1-9 AUI, 1-9 Ethernet LEDs, 3-5 interface
Flash memory cards, 1-33 preparation for, 1-5 to 1-8 interfaces descriptions of, C-4 enabling and disabling, A-6 Ethernet 10/100BASE-Tx, 1-9 10BASE-T, 1-9 AUI, 1-9 fiber, 1-9 serial, 1-9 token ring STP, 1-9 UTP, 1-9 internal clocking, setting, A-3 IP address settings DSU/CSU, A-3 Ethernet, A-4 serial, A-3 token ring, A-5 connector settings DSU/CSU, A-3 Ethernet, A-4 ring speed, A-5 serial, A-3 token ring, A-5 default settings DSU/CSU, A-3 Ethernet, A-4 serial, A-3 token ring, A-5 interface, testing during Q
modem back-panel interface, C-17 cable connecting, 1-29 supplied, 1-2 connecting to, 1-30 default settings adapter module, 1-23 external, 1-29 interface connecting to, 1-30 pin assignments, C-18 modules, locating, 1-9 N netboot attaching a console for, 1-25 attaching a modem for, 1-29 bconfig command, A-8 described, 2-2 ifconfig command, A-2 requirements, 2-2, 2-6 using, 2-6, 2-8 ISDN port connector, C-14 modem interface, C-18 RJ-11, C-16 serial interface, C-10 token ring STP interface, C-8 UTP interface,
reset button LEDs and, 3-12 using, 3-12 Standard protocol, Bay Networks, A-3 RIP routing protocol, worksheet for, B-8 startup options, displaying, A-8 RJ-11 interface pin assignments, C-16 STP cables, connecting, 1-14 interfaces connecting to, 1-14 pin assignments, C-8 RMON (remote monitoring), 3-3 router software image default boot location, 2-4 defined, 2-1 European, D-1 to D-16 physical, C-1 RS-232 connections console (service) interface, C-15, C-16 serial interface, C-9 service modem interface,
U UTP cables, connecting to, 1-15 interfaces connecting to, 1-15 pin assignments, C-9 V V.28 connections, C-9, D-3 V.34 connections, 1-22, 1-31, C-16 V.35 connections, C-9, D-3 voltage specifications, C-2 W warm boot, 3-12 wire fault (WFLT) LED, 3-4, 3-5 wiring, 1-1 X X.