
Technical data


Installing and Operating BayStack ARN/DC Routers
2-4
116273-B Rev 00
Starting the ARN/DC for the First Time
The ARN/DC factory defaults are set to find the image file and configuration file
from the following locations:
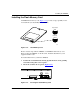
• Image file -- on the local PCMCIA Flash memory card
• Configuration file -- over the network
These default settings work with the default EZ-Install procedure.
The first time you power on an ARN/DC, the router steps through its diagnostic
tests and then attempts to boot over all of its serial (COM) interfaces using
EZ-Install.
If your network administrator has configured the network for the EZ-Install
procedure, the router boots using its local image and obtains its configuration file
over the network. Your network administrator can then connect to the ARN/DC
and manage it remotely. For more information, refer to the next section, “
Using
EZ-Install.”
If your network administrator does not configure the network for EZ-Install, the
ARN/DC cannot obtain its configuration file from the network, and the EZ-Install
procedure fails. The ARN/DC then attempts to boot locally with the configuration
file that resides on its Flash memory card. Refer to “
Using Netboot, Directed
Netboot, or Local Boot” for more information.
If both the EZ-Install and local boot attempts fail, the EZ-Install and local boot
processes repeat until one of the following occurs:
• The ARN/DC boots successfully.
• You interrupt the boot process to enter the ARN/DC monitor.
• You turn off the ARN/DC.
The following sections describe how to use each of the different boot options for
the ARN/DC.
Note:
Coordinate the initial startup of the ARN/DC with your network
administrator. To determine which software configuration option is best for
your site and for instructions on setting up a boot server, the network
administrator can refer to Configuring BayStack Remote Access.