
Specifications
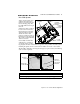
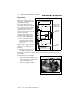
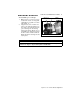
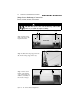
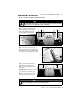
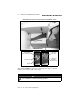
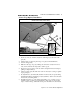

Table Of Contents
- ChapTER 1: ABOUT THIS MANUAL
- CHAPTER 2: PRODUCT SPECIFICATIONS
- ChapTER 3: COMPONENTS/sYSTEMS
- Electrical System (12Volt DC)
- Fuses and/or Circuit Breakers
- Dash Programming (1952BV only)
- Controls
- Navigation and Interior Lights
- Compass
- Depth Finder
- Bow Mount For Trolling Motor-1804PC and 1954CW
- Anchoring
- Ski Tow Ring
- Ski Pylon (outboard models)
- Hull Exterior Drains & Hardware
- Quick Oil Drain System
- Fuel System
- Bilge Blower
- Live Well System
- Bilge Pump
- Jump Seat to Sunlounge Conversion
- Sleeper Seat Adjustment
- Removable Fishing Seats (1804PC and 1954CW)
- Canvas Top (Option) Installation
- Canvas Stowage
- ChapTER 4: Wiring Diagrams
- Appendix A: BAYLINER CAPRI LIMITED WARRANTY

CHAPTER 3: COMPONENTS/SYSTEMS 33
Capri 16’ - 19’ • Owner’s Manual Supplement
Canvas Top (Option) Installation
1. Insert eye ends (A) of main bow (B) into deck hinges (C) and secure with
pins (D).
2. Unfold canvas top and snap front edge of top (E) to windshield frame.
3. Close front zipper (F).
4. Pull aft on aft edge of top (G), making sure canvas lies evenly from side to
side, and hook hold down straps (H) to deck loops (I).
5. If canvas top does not have a smooth, taut look, tighten hold down straps by
pulling on strap buckle (J).
6. Align secondary bow (K) with center seam of canvas by loosening or tighten-
ing top straps (L).
7. No adjustments to jaw slides (M) should be needed as they are preset during
manufacturing. Before attempting to adjust jawslides, obtain correct measure-
ments from your selling dealer.
8. If additional canvas (i.e. side curtains, slant back cover, or camper cover) is
installed, canvas top may need readjustment to align snaps on canvas with
snaps on boat. Like top, additional canvas pieces should be smooth and taut.
L
K
E
F
G
H
I
M
J
A
C
D
CANVAS INSTALLATION (TYPICAL VIEW)
B