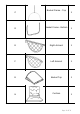
Caution : You should read this before you proceed BASKET CHAIR Label Picture Description QTY A Basket Seat 1 B Basket Back 1 Page 1 OF 8
C D Basket Frame - Top Basket Frame - Bottom 1 1 E Right Armrest 1 F Left Armrest 1 G Basket Top 1 H Cushion 1 Page 2 OF 8
Label Picture Description QTY ① Plastic Bolt Cap 19 ② Plastic Nut Cap 3 ③ Bolt M6*20mm 8 ④ Bolt M6*35mm 10 ⑤ Bolt M6*40mm 3 ⑥ Nut 3 ⑦ Washer Ring 21 ⑧ Wrench 1 ⑨ Allen Key 1 Before Beginning Assembly: Page 3 OF 8
Overview This Basket Chair has multiple parts and may require up to some 30 minutes to assemble. To give you an overview of the Basket Chair parts, the above picture is provided to help you put the various parts into perspective. Please read through the instructions below to familiarise yourself with the parts and steps before assembly. Step 1 Open the carton and place all the parts onto a clean, soft surface. Unpack all hardware packages.
Step 2 Attach the Basket Frame - Top(C) to the Basket Frame - Bottom (D) with the Allen Key(⑨) and Wrench (⑧), using Bolts (④), Washers(⑦) and Nuts (⑥) as shown in picture above. Do not fully tighten the bolts. Caution:Two or three adults are required for assembly at this step. Step 3 Attach the Basket Frame - Top(C) and the Basket Frame - Bottom (D) to the Basket Seat(A) with the Allen Key(⑨), using Bolts (③) and Washers(⑦) as shown in the picture above. Do not fully tighten the bolts.
Step 4 Stand the Basket Chair upright. Attach the Right Armrest(E) to the Basket Seat(A), Basket Back(B) and the Basket Frame Bottom (D) with the Allen Key(⑨), using Bolts(④), Bolts(③) and Washers(⑦), as shown in the picture above. Repeat the same process with the Left Armrest(F). Do not fully tighten the bolts. Caution:Two or three adults are required for assembly at this step.
Step 6 Check for stability and then tighten all Bolts at all joints. Note: DO NOT fully tighten a Bolt in one go and then move on to the next. Rather in a sequential manner, gradually tighten each Bolt until all Bolts are evenly secured. This methodology will ensure maximum evenness once all Bolts are fully tightened. Step 7 Cover all the Bolts and nuts with the Bolt Caps(①) and the Nut Caps(②) as shown in pictures 7.1 and 7.2.
Step 8 Place the Cushion(H) in the Basket. Your Basket Chair is ready for use.