READ MANUAL BEFORE USE MODEL #2212 LP GAS COOKER OWNER’S MANUAL SAFETY ALERTS, ASSEMBLY & OPERATING INSTRUCTIONS GENERAL MAINTENANCE & STORAGE This manual is for Barbour International "Bayou Classic" products only. If you are using another manufacturer’s product, refer to the manual supplied with that product. KEEP THIS MANUAL FOR FUTURE REFERENCE This Instruction Manual contains important information necessary for the proper assembly and safe use of this appliance.
SAFETY SYMBOLS The symbols and boxes shown below explain what each heading means. Read and follow all of the safety warnings and instructions contained in this manual and on the cooker. THE PURPOSE OF THIS SAFETY ALERT SYMBOL IS TO ATTRACT YOUR ATTENTION TO POSSIBLE HAZARDS AS YOU ASSEMBLE AND USE THIS PRODUCT. THE PURPOSE OF THIS SAFETY ALERT SYMBOL INDICATES FAILURE TO FOLLOW WARNINGS COULD RESULT IN FIRE OR EXPLOSION.
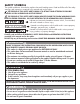
DANGER • Never operate this appliance unattended. A sober, adult must attend and monitor this appliance at all times during use. • Never operate this appliance within 25 feet (7.5m) of any flammable liquids. • Never operate this appliance within 10 feet (3.0 m) of any structure, combustible material or additional gas cylinders. • Do not fill cooking vessel with oil or water beyond maximum fill line. • Never allow oil or grease to get hotter than 350˚F (177˚C).
Safety Precautions & Warnings Outdoor gas appliances do not have automatic thermostat controls so must be attended and monitored at all times during use.
WARNING GENERAL OPERATING • This appliance does not have automatic thermostat controls so must be attended and monitored at all times during use. Even when burner is set at a low flame, never leave the cooker unattended. • This appliance has an open flame. In sunlight or other bright light, the flame may be almost invisible. Use extreme caution keeping hands, hair and clothing away from the cooker. Do not lean over the cooker when lighting burner.
WARNING COOKING WITH OIL OR GREASE • When cooking with oil or grease, a thermometer MUST be used for reasonable temperature reading. Follow instructions for proper testing, installation and use of a thermometer in this manual. • Cooking oil pre-heat up to over-heat times can vary significantly with relatively small adjustments to regulator; variable wind, ambient temperature, altitude, starting oil temperature, and type of cooking oil used.
WARNING PLACEMENT OF COOKER - CONTINUED • Keep the cooking area clear and free of any combustible material such as household chemicals, paint, gasoline and other flammable vapors and liquids. Do not store or use gasoline or other liquid/aerosols with flammable vapors within 25 feet (7.5m) of this cooker. • Prior to lighting the burner, check wind direction for placement of cooker DOWNWIND from upright LP cylinder.
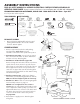
ASSEMBLY INSTRUCTIONS READ ALL SAFETY WARNINGS & ASSEMBLY INSTRUCTIONS CAREFULLY BEFORE ASSEMBLING OR OPERATING YOUR COOKER. Inspect contents in the box to ensure all parts are included and undamaged. FOR MISSING PARTS OR ASSISTANCE, PLEASE CALL 1-800-864-6194 M-F 8am - 5pm CST. Proof of purchase will be required.
DANGER CARBON MONOXIDE HAZARD This appliance can produce carbon monoxide which has no odor. Using it in an enclosed space can kill you. Never use this appliance in an enclosed space such as a camper, tent, boat, car or home. WARNING LP GAS CYLINDER • Use only a 20 pound LP Gas Cylinder or smaller with a protective collar. • LP (propane) gas is colorless, tasteless, heavier than air, and is both flammable and explosive. Combustion of propane consumes oxygen and produces carbon monoxide, a poisonous gas.
To check your local codes, see your local LP gas dealer or natural gas company. This cooker is not intended to be connected to a natural gas supply line. When purchasing or exchanging a cylinder for your gas cooker, it must be constructed and marked in accordance with the specifications for LP gas cylinders by the U.S.
REGULATOR HOSE ASSEMBLY WARNING • The pressure regulator hose assembly supplied with this product must be used. • Clean and inspect the hose before each use for any evidence of abrasion, wear, cuts or leaks. Hose must be replaced prior to use if any of these issues are found. Only use manufacturer recommended replacement assembly. • Replace regulator hose assembly at least every two years. • Keep the fuel supply hose away from any heated surface.
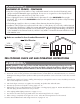
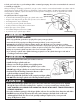
CONNECTING REGULATOR HOSE ASSEMBLY TO LP GAS CYLINDER 1. Check that cylinder is upright and the valve is closed by turning the knob clockwise. 2. Remove the protective safety cap from the cylinder valve and the Type-1 Coupling Nut. 3. Insert the nipple of the large coupling nut into the valve outlet. Insure that the coupling nut is centered properly. 4. Turn the large coupling nut clockwise by hand and tighten to a full stop. Take care not to cross thread the coupling nut onto the cylinder valve.
GAS LEAK TEST INSTRUCTIONS I Note: The gas leak test must be performed in an area that has adequate lighting in order to see if bubbles are developing. DO NOT use a flashlight to check for bubbles. J 1. Create a mixture of 50% water and 50% liquid no-ammonia base dishwashing soap. 2. Turn the gas cylinder valve I to the OFF position (clockwise). Then turn regulator control knob J to OFF position (as indicated on knob). 3.
THERMOMETER TEST INSTRUCTIONS WARNING Always use a thermometer when frying any food products. A thermometer is a sensitive measuring device which may not work properly if dropped, bent, or twisted. Always check to be sure your thermometer is working properly before frying. DO NOT use a boiling thermometer or meat thermometer for frying. 2-STEP METHOD for Thermometer Testing 1. TEMPERATURE ACCURACY: While wearing protective gloves, hold the thermometer by the dial and insert stem into boiling water.
3. Add water into the vessel until the food product is almost submerged. There must be a minimum of 3 inches between the water level and top of the vessel. 4. Remove the food product from the vessel and, either mark the level on the side of the vessel, or measure the amount of water in the vessel. This water level indicates the amount of cooking oil needed to cook the food product. NOTE: Cooking oil/grease will expand when heated and increases the level inside the cooking vessel. 5.
WARNING Thermometer will become very hot and cause burns if touched by bare hands. Always wear protective gloves or mitts when handling a hot thermometer. 9. Leaving burner flame at lowest setting, and wearing a protective glove, carefully and S-L-O-W-L-Y lower the basket, with thermometer attached and food product into the cooking oil. Inserting the food product into hot oil will cause a brief and furious spatter, and will quickly reduce oil temperature.
LIGHTING INSTRUCTIONS for BURNER COOKER WARNING DO NOT stand with head, body or arms over the cooker when lighting. Loose clothing and hair can catch fire. Follow the instructions exactly. You should have already assembled hose/regulator to supply tank/cylinder and cooker. You should have already leak checked the connections, as instructed in this manual, prior to attempting to operate the cooker.
Position fire place match or long lighter over the burner, then S-L-O-W-L-Y turn regulator control valve until you hear gas HISSING from the burner. Burner should light immediately. CAUTION: The flame may be difficult to see in direct sunlight. Do not remove match or lighter until you are sure flame is lit.
HOW TO REIGNITE Follow steps 1 - 6 on previous page, to reignite burner. Use caution when re-lighting the burner, as hot oil from cooking vessel may have splattered and run down the sides of the unit creating a slick surface. Use caution not to bump the cooker or cooking vessel when re-lighting the burner. TURNING OFF THE COOKER NOTE: Turn off LP gas cylinder valve first to prevent gas from being left in the regulator hose system under pressure. 1.
TROUBLE SHOOTING GUIDE SYMPTOM CAUSE POSSIBLE SOLUTION Cooker lights but the flame remains very small Rapid gas flow from propane tank activates EXCESS FLOW safety device because regulator control valve is not in OFF position Repeat lighting instructions and be certain to S-L-O-W-L-Y open cylinder valve one full turn, then S-L-O-W-L-Y open regulator valve to light burner. It may be necessary to disconnect, then reconnect the regulator to the cylinder in order to reset the gas flow system.
TROUBLE SHOOTING TIPS Sometimes the burner does not light or has a only a meager match flame. Other times, the flame blows out, burns yellow, or there is a flame inside the burner tube. These symptoms are common and easy to remedy. The following Trouble Shooting Tips cover most questions and problems associated with outdoor gas cooker appliances. Save this manual for future reference. SYMPTOM #1: Burner lights but the flame remains very small and will not increase for heat-up and cooking.
GENERAL MAINTENANCE & STORAGE Intense heat from the cooker will burn away paint from parts of the frame, windscreen flashing, and flame spreader. This is normal and will cause a slight 'odor' for a few minutes during the initial use. The exposed steel will rust. Occasional care must be taken to prolong the life of your cooker. 1. Store cooker in a dry place. Do not store outside exposed to weather. Storage of a gas cooker appliance indoors is permissible only if the cylinder is disconnected.
3. After cooking, allow pans and lids to cool gradually. Do not pour cold water into a hot pan. Sudden temperature change can cause cookware to warp resulting in an uneven bottom. Always wash cookware thoroughly in hot, soapy detergent after each use to remove all traces of food, salt, or grease particles that will cause stains when reheated. 4. Overheating may cause food to scorch and stick to cookware.
Stainless Steel and Aluminum Stockpots 24-Qt. - 162-Qt. Stainless Steel Stockpots with Spigot Cast Iron Cookware Dutch Ovens, Skillets, Griddles, and more 36-Qt. & 44-Qt. 7633 Propane "Y" Splitter 2-Hose Connector 5020 or 5025 5" or 12" Stainless Steel Thermometer Stainless Steel 6-PC. Brew Kettle Set 8, 10 & 16-Gallon 800-772 12" Brew Thermometer SP10 High Pressure Cooker SP2 Double Jet Cooker with Hose Guard Stainless Steel Bayou® Fryers KAB6 Bayou® Cooker with Hose Guard www.thebayou.