
Troubleshooting guide


FLAMINGOS@2.1-m, Ver. 2.39, 2011 May 13 Page 6 of 46
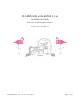
Figure 1: FLAMINGOS Functional Diagram. The relative layout and connections between the various parts of
FLAMINGOS are shown schematically. The MOS and Camera dewars are shown in the middle of the figure, including the
relative layout of the 5 internal mechanisms above the detector array, and the elements of the two electronics racks are
shown on either side of the dewars, much as they are in actuality.
The input beam from the telescope is shown in red; it passes first through the Decker wheel (a baffle wheel) to the MOS
wheel at the Cassegrain focus. The beam is collimated (some optical elements are not diagrammed in this figure) before
passing through the Filter, Lyot, and Grism wheels, and then through the camera optics to the detector array.
Biases and Clock voltages are input into the array by MCE4, the array controller. All 4 quadrants of the array are read
out through all 32 output amplifiers; they are multiplexed down to 16 outputs at the preamp before they are sent into the 16
A/Ds on MCE4. The final output image is then sent via a fiber to the EDT frame grabber on the control computer
flamingos1a or 1b, where it is written to the data drive.
The observer makes a remote connection to flamingos1a/1b via the RJ-45 to fiber media converter at the instrument's
public network switch. The Baytech networked AC power control module is accessible from flamingos1a/1b or a Kitt Peak
computer, and the observer may toggle the power to MCE4, the Perle (formerly the Iocomm) serial port annex or the Motor
controller.
Three software daemons running on flamingos1a/1b transfer commands via the private network switch to the Perle
(which replaced the Iocomm), which passes the commands to the serial port of the correct device. The three devices are the
MCE4 Array Controller, the Motor Controller, and the LS208 Temperature monitor.