MODELS INCLUDED IN THIS MANUAL: EL604/608, EL804/808, EL104/108, EL6A-hp, EL8A-hp, EL10A-hp, RS604DV/608DV, RS804DV/808DV, RS104DV/108DV, RS6A-hp, RS8A-hp, RS10A-hp, SM804, SM104, SM8A, SM10A, SM8A-hp, SM10A-hp, CS8A5 SOUTHERN AUDIO SERVICES, INC. 15049 FLORIDA BLVD.
Dear Friend, CONTENTS Thank you for selecting Bazooka® subwoofer speaker systems for your car stereo system. Today, the Bazooka represents Bazooka Mobile Audios continued commitment to efficiency and design. An innovative manufacturing process developed by SAS for the Bazooka provides consumers with state-of-the-art speaker system design.
VEHICLE PLACEMENT RECOMMENDATIONS BOAT PLACEMENT RECOMMENDATIONS TRUCK INSTALLATION tube size is exaggerated for emphasis HATCHBACK INSTALLATION tube size is exaggerated for emphasis BOW RIDER/SKI BOAT tube size is exaggerated for emphasis Under passenger console Under seat storage compartment SEDAN INSTALLATION tube size is exaggerated for emphasis SPORT YACHT tube size is exaggerated for emphasis Under bed storage compartment Under seat storage compartment 3 4
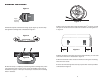
MOUNTING THE BAZOOKA Figure 1 Top Logo should face up Figure 4 1. With the topside of the buckle facing up (see figure 1), lace the strap through the mounting base as illustrated in figure 2 3. Place each mounting base under the Bass Tubes® enclosure so that the apex at the bottom of the tube sits inside the mounting base as in figure 4. Figure 2 ,, 3 Figure 3 Figure 5 ,, 3 4. Move the bases so that they are spaced approximately 3 from each end of the enclosure as illustrated in figure 5. 5.
See Model Size For Length EL WIRING DIAGRAM Figure 6 7. Remove any slack in the strap by feeding it out of the mounting base on the loose end of the strap opposite the buckle. 8. Place the Bass Tubes® enclosure on the mounting bases and fasten the buckles as illustrated in figure 7. The strap should loop through the buckle and be tightened securely by holding the strap in place with one hand and pulling the loose end away from the buckle, but against the cabinet.
RS WIRING DIAGRAM CS8A5 WIRING DIAGRAM OPTIONAL REMOTE CONTROL CONNECTOR AUTO TURN-ON JUMPER SWITCH 12 GAUGE BLACK CHASSIS LEVEL X-OVER 15 AMP 12 GAUGE RED BATTERY (12v+) YELLOW HI-LEVEL OUTPUT (-) REMOTE INPUT AMPLIFIER STATUS LED ORANGE REMOTE POWER F/R GAIN B- GRAY HI-LEV INPUT (+) GREEN/TRACE RCA PHONO PLUGS HI-LEV Right & Left Low Level Inputs GREEN GRAY/TRACE INPUT (-) HI-LEV HI-LEV INPUT (+) INPUT (-) PHASE B+ White - front left pos. input White/Black - front left neg.
100 watts Power Handling 2 ohms DVC 12 lbs. 100 watts 105 dB* 39-85 hz. 15 oz. 2 ohms DVC 14 lbs. 18.125 x 8.5 x 10 Magnet Size Impedance Weight Dimensions Power Handling Efficiency** 4 ohms/8 ohms 15.5 lbs. 18 x 8.5 x 10 6-150 watts/channel 102 dB* 39-1500 hz. 28 oz. 28 oz. Magnet Size 102 dB* 4 ohms/8 ohms 15.5 lbs. 18 x 8.5 x 10 6-150 watts/channel 4 ohms/8 ohms 23 lbs. 20.75 x 10.3 x 12.2 6-200 watts/channel 104 dB* 39-1000 hz. 28 oz. 1.5 high power.
13 RS804DV RS104DV RS6A-hp RS8A-hp RS10A-hp X X X X X X X X X X X X X X X X X X X X X X X X X X X X X X X X X X X X X X X X X X X X X X X X X X X X X X X X X X X X X X X X X X X X X X X X X X X X X X X X X X X X X X X X X X X X X X X X X X X X X X X X X X X X X X X X X X X X X X X X X X X X X X X X X X X X X X X X X X X X X X X X X X X X X X X X X X X SM10A-hp RS604DV X X X X X X X X SM8A-hp EL10A-hp X X X X X X X X SM10A EL8A-hp X X X X X X X X
AMPLIFIED MODELS: (EL6A-hp, EL8A-hp, EL10A-hp, RS6A-hp, RS8A-hp, RS10A-HP, CS8A5, SM8A, SM8A-hp , SM10A, SM10A-hp) DO NOT substitute the fuse included with the Amplified Bazooka subwoofer with anything other than the SAME fast blow current rated fuse. Substitution or deletion will void the product's warranty and may cause damage to your car or the amplifier. SHOULD I USE HIGH OR LOW LEVEL INPUTS? If the source unit has only speaker outputs, use the high-level inputs of the Amplified Bazooka subwoofer.
ALL RS Amplified, SM8A-hp, and SM10A-hp: The Auto/off Jumper Clip must be in the off position (the two right most pins) and the Orange wire will supply turn on voltage to the Amplified Bazooka. ADJUSTING THE CROSSOVER (All RS Amplified, SM8A-hp, and SM10A-hp ONLY) OPTION THREE: The Amplified Bazooka subwoofer has a built-in Auto Turn-On Feature.
INPUT/OUTPUT HARNESS CONNECTOR DETAIL 8 pin input connector: (1) White White/Black Front Left Positive Input Front Left Negative Input Grey Grey/Black Front Right Positive Input Front Right Negative Input Green Green/Black Rear Left Positive Input Rear Left Negative Input Purple Purple/Black Rear Right Positive Input Rear Right Negative Input 10-pin speaker output connector: (2) Red Red/White Front Left Positive Speaker Output Front Left Negative Speaker Output Yellow Yellow/Gray Front Right Posi
All RS AMPLIFIED, SM8A-HP, SM10A-HP. TROUBLESHOOTING Remote Bass Control and Crossover (RBCM-RS): If you find you like to vary the crossover point in addition to changing the level of bass depending on what you are listening to and want an easy way to make this possible, you can purchase an optional Remote Level and Crossover Control.
PHASE CORRECTING PROCEDURE Disconnect all but one Bazooka® from your system. Be sure that any loose wire connections are insulated to avoid the chance of short-circuiting any of the electronic equipment. Listen to the system and take note of the level of the Bass Response. Connect the next Bazooka® and compare the level of the combined output to that of the single unit. If the Bass Response increases, the Phasing is correct and you can repeat this process on the next Bazooka.
Fecha de compra:_____________________________________________________________ 25 26 ____________________________________________ E-MAIL Producto:______________________________________________________________________ ____________________________________________ TELEPHONE Colonia ________________________________________________________________________ ____________________________________________ TELEPHONE Calle y #________________________________________________________________________ ______________