WFDBELL1 WIFI DOORBELL WITH HD CAMERA 1080P SONNETTE WIFI AVEC CAMÉRA HD 1080P INSTRUCTIONS
WARNING ATTENTION · Please read all informations carefully before installation. · For any questions or troubleshooting please visit: www.bazzsmarthome.com or www.bazzsmarthome.ca. · Veuillez lire attentivement toutes les informations avant l'installation. · Pour toutes questions ou dépannage, visitez le site www.bazzsmarthome.com ou www.bazzsmarthome.ca. REQUIREMENTS PRÉREQUIS · Internet connection with a WiFi network. · Strong WiFi signal. · 2.4 GHz wireless frequency.
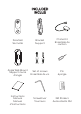
INCLUDED INCLUS Doorbell Sonnette Bracket Support X2 x2 X2 x1 Chime Kit Ensemble de carillon Angle Wall Mount Support mural d’angle Set of screws Ensemble de vis Pin épingle Instructions Manual Manuel d’instructions Screwdriver Tournevis 3M Stickers Autocollants 3M
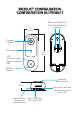
PRODUCT CONFIGURATION CONFIGURATION DU PRODUIT External Power Port Port d’alimentation externe 1 ¾" 45 mm Camera Caméra Microphone LED Indicator Light Voyant lumineux DEL 4 ½" 115 mm Button Bouton 1" 27 mm Reset button Mini USB Port Bouton de Mini port USB réinitialisation Speaker haut-parleur Micro SD card slot Fente pour carte micro SD
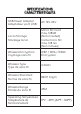
SPECIFICATIONS CARACTÉRISTIQUES USB Power Adapter Adaptateur port USB AC 12V~24V Local Storage Stockage local Micro SD Card max. 128GB (Not included) Carte micro SD max. 128 Go (Non incluse) Wireless Encryption Cryptage sans fil WEP / WPA / WPA2 Encryption Wireless Type Type de sans fil 2.4GHz Wireless Standard Norme de sans fil 802.
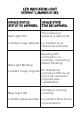
LED INDICATOR LIGHT VOYANT LUMINEUX DEL DEVICE STATUS STATUT DE L'APPAREIL DEVICE STATE ÉTAT DE L'APPAREIL Red Light ON The camera or network is abnormal. Lumière rouge allumée La caméra ou le réseau est anormal. Red Light Blinking Lumière rouge clignote Blue Light ON Lumière bleue allumée Awaiting WiFi connection, or currently connecting (faster blinking). En attente de connexion WiFi ou en cours de connexion (clignote plus rapidement). Camera is running correctly. La caméra fonctionne correctement.
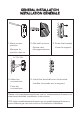
GENERAL INSTALLATION INSTALLATION GÉNÉRALE 1. Mark screws position. Marquer la position des vis. 2. Add wall anchors. Ajouter des ancrages muraux. 3. Screw the bracket. Visser le support. AC 12V~24V 4. Make the connections. Faire les connections. 5. Install the doorbell onto the bracket. Installer la sonette sur le support. Please visit www.bazzsmarthome.com or www.bazzsmarthome.ca to download detailed installation instructions. SVP visitez www.bazzsmarthome.com ou www.bazzsmarthome.
ANGLE WALL MOUNT INSTALLATION. INSTALLATION AVEC FIXATION MURALE À ANGLE. 1. Mark screws position. Marquer la position des vis. 2. Add wall anchors. Ajouter des ancrages muraux. 3. Fit the bracket to the angle wall mounting plate. Mettre le support sur la fixation murale à angle. AC 12V~24V 4. Screw the bracket. Visser le support. 5. Make the connections. Faire les connections. 6. Install the doorbell onto the bracket. Installer la sonette sur le support. Please visit www.bazzsmarthome.com or www.
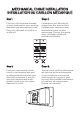
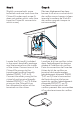
MECHANICAL CHIME INSTALLATION INSTALLATION DU CARILLON MÉCANIQUE Step 1: Étape 1: First turn off the power breaker at your fuse box for your existing doorbell and mechanical chime. Ring your doorbell to confirm it is now off. Commencer par éteindre le disjoncteur sur votre boîte à fusibles pour votre sonnette existante et votre carillon mécanique. Sonner à la porte pour confirmer qu’elle est maintenant éteinte.
Step 3: Étape 3: Slightly unscrew both screw terminals and one hook from the Chime Kit under each screw (It does not matter which color wire from the Chime Kit connects to which screw). Dévisser légèrement les deux bornes à vis et un crochet du kit de carillon sous chaque vis (peu importe la couleur de fil du kit de carillon auquel chaque vis est connectée). Locate the Chime Kit included in the smart doorbell’s package and the terminals on the inside of the chime.
Step 4: Étape 4: Using the included doubles sided tape, affix the Chime Kit to your chime wherever there is space and replace the cover. Be careful not to interfere with any of the chime’s moving parts. À l’aide du ruban adhésif double-face fourni, fixer le kit de carillon sur votre carillon là où il y a de la place et replacer le couvercle. Ne pas interférer avec les pièces mobiles du carillon. Ensure that the Chime Kit and wires DO NOT interfere with the mechanical parts of the chime.
DOWNLOAD FREE APP TÉLÉCHARGER L’APPLICATION GRATUITE Don’t have the APP? Download the APP. Search for "Bazz Smart Home" to download in APP Store or Google Play. The free app "Bazz Smart Home" is compatible with mobile devices IOS 8.0 and above and Android 4.0 and above. Vous n’avez pas l’application? Télécharger la. Rechercher "Bazz Smart Home" pour télécharger dans l'APP Store ou Google Play. L’application gratuite "Bazz Smart Home" est compatible avec les appareils mobiles IOS 8.0 et plus et Android 4.
REGISTER AND LOGIN Open "Bazz Smart Home" app, select "Register" to create an account. Select the right country code, enter your email or mobile number and then set password. You can also register through other communication apps which are on the bottom of the page, such as Facebook. Note: 1. If you register by email, you will not receive a verification code. Simply enter your password to log in. 2. If you register by phone number, you will receive a verification code before setting password.
S'INSCRIRE ET SE CONNECTER Ouvrir l’application "Bazz Smart Home", sélectionner "S’inscrire" pour créer un compte. Sélectionner le bon code de pays, entrer votre adresse courriel ou votre numéro de téléphone mobile, puis définir le mot de passe. Vous pouvez aussi vous inscrire via d’autres applications de communication qui se trouvent au bas de la page, tel que Facebook. Remarque: 1. Si vous vous enregistrez par courriel, vous n’allez pas recevoir de code de vérification.
QUICKSTAR - PAIRING 1- Preparation: 1. Confirm the device is powered on. 2. Confirm the device, smartphone and router are as close to each other as possible. 3. Confirm the phone is connected to the WiFi router and to the internet. 2- Pairing steps: 1. Open your app, tap the icon "+" on the top right corner of "Devices" page, select the type of device you want to add (camera). 2. After you hear a sound from the camera, click "OK" in the app.
INITIALISATION - JUMELAGE 1- Préparation: 1. Vérifier que l'appareil est allumé. 2. Vérifier que l'appareil, le téléphone intelligent et le routeur sont aussi proches que possible l'un de l'autre. 3. Vérifier que le téléphone est connecté au routeur WiFi et à Internet. 2- Étapes de jumelage: 1. Ouvrir l’application, appuyer sur l’icône "+" dans le coin supérieur droit de la page "Appareil", sélectionner l’appareil que vous souhaite ajouter (caméra). 2.
GO INTO SETTINGS FOR MORE OPTIONS ALLER DANS RÉGLAGES POUR PLUS D’OPTIONS Examples: 1. Customize Scenes: scenes setting. 2. Share Device: allow others to control the device by sharing device. 3. Push notification. Exemples: 1. Personnaliser les scènes: réglage des scènes. 2. Partager l’appareil: autoriser les autres utilisateurs à contrôler l’appareil en le partageant. 3. Envoyer des notifications.
WARRANTY BAZZ’s warranty applies to manufacturing defects affecting its products which existed at the time of the purchase of the product, that are nonapparent and are unknown to the buyer, for a period of 1 year. This warranty applies to the product only and does not cover the installation of the product. The warranty does not apply to material, economic, and/or physical damages or losses caused by the product.
GARANTIE BAZZ garantit ce produit contre tout vice de fabrication existant au moment de la vente, non apparent et non connu de l’acheteur et ce, pour une période de 1 an. La garantie se limite au produit seulement et ne vise pas l’installation du produit. La garantie ne s’applique pas aux dommages ou pertes matériels, économiques et/ou physiques causés par le produit.
FCC NOTE This device complies with Part 15 of the FCC Rules. Operation is subject to the following two conditions: 1- this device may not cause harmful interference, 2- this device must accept any interference received, including interference that may cause undesired operation. The manufacturer is not responsible for any radio or tv interference caused by unauthorized modifications or change to this equipment. Such modifications or change could void the user’s authority to operate the equipment.
NOTE FCC Cet appareil est conforme à la section 15 de la réglementation FCC. L’opération est soumise aux deux conditions suivantes: 1- cet appareil ne doit pas causer d’interférences nuisibles, 2- cet appareil doit accepter toute interférence reçue, y compris les interférences pouvant provoquer un fonctionnement indésirable. Le fabricant n’est pas responsable des interférences radio ou tv causés par des modifications non autorisées ou des modifications apportées à cet équipement.
CAMFXWFW1 HD Directional Camera Caméra orientable HD WFCAM360 HD Motorized Camera Caméra motorisée HD WFCAMOUT HD Outdoor Camera Caméra extérieure HD ALARMWFW1 Siren Alarm Sirène d’alarme DOORWFW1 Door Contact Sensor Détecteur de contact de porte FLDWFW1 Water Leak Sensor Détecteur de fuite d’eau IRREMOTEWFBK IR Remote Control Converter Convertisseur de télécommande IR MTSWFW1 Motion Sensor Détecteur de mouvement PLGWFW1 Smart Plug Prise intelligente
ALSO AVAILABLE AUSSI DISPONIBLE R G R SLMR4TNWFB SLMR4TNWFBK SLMR4TNWFW 4" LED Recessed Fixture Encastré DEL 4" SWTCHWFW1 Wall Switch Interrupteur mural W G R B SLDSK6TNWWF SLDSK6RGBTNWWF 6" LED Disk Recessed Fixture Encastré DEL Disk 6" G W W B B R B G W B CON6RGBTNWWF 6" LED Conversion Kit Kit de conversion DEL 6" BR30RGBTNWWF WFA19RGB1 BR30/A19 LED Bulb Ampoule DEL BR30/A19 WFGARAGE Garage Door Controller Contrôleur de porte de garage WFWSV Water Shut Valve Valve d’arrêt d’eau R G
For more informations visit: Pour plus d'informations visitez: www.bazzsmarthome.com or/ou www.bazzsmarthome.