
Installation guide

BBV_1-2-1 _Protocol_converter_manual_V41_November_2013 Page 23 / 40
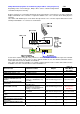
LG DOME (PELCO D) from BBV and Pelco D/P telemetry only.
Connect the twisted pair as follows:
Dome TRX D+ (RED) to BBV 1-2-1 converter TA
Dome TRX D- (GREEN) to BBV 1-2-1 converter TB
Dome SW301 – 1 OFF, 2 ON, 3 ON, 4 OFF (Selects Pelco D)
Dome SW304 – ALL OFF (9600 baud)
Dome SW302 – Address – set to match the matrix camera input
The following functionality is provided:
Variable speed Pan/Tilt
Zoom/Focus/Iris
64 preset positions
Menu access and navigation
Pattern record and playback
Preset patrol 1
Additional Dome features
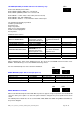
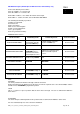
Dome Function TX1000 Keystroke TX1500 Keystroke Pelco Procedure
DISPLAY DOME MENU
hold # and tap WASH
and navigate using the
ZOOM and FOCUS keys
1 # and navigate using
the ZOOM and FOCUS
keys
Go to Preset 61
180 DEGREE PAN FLIP hold # and tap WIPE
2 #
Go to Preset 62
PATTERN RECORD START
hold # and tap
AUTOPAN then use
joystick to move dome
around required scenes.
3 # then use joystick to
move dome around the
required scenes.
Go to Preset 63
PATTERN RECORD STOP hold # and tap LIGHTS
4 #
Go to Preset 64
PATTERN PLAYBACK
AUTOPAN AUTOPAN
Go to Preset 68
PATROL 1 PLAYBACK hold PATROL and tap 1
1 PATROL
Go to Preset 66
Note:
When navigating the dome menu ZOOM IN moves the cursor UP and ZOOM OUT moved the cursor
DOWN. The FOCUS keys are used to ENTER and change values.
For more information please refer to the dome handbook.
MARK MERCER (adjust SW3 to suit input protocol)
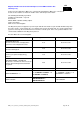
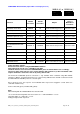
Function TX1500 Procedure Pelco Procedure Molynx
180 Pan U turn
1 # or WASH
Go to Preset 61 Cam on then Prog preset 1
Start current dome’s patrol
1 PATROL
Go to Preset 66 Cam on then Goto preset 5
Start ALL DOMES patrol
2 PATROL
Go to Preset 67 Cam on then Goto preset 6
MARK MERCER from VICON
When used with VICON protocol the Mark Mercer protocols supports 79 preset positions. Preset 80-89 will
cause the dome preset patrol 1 to start. The patrol cannot be changed once preset positions have been
saved.
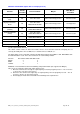
The VICON protocol baud rate can be set from 2400, 4800, 9600 and 19200 using SW3/4 and SW3/5 as
the previous diagram.
SW3 SW4
SW3 SW4
SW4