
Installation guide

BBV_1-2-1 _Protocol_converter_manual_V41_November_2013 Page 28 / 40
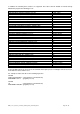
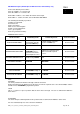
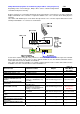
PELCO P and PELCO D (adjust SW3 to suit input protocol)
Function
TX1500
Procedure
Pelco Procedure Molynx
Mark Mercer
Procedure
Display Dome Menu 1 # Go to Preset 61 Cam on then Prog preset 1 Go to Preset 61
180 degree pan flip (U
turn)
2 # Go to Preset 62 Cam on then Prog preset 2 Go to Preset 62
Display Technicians
Menu
3 #
Go to Preset 63
SW4/8 MUST BE OFF
Cam on then Prog preset 3 Not Supported
PATTERN DEFINE
(START)
3 #
Go to Preset 63
SW4/8 MUST BE ON
Cam on then Prog preset 3 Go to Preset 63
PATTERN DEFINE
(STOP)
4 #
Go to Preset 64
SW4/8 MUST BE ON
Cam on then Prog preset 4 Go to Preset 64
PATTERN PLAYBACK AUTOPAN
Go to Preset 69
SW4/8 MUST BE ON
Cam on then Goto preset 5 Go to Preset 68
Start Random Scanning PATROL 1 Go to Preset 66 Cam on then Goto preset 6 Go to Preset 66
Start Frame Scanning PATROL 2 Go to Preset 67 Cam on then Goto Preset 7 Go to Preset 67
Use Iris open as Enter in menu.
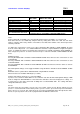
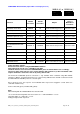
This allows control of Pelco P and Pelco D units. Please ensure that the baud rate and parity are set
correctly. Generally Pelco P uses 9600, N, 8, 1 and Pelco D uses 2400, N, 8, 1.
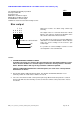
The Esprit wiper can be controlled using the TX1500 wiper function when SW4/7 is ON. With SW4/7 OFF
the LIGHTS button is used. This is due to functions for each auxiliary number.
Function Aux number SW4/7 ON SW4/7 OFF
WASH 3 3
WIPE 1 2
LIGHTS 2 1
Additional of zone definition to allow zone blanking of Esprit PTZ heads.(not supported for Molynx)
Three steps are required to define and enable privacy zones.
1. Move the camera to the left edge of required privacy zone then program preset 71 – 78. 71 for zone
1, 72 for zone 2 etc up to 78 for zone 8.
2. Now move the camera to the right edge of required privacy zone the program preset 81 – 88. 81
for zone 1, 82 for 2 etc up to 88 for zone 8
3. Next display the head menu and enable zone blanking for the required zone.