Owner’s Manual Bedienungsanleitung Manuel D’Utilisation Manuale Di Istruzioni
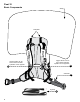
Float 22 Basic Components airbag trigger handle leg strap 2 10 waist belt 12 13
Float 22 Basic Components probe and shovel compartment airbag compartment diagonal ski mount loop main storage compartment helmet carry loops diagonal ski mount loop 11 waist belt pocket 3
Float Throttle Basic Components airbag 13 trigger handle leg strap waist belt 4 12 10
Float Throttle Basic Components probe and shovel compartment airbag compartment helmet carry loops main storage compartment THROTTL E 11 waist belt pocket 5
Float 32 Basic Components airbag load lifters 13 trigger handle: can be set on either shoulder, hydration on the opposite trigger handle: can be set on either shoulder, hydration on the opposite waist belt leg strap 6 10 13 12
Float 32 Basic Components airbag compartment lined goggle pocket diagonal ski mount loop shovel and probe compartment helmet sling storage helmet carry loops ice axe cords compression strap main storage compartment ice axe loops diagonal ski mount loop 12 waist belt pocket 7
Theory of Operation / Disclaimer / Warranty Why do I need an avalanche airbag? Preventing or minimizing burial depth is the key to reducing avalanche fatalities. That’s because the majority of time in an avalanche rescue is spent on excavating the victim. An airbag is designed to keep you at or near the surface, minimizing excavation time. Disclaimer The Float system is designed to help improve your chances of surviving an avalanche. It must be used correctly, following the guidelines in this manual.
Equipment Check Compressed Air System trigger cover 7 trigger cable pressure gauge 8 4 14 release valve cover coupler gauge air hose ejector assembly 9 air cylinder 1 3 quick connect fitting 2 9
Installing Compressed Air Cylinder 1. Remove packaging caps from compressed air cylinder. To reach the trigger cable and air hose, unzip the main storage compartment and fold back the Velcro flap inside. 2. With the compressed air cylinder outside of the backpack’s cylinder sleeve, connect the quick connect fitting on the air hose u by pulling the large ring toward the air cylinder v. It should click back into place when air hose w is properly connected.
Using the Avalanche Airbag 5. After all connections have been checked, slide the compressed air cylinder into the backpack’s cylinder sleeve. 6. Empty cylinders should only be refilled or exchanged at authorized Float refill or exchange centers. For a list of these locations, please see www.backcountryaccess.com/refillcenters. If shipping is required, see “Shipping a Compressed Air Cylinder” below. 7. To disconnect an empty cylinder, follow the above steps in reverse.
Using the Avalanche Airbag Check to make sure that nothing is obstructing the airbag compartment on the outside of the pack, especially any items with sharp points such as crampons or ice tools. Only carry skis using the diagonal ski carry. Do not use the side compression straps for A-frame carry, as they may obstruct the airbag’s deployment. Pack Adjustments Your pack should be properly fitted before you head into avalanche terrain.
Using the Avalanche Airbag Ski/Snowboard Attachment Float 22: Skis can be carried using the diagonal ski mounts. To carry a snowboard, order our BCA Snowboard Carry Attachment, which integrates with the snowboard attachment loops on the back panel. Float Throttle: Does not offer the diagonal ski carry. However, it is possible to attach BCA’s Snowboard Carry Attachment, which integrates with the snowboard attachment loops on the back panel. Float 32: Skis can be carried using the diagonal ski mounts.
Using the Avalanche Airbag What to Expect The airbag should exit the backpack and fill completely in approximately three seconds. The airbag will continue to build pressure for a few seconds longer until the system pressure equalizes. The airbag will hold air for several minutes until the threat of an avalanche has passed. After Deployment Release the air from the airbag by pressing the release valve with your finger. The valve is located underneath the orange release valve cover 14 .
Maintenance Removing and Installing the Airbag System The 12/13 Float packs feature a removable and interchangeable airbag system. The airbag components can be swapped between the Float 32 and Float 22/Float Throttle or removed entirely. Removing 1. To remove the airbag, open the airbag compartment by pulling the breakaway zipper apart under the Velcro flap. Never try to “unzip” the airbag compartment zipper. Doing so could result in damage to the breakaway zipper. 2.
Installing 1. With the airbag unfolded, lay the ejector in the airbag compartment with the orange release valve cover facing up (a). The air hose should be fed through the designated opening (b) into the main storage compartment where the cylinder is kept. 2. Starting on the side with the fixed end of the orange rope, thread the rope downward through the first slit in the airbag. Thread the rope through the first webbing loop then upward back through the first slit.
Installing / Maintenance and Storage Moving the Trigger The Float 32 allows you to install the trigger in the left or right shoulder strap, depending on your preference. This feature is not available in the Float 22 or Float Throttle. Removing 1. Open the zipper on the shoulder strap containing the trigger. 2. Untighten the small screw that attaches the trigger to the webbing loop inside the shoulder strap. 3. Pull the trigger and cable out (a) through the shoulder strap zipper. a Installing 1.
Maintenance / Storage / Transportation No scheduled maintenance is required as long as the system is stored in a cool, dry place. Do not expose a charged Float cylinder to temperatures exceeding 130°F (55°C) or below -22°F (-30°C). If subjected to adverse conditions, check that all connections are free of contaminants. Pack can be cleaned with warm soapy water and connections can be cleaned with a damp cloth. Do not use lubricants.
Certifications and Markings The following marks can be found on Backcountry Access Float avalanche airbags. The CE mark of conformity indicates that Backcountry Access and this product meet the requirements of the Personal Protective Equipment Directive (89/686/EEC). The Pi mark of conformity indicates that Backcountry Access and this product meet the requirements of ADR/RID and TPED (Directive 2010/35/EU). Tested by TÜV SÜD: a globally recognized testing, inspection, and certification organization.
Avalanche Rescue This is a basic introduction to avalanche rescue techniques. On our website, you will also find a list of avalanche instructors. We strongly suggest taking an avalanche course in your area before venturing into the backcountry. Each person needs a working beacon, probe and shovel—and must know how to use them. Before leaving, call your local avalanche forecast center and determine the danger level in the area you intend to visit: US: www.avalanche.org Canada: www.avalanche.ca Europe: www.
Float save in Montezuma, Colorado, USA.
Backcountry Access, Inc. 2820 Wilderness Place, Unit H Boulder, Colorado USA Phone: 303.417.1345 www.backcountryaccess.com BCA /K2 Europe K2 Sports Europe GmbH Seeshaupter Strasse 62 82377 Penzberg Germany Fon: +49 8856 901 – 0 europe@backcountryaccess.