WLAN600 Wireless IP Phone User Guide Copyright Statement All brand names are registered trademarks of their respective companies. Disclaimer Products and specifications are subject to change without notice. NEV, 2003, Rev: 0.
FEDERAL COMMUNICATIONS COMMISSION This device complies with Part 15 of the FCC Rules.Operation is subject to the following two conditions:(1) this device may not cause harmful interference, and (2) this device must accept any interference received, including interference that may cause undesired operation. NOTE This equipment has been tested and found to comply with the limits for a Class B digital device, pursuant to Part 15 of the FCC Rules.
Contents 1. 2. Introduction ..................................................................... 5 Getting Started................................................................ 6 2.1. Checking Shipment Completeness........................................... 6 2.2. Installing and Removing the Battery ........................................ 6 2.3. Charging the Battery ................................................................ 8 2.4. Keypad Definition of WLAN600 ..............................
3.7. 4. 3.6.3. Dialed Call ................................................................................................................... 42 3.6.4. Erase Calls.................................................................................................................. 44 Setting..................................................................................... 46 3.7.1. Adjusting the Ring Volume ................................................................................. 46 3.7.2.
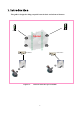
1. Introduction This guide is designed to help you quick learn the basic and advanced features. Proxy Server Proxy Server Internet ADSL Modem ADSL Modem AP AP WLAN600 WLAN600 Figure 1.
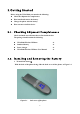
2. Getting Started Before using the WLAN600, you must do the following: Check the shipment for completeness How install and remove the battery Charge the phone with the battery How can turn on/off the device 2.1. Checking Shipment Completeness Check and make sure all items that are Put inside the box. The package should contain the following: WLAN600 Wireless IP Phone Standard battery Power charger WLAN600 Wireless IP Phone User Manual x1 x1 x1 x1 2.2. Installing and Removing the Battery 1.
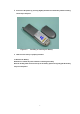
2. Fasten it to the phone by pressing slightly downward on the battery until the locking catch snaps into place. Figure 2.2 Installing or removing the Battery 3. Make sure the battery is properly installed. To Remove the Battery: Remember to switch the power off before removing the battery Slide the locking latch located at the top of the battery upward and gently pull the battery away from the phone.
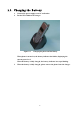
2.3. Charging the Battery 1. 2. Connect the power supply to an AC wall outlet. Put the WLAN600 on the charger. Figure 2.3 3. Charging the phone and the Battery When phone is turned on, the battery indicator bar blinks, displaying the current power level. When the battery is fully charged, the battery indicator bar stops blinking. When the battery is fully charged, please remove the phone from the charger.
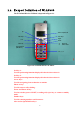
2.4. Keypad Definition of WLAN600 The WLAN600 Wireless IP Phone is depicted in Figure 2.1. Up Mono Graphic LCD Soft key1 Soft key2 Right Left Down Phone on Phone off Power on/off Load default IP (192.168.0.6) 1~9, *, 0, # Figure 2.4 WLAN600 Wireless IP Phone Soft key 1: Used for performing functions displayed in the tab shown above it. Soft key 2: Used for performing functions displayed in the tab shown above it. Arrow keys: Used for navigating from on function to another.
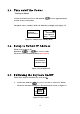
2.5. Turn on/off the Power Turning On Phone To turn on/off the Power, Press and hold the “ ” key for approximately 2 seconds to turn on the phone. The phone enters “standby” mode, the Main Screen displayed as Figure 2.5. 12:00 WLAN600 Not registered Menu Names Initializing…. >>Please Wait!<< Figure 2.5 Main Screen / Standby Mode 2.6. Setup to Default IP Address When device is Power off. Hold these “ ”+“ ” key over 2 seconds. The device reset to default IP address (192.168.0.6).
2. How turn off “key-lock”? Press and hold the key over 2 seconds. A prompt appears as shown in Figure 2.8. Key Pad Unlock 12:00 Figure 2.8 Key Unlock 2.8. Adjusting the Speaker Volume During a call, increase the volume by pressing ► key. Decrease the volume by pressing ◄ key. See Figure 2.9. 12:00 12 ) ) ) ) ) ) ) ) ) ) 123456 Figure 2.
3. Configuring Network Environment The chapter introduces/modify the Network Environment. 3.1. Network Configuration This section introduces/modifies Network information. 3.1.1. Setting Up/Modify to Static IP The section introduces /Modify to Static IP. 1. 2. 3. 4. 5. In Normal, press key. Press ▲ or ▼ key, until “Network Setting” in screen. Press key, into “Network Setting”. Press ▲ or ▼ key, until “Network Mode” in screen. Press key, into the “Network Mode”. 6. 7.
12:00 WLAN600 Not registered Menu Names Menu π θ 4. Net Setting 5. SIP Setting 6. Setting Select Back Select π θ Back 1. Network Mode 2. IP Address 3. Subnet Mask Select Back Select 2. IP Address 3. Subnet Mask 4. Gateway Select Back Select 3. Subnet Mask 4. Gateway 1. Network Mode Select Back Select 4. Gateway 1. Network Mode 2. IP Address Select Back Select π θ Back [1]Fixed IP [2]DHCP [3]PPPoE Select Back Select [1]Fixed [2]DHCP Select [3]PPPoE O.K.
3.1.2. Setting UP/modify the DHCP Client This section provides instructions for performing the DHCP settings. The Dynamic Host Configuration Protocol (DHCP) client provides a mechanism for allocating IP address dynamically so that addresses can be reused when hosts no longer need them. 1. 2. 3. 4. 5. 6. 7. key. In idle state, press Press ▲ or ▼ key, until “Network Setting” in screen. Press key, into “Network Setting”. Press ▲ or ▼ key, until “Network Mode” in screen. Press key, into “Network Mode”.
3.1.3. Setting UP the PPPoE Settings This section provides instructions for performing the PPPoE settings. The Poin-to-Poin Protocol over Ethernet (PPPoE) client provides a mechanism for allocating IP address dynamically so that addresses can be reused when hosts no longer need them. 1. 2. 3. 4. 5. 6. 7. 8. 9. key. In idle state, press Press ▲ or ▼ key, until “Net Setting” in screen. Press key, into “Net Setting”. Press ▲ or ▼ key, until “Network Mode” in screen. Press key, into “Network Mode”.
12:00 WLAN600 Not registered Menu Names Menu π θ 4. Net Setting 5. SIP Setting 6. Setting Select Back Select π θ Back 1. Network Mode 2. IP Address 3. Subnet Mask Select Back Select 2. PPPoE Name 3. PPPoE Pwd 1. Network Mode Select Back Select π θ Back [3]PPPoE [1]Fixed IP [2]DHCP Select Back Select [2]PPPoE [3]Fix IP Select [1]DHCPO.K. Select Back Input the name Back π θ Clear PPPoE Name t03040506| Ok Ok Clear PPPoE Name t0304150 Saved Ok O.K.
3.2. Wireless Configuration This section provides instructions for performing the 802.11b configuring using the 802.11b Configuration submenu. 3.2.1. Setting UP the Wireless Settings This section provides information about performing the following wireless settings: Scanning the Wireless Service Set Identifier Setting Up the Wireless Settings Setting Up the Wired Equivalent Privacy Keys 3.2.1.1. Scanning the Wireless Service Set Identifier 1. 2. 3. 4. 5. 6. 7. In idle state, press key.
3.2.1.2. Setting Up the Wireless Settings 1. 2. 3. 4. 5. 6. 7. 8. 9. 10. 11. 12. 13. In idle state, press key. Press ▲ or ▼ key, until “Wireless” in screen. Press key into “Wireless”. Press ▲ or ▼ key, until “ESSID” in screen. key to “edit” mode. Press Press key, delete all number of last entered. When finished these entering or editing. Press key, return to “Wireless” Press ▲ or ▼ key, until “Network Mode” in screen. Press key, into “Network Mode”. Press ▲ or ▼ key to scroll to “Public”.
12:00 WLAN600 Not registered Menu Names Menu Input the ESSID π θ 7. Wireless 8. SSL Setting 9. Restart Select Back Select π θ Back Back π θ Back π θ Back π θ Back π θ 2. ESSID 3. Network Mode 4. Channel Select Back Select 3. Network Mode 4. Channel 5. Rate Select Back Select 4. Channel 5. Rate 6. WEP Select Select Back Select 5. Rate 6. WEP Select 7. Wep Key1 Select Back Select 6. WEP Select 7. WEP Key1 8.
3.2.1.3. Setting Up the Wired Equivalent Privacy Keys 1. 2. 3. 4. 5. 6. 7. 8. 9. 10. 11. 12. 13. In idle state, press key. Press ▲ or ▼ key, until “Wireless” in screen. Press key, into “Wireless”. Press ▲ or ▼ key until “WEP Select” in screen. key, into “WEP Select”. Press Press ▲ or ▼ key, scroll to “WEP”. When finished these entering or selecting. Press key, return to “Wireless”. Press ▲ or ▼ key, until “WEP Key 1” in screen. Press key to enter the edit mode. Press key delete all number of last entered.
12:00 WLAN600 Not registered Menu Names Menu π θ 7. Wireless 8. SSL Setting 9. Restart Select Back Select π θ Back 6. WEP Select 7. Wep Key 1 8. Wep Key 2 Select Back Select 7. Wep Key 1 8. Wep Key 2 9. Wep Key 3 Select Back Select 8. Wep Key 2 9. Wep Key 3 10. Wep Key 4 Select Back Select 9. Wep Key 3 10. Wep Key 4 11. Key Select Select Back Select 10. Wep Key 4 11. Key Select 1.
3.3. SIP Configuration This section provides instructions for performing the Session Initiation Protocol (SIP) configuring using the SIP Configuration submenu. 3.3.1. Setting UP the Proxy Server Settings This section provides information about performing the proxy server settings. 1. 2. 3. 4. 5. 6. 7. In idle state, press key. Press ▲ or ▼ key, until “SIP Setting” in screen. Press key, into “SIP Setting”. Press ▲ or ▼ key, until “Proxy Server” in screen. Press key, into “Proxy Server”.
12:00 WLAN600 Not registered Menu Names Menu π θ 5. SIP Setting 6. Setting 7. Wireless Select Back Select Back Input the IP π θ 1. Proxy Server 2. OutboundProxy 3. User Account Select Back Select π θ Back 1. Proxy IP 2. Port 3. Expire Time Select Back Select 2. Port 3. Expire Time 1. Proxy IP Select Back Select 3. Expire Time 1. Proxy IP 2. Port Select Back Select Clear Proxy IP 123.123.123.123| Ok Ok Clear Proxy IP 123.123.123.123 Saved O.K.
3.3.2. Setting UP the Outbound Proxy Settings This section provides information about performing the Outbound Proxy settings. 1. 2. 3. 4. 5. 6. 7. 8. 9. 10. 11. 12. 13. In idle state, press key. Press ▲ or ▼ key, until “SIP Setting” in screen. Press key, into “SIP Setting”. Press ▲ or ▼ key, until “Outbound Proxy” in screen. Press key, into “Outbound Proxy”.. Press ▲ or ▼ key, until “Proxy IP” in screen. Press key, enter “edit” mode. Press key, delete all number of last entered.
3.3.3. Setting UP the User Account Settings This section provides information about performing the User Account settings. 1. 2. 3. 4. 5. 6. 7. 8. 9. In idle state, press key. Press ▲ or ▼ key, until “SIP Setting” in screen. Press key, into “SIP Setting”.. Press ▲ or ▼ key, until “User Account” in screen. Press key, into “User Account”. Press ▲ or ▼ key, until “Phone Number” in screen. Press key, enter “edit” mode. Press key, delete all number of last entered.. When finished these entering or editing.
12:00 WLAN600 Not registered Menu Names Menu π θ 5. SIP Setting 6. Setting 7. Wireless Select Back Select Back Input the number π θ 3. User Account 1. Proxy Server 2. OutboundProxy Select Back Select π θ Back 1. Phone Number 2. Username 3. User Pwd Select Back Select Clear Phone Number 3229111| Ok Ok Clear Phone Number 3229672 Saved O.K. Ok Clear Input the name Back π θ 2. Username 3. User Pwd 1.
3.4. SSL Configuration This section provides instructions for performing the SSL settings. The Secure Sockets Layer (SSL) client provides a security protocol provides data encryption, server authentication, message integrity, and optional client authentication for a TCP/IP connection 1. 2. 3. 4. 5. 6. 7. 8. 9. key. In idle state, press Press ▲ or ▼ key, until “SSL Setting” in screen. Press key, into “SSL Setting”.. Press ▲ or ▼ key, until “SSL Select” in screen. Press key, into “SSL Select”.
12:00 BCM Not registered Menu Names Menu π θ 8. SSL Setting 9. Restart 1. Information Select Back Select π θ Back 1. SSL Select 2. SSL Username 3. SSL Pwd Select Back Select 2. SSL Username 3. SSL Pwd 1. SSL Select Select Back Select 3. SSL Pwd 1. SSL Select 2. SSL Username Select Back Select π θ Back [1]on [2]off Select Select Back [1]on [2]off Select O.K. Select Back Input the name Back π θ Clear SSL Username bcm-test| Ok Ok Clear SSL Username bcm-test Saved Ok O.K.
3.5. Using the Phone Book This section provides information about accessing the phone book and using its features. 3.5.1. Searching Phone Book Entry: Speed Dial Key This section provides information about performing the Speed Dial settings. 1. 2. 3. 4. 5. 6. In idle state, press key. Press ▲ or ▼ key, until “Phone Book” in screen. Press key, into “Phone Book Setting” Press ▲ or ▼ key, until “Search” in screen. Press key, into “Search” Press ▲ or ▼ key, scroll to “list of entries”.
3.5.2. Searching Phone Book Entry: Edit Entry This section provides information about performing the Speed Dial settings. 1. 2. 3. 4. 5. 6. In idle state, press key. Press ▲ or ▼ key, until “Phone Book” in screen. Press key, into “Phone Book Setting”. Press ▲ or ▼ key, until “Search” in screen. Press key, into “Search”. Press ▲ or ▼ key, scroll “list of entries”. If there is no any entry, it will show “No Data Exist!” in screen. 7. Press key, into/add the entry. 8. Press ▲ or ▼ key, until “Edit” screen.
12:00 WLAN600 Not registered Menu Names Menu π θ 3. Phone Book 4. Net Setting 5. SIP Setting Select Back Select π θ 1. Search 2. Add Entry 3. Erase Select Back Select π θ Back David Mark Ken Select Select 1. Search 2. AddNo Entry Data 3. Erase [Exist!! Select Back Back Edit the name Select Back π θ Back 2. Edit 3. Erase 4. Group Setting Select Back Select Clear Edit the Number Ok Name: David| Ok Clear Clear Edit the IP Number: 123456| Ok Clear Ok Clear IP 123.123.123.
3.5.3. Searching Phone Book Entry: Erase Entry This section provides information about performing the Erase Phone Book Entry settings. 1. 2. 3. 4. 5. 6. In idle state, press key. Press ▲ or ▼ key, until “Phone Book” in screen. Press key, into “Phone Book Setting”. Press ▲ or ▼ key, until “Search” screen. Press key, into “Search”. Press ▲ or ▼ key, scroll the list of entries. If there is no any entry, it will show “No Data Exist!” in screen 7. Press key, into/add the entry. 8.
3.5.4. Searching Phone Book Entry: Group Setting This section provides information about performing the Phone Book Entry Group Settings. 1. 2. 3. 4. 5. 6. In idle state, press key. Press ▲ or ▼ key, until “Phone Book” in screen. Press key, into “Phone Book Setting”. Press ▲ or ▼ key, until “Search” in screen. Press key, into “Search”. Press ▲ or ▼ key, scroll to the list of entries. If there is no any entry, it will show “No Data Exist!” in screen. 7. Press key, into/add the entry. 8.
3.5.5. Adding a Phone Book Entry This section provides information about performing add a phone book entry settings. 1. 2. 3. 4. 5. 6. 7. 8. 9. 10. 11. In idle state, press key. Press ▲ or ▼ key, until “Phone Book” in screen. Press key, into “Phone Book Setting”. Press ▲ or ▼ key, until “Add Entry” in screen. Press key, enter “edit name” mode. Press key, delete all number of last entered. Press key, enter “edit number” mode. Press key, delete all number of last entered. Press key, enter “edit IP” mode.
3.5.6. Erasing Phone Book Entry: One by One This section provides information about performing the Erase Phone Book Entry settings. 1. 2. 3. 4. 5. 6. 7. 8. In idle state, press key. Press ▲ or ▼ key, until “Phone Book” in screen. Press key, into “Phone Book Setting”. Press ▲ or ▼ key, until “Erase” in screen. Press key, into “Erase”. Press ▲ or ▼ key, until “One by One in screen. Press key, into “One by One”. Press ▲ or ▼ key, scroll to the list of entries.
12:00 WLAN600 Not registered Menu Names Menu π θ 3. Phone Book 4. Net Setting 5. SIP Setting Select Back Select π θ Back 3. Erase 1. Search 2. Add Entry Select Back Select Back π 1. One by One 2. Erase All θ Select Select π θ David Mark Ken Select Select Back 1. One by One 2. Erase No All Data [Exist!! Select Back Back Select Are you sure? Back Back Ok Back 36 Ok Are Erased you sure? O.K.
3.5.7. Erasing Phone Book Entry: All This section provides information about performing the Erase Phone Book Entry settings. 1. 2. 3. 4. 5. 6. 7. 8. 9. In idle state, press key. Press ▲ or ▼ key, until “Phone Book” in screen. Press key, into “Phone Book Setting”. Press ▲ or ▼ key, until “Erase” in screen. Press key, into “Erase”. Press ▲ or ▼ key, until “Erase All” in screen. Press key, into “Erase All”. Press key, confirm the erase entry. W hen finished these entering or editing.
3.6. Using the Call History The Call History is a useful feature for checking missed calls, received calls, and dialed calls. 3.6.1. Missed Call You can check for missed calls and then edit and dial the phone numbers on the Missed Calls list. Edit: 1. In idle state, press key. 2. Press ▲ or ▼ key, until “Call History” in screen. 3. Press key, into “Call History Setting”. 4. Press ▲ or ▼ key, until “Missed Call” in screen. 5. Press key, into “Miss Call”. 6. Press ▲ or ▼ key, scroll to “Missed call” number.
12:00 WLAN600 Not registered Menu Names Menu π θ 2. Call History 3. Phone Book 4. Net Setting Select Back Select π θ 1. Missed call 2. Received call 3. Dialed call Select Back Select π θ Back 1. Missed call 2. Recieved No Datacall 3. Dialed call [Exist!! Select Back Name: 100 Saved O.K. Ok Clear Back Ok Select 807 808 Select Select Back π θ Back Select Select π θ Ok 1. Edit Missed 2. Erase Missed Back Clear Ok Clear Clear Name: 100 Ok Clear Back Ok 2. Erase Missed 1.
3.6.2. Received Call You can check for Received calls and then edit and dial the phone numbers on the Missed Calls list. Edit: 1. In idle state, press key. 2. Press ▲ or ▼ key, until “Call History” in screen. 3. Press key, into “Call History Setting”. 4. Press ▲ or ▼ key, until “Received Call” in screen. 5. Press key, into “Received Call”. 6. Press ▲ or ▼ key, scroll to “received call number”. Or then Press key to dial the number. 7. 8. 9. 10. 11. 12. 13. Press key, into “edit the number”, if necessary.
12:00 WLAN600 Not registered Menu Names Menu π θ 2. Call History 3. Phone Book 4. Net Setting Select Back Select π θ 2. Received call 3. Dialed call 4. Erase calls Select Back Select π θ Back 2. Received call 3. Dialed call No Data 4. Erase calls [Exist!! Select Back Name: 100 Saved O.K. Ok Clear Back Ok Select 807 808 Select Select Back π θ Back Select Select π θ Ok 1. Edit Received 2. Erase Received Back Clear Ok Clear Clear Name: 100 Ok Clear Back Ok 2. Erase Received 1.
3.6.3. Dialed Call You can check for Dialed calls and then edit and dial the phone numbers on the Dialed Calls list. Edit: 1. In idle state, press key. 2. Press ▲ or ▼ key, until “Call History” in screen. 3. Press key, into “Call History Setting”. 4. Press ▲ or ▼ key, until “Dialed Call” in screen. 5. Press key, into “Dialed Call”. 6. Press ▲ or ▼ key, scroll to the received call number. Or then Press key, dial the number, if necessary. 7. 8. 9. 10. 11. 12. 13. Press key, edit the number, if necessary.
12:00 WLAN600 Not registered Menu Names Menu π θ 2. Call History 3. Phone Book 4. Net Setting Select Back Select π θ 3. Dialed call 4. Erase calls 1. Missed call Select Back Select π θ Back 3. Dialed call 4. Erase calls No Data 1. Missed call [Exist!! Select Back Name: 100 Saved O.K. Ok Clear Back Ok Select 807 808 Select Select Back π θ Back Select Back Select π θ Ok 1. Edit Dialed 2. Erase Dialed Clear Ok Clear Clear Name: 100 Ok Clear Back Ok 2. Erase Dialed 1.
3.6.4. Erase Calls Erase All: 1. In idle state, press key. 2. Press ▲ or ▼ key, until “Call History” in screen. 3. Press key, into “Call History Setting”. 4. Press ▲ or ▼ key, until “Erase Calls” in screen. 5. Press key, into “Erase Calls”. 6. Press ▲ or ▼ key, scroll to “Erase All. 7. Press key, erase the Call History. 8. Press key, confirm the erase “Call History. 9. When finished these entering or editing. Press key, return to “Erase Calls”. Erase Missed: 1. In idle state, press 2. 3. 4. 5. 6. 7. 8. 9.
Erase Dialed: 1. In idle state, press key. 2. Press ▲ or ▼ key, until “Call History” in screen. 3. Press key, into “Call History Setting”. 4. Press ▲ or ▼ key, until “Erase Calls” in screen. 5. Press key, into “Erase Calls”. 6. Press ▲ or ▼ key, scroll to “Erase Dialed”. 7. Press key to erase the Dialed Call. 8. Press key, confirm the erase “Dialed Call. 9. When finished these entering or editing. Press key, return to “Erase Calls”. 12:00 WLAN600 Not registered Menu Names Menu π θ 2. Call History 3.
3.7. Setting The Call History is a useful feature for checking missed calls, received calls, and dialed calls. 3.7.1. Adjusting the Ring Volume 1. 2. 3. 4. In idle state, press key. Press ▲ or ▼ key, until “Setting” in screen. Press key, into “Setting”. Press ▲ or ▼ key, until “Ring Volume” in screen. 5. 6. Press key, into “Ring volume”. Press ▲ or ▼ key, scroll the Ring Volume. 7. When finished these entering or editing. Press key, return to “Setting”.
3.7.2. Setting the Ring Melody 1. 2. 3. 4. In idle state, press key. Press ▲ or ▼ key, until “Setting” in screen. Press key, into “Setting”. Press ▲ or ▼ key, until “Melody” in screen. 5. 6. key, into “Melody”. Press Press ▲ or ▼ key, scroll the Melody. 7. When finished these entering or editing. Press key, return to “Setting”. 12:00 WLAN600 Not registered Menu Names Menu π θ 6. Setting 7. Wireless 8. SSL Setting Select Back Select π θ Back 1. Melody 2. Vibrator 3.
3.7.3. Setting the Vibrator Mode 1. 2. 3. 4. In idle state, press key. Press ▲ or ▼ key, until “Setting” in screen. Press key, into “Setting”. Press ▲ or ▼ key, until “Vibrator” in screen. 5. 6. key, into “Vibrator”. Press Press ▲ or ▼ key, scroll the Vibrator on/off. 7. When finished these entering or editing. Press key, return to “Setting”. 12:00 WLAN600 Not registered Menu Names Menu π θ 6. Setting 7. Wireless 8. SSL Setting Select Back Select π θ Back 2. Vidrator 3. Ring Volume 4.
3.7.4. Setting the Time Format 1. 2. 3. 4. In idle state, press key. Press ▲ or ▼ key, until “Setting” in screen. Press key, into “Setting”. Press ▲ or ▼ key, until “Time Format” in screen. 5. 6. key, into “Time Format”. Press Press ▲ or ▼ key, scroll the Time Format. 7. When finished these entering or editing. Press key, return to “Setting”. 12:00 WLAN600 Not registered Menu Names Menu π θ 6. Setting 7. Wireless 8. SSL Setting Select Back Select π θ Back 4. Time Format 5. Time Edit 6.
3.7.5. Setting the Time Edit 1. 2. 3. 4. In idle state, press key. Press ▲ or ▼ key, until “Setting” in screen. Press key, into “Setting”. Press ▲ or ▼ key, until “Time Edit” in screen. 5. 6. 7. key, enter “edit number” mode. Press Press ◄ or ► key to moving the curser when editing. When finished these entering or editing. Press key, return to “Setting”. 12:00 WLAN600 Not registered Menu Names Menu π θ 6. Setting 7. Wireless 8. SSL Setting Select Back Select π θ Back 5. Time Edit 6. Banner 7.
3.7.6. Setting the Banner 1. 2. 3. 4. In idle state, press key. Press ▲ or ▼ key, until “Setting” in screen. Press key, into “Setting”. Press ▲ or ▼ key, until “Banner” in screen. 5. 6. 7. key, enter “edit” mode. Press Press key delete all number of last entered. When finished these entering or editing. Press key, return to “Setting”. 12:00 WLAN600 Not registered Menu Names Menu π θ 6. Setting 7. Wireless 8. SSL Setting Select Back Select π θ Back 6. Banner 7. Key Lock 8.
3.7.7. Setting the Key Lock. 1. 2. 3. 4. 5. 6. 7. In idle state, press key. Press ▲ or ▼ key, until “Setting” in screen. Press key, into “Setting”. Press ▲ or ▼ key, until “Key Lock” in screen. key, into “Key Lock”. Press Press ▲ or ▼ key, scroll the Key Lock on/off. When finished these entering or editing. Press key, return to “Setting”. 12:00 WLAN600 Not registered Menu Names Menu π θ 6. Setting 7. Wireless 8. SSL Setting Select Back Select π θ Back 7. Key Lock 8. Load Default 1.
3.7.8. Restoring the Factory Default Settings 1. 2. 3. 4. In idle state, press key. Press ▲ or ▼ key, until “Setting” in screen. Press key, into “Setting”. Press ▲ or ▼ key, until “Load Default” in screen. 5. 6. 7. key, into “Load Default”. Press Press key, confirm the “Load Default Factory”. The device will automatically reboot when the factory default settings are restored. 12:00 WLAN600 Not registered Menu Names Menu π θ 6. Setting 7. Wireless 8. SSL Setting Select Back Select π θ Back 8.
4. Web Configuration Setting This chapter provides information that is using the web Brower to configure the WLAN600 Wireless IP Phone. 4.1.
Phone Number Registration Status Phone Book Setup Destination Name Destination Phone NO. Destination IP Address Use Proxy Wireless Setting ESSID Channel ( 1-11 ) Mode 802.11b AdHoc Infrastructure Rate Auto 1M 2M 5.
Voice Frame per Packet Small Medium Large DTMF RELAY DTMF Payload( 0 ~ 127 ) System Login Username New Password Confirm Password Admin Login username Admin New Password Admin Confirm Password Time Zone Time Server Update Firmware TFTP IP Address File Name Block Size Select File 56
4.2. Login Password Users can use browsers to setup or show the information of the IP phone. Go to http:// Use default username “user” and password “1111” to see the settings, Administrator use “voipadmin” and password “admin” to login. The web page is divided into several frames, each of which is related to VoIP module.
4.3. Device Information 4.4.
4.5. Network Configuration: DHCP 4.6.
4.7. OutBound Proxy Configuration 4.8.
4.9. Phone Book 4.10.
4.11. System 4.12.
5. Basic Phone Tasks This chapter provides information about performing the following tasks: Dialing a Phone Number Redialing a Number Using Speed Dial Answering a Call Holding a Call 5.1. Dialing a Phone Number 1. 2. 3. In idle state, enter the phone number by using the numerical keys. If you entered an incorrect number, press key to delete it. Press key to connect your call. 5.2. Redialing a Phone Number 1. In idle state, Press key. 2. The list of placed calls is displayed.
6. Display Messages This appendix provides a list of messages that are displayed on the user interface of the WLAN600, and contains the following sections: Error Messages Warning Messages 6.1. Error Messages “Error messages” are displayed to let you know that an error has occurred. These “error message” may prevent you from connecting to the network or from using the phone. You may need to contact the system administrator to resolve the problem.
6.2. Warning Messages Warning messages are displayed when the phone detects a condition that may disrupt your phone service Warn 1: Battery Low ( The Screen has 2 states : blinking ) (1)The battery will be charging automatically after 10 sec when it runs out of power. (2)The device is in power-off condition. 12:00 WLAN600 Net Fail! (DHCP) Menu Names 12:00 WLAN600 Not registered Menu Names Warn 2: Battery Low ( blinking) The battery energy level is low.