
User`s manual


27
1.6.2 Installing the CPU Heatsink and Fan
The Intel LGA1156 processor requires a specially designed heatsink and fan assembly to ensure optimum
thermal condition and performance.
• When you purchase a boxed Intel® processor, the package includes the CPU fan and
heatsink assembly. If you buy a CPU separately, make sure that you use only
Intel®-certified multi-directional heatsink and fan.
• Your Intel® LGA1156 heatsink and fan assembly comes in a push-pin design and requires
no tool to install.
• If you purchased a separate CPU heatsink and fan assembly, make sure that:
a. The CPU heatsink and fan assembly is designed to withstand the “TDP” (Thermal
Dissipation Power) specified by Intel specification of corresponding CPU that you are
going to install.
b. You have properly applied an even layer of Thermal Interface Material to between the
CPU heatsink and the top of CPU before you install the heatsink and fan assembly
(please check with your CPU fan/heatsink vendor for details).
NOTE: Make sure that you have installed the mainboard to the chassis before you install
the CPU fan and heatsink assembly.
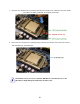
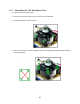
To install the CPU heatsink and fan:
1. Place the CPU heatsink on top of the installed CPU, making sure that the four fasteners match the
holes on the mainboard.
NOTE: Orient the heatsink and fan assembly such that the CPU fan cable is closest to the
CPU fan connector).