
Product Manual

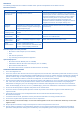
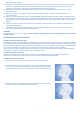


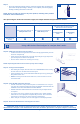

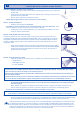
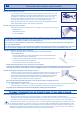
Table Of Contents
- For In Vitro Diagnostic Use
- For In Vitro Diagnostic Use
- INTENDED USE
- INTENDED USE
- SUMMARY AND EXPLANATION OF THE TEST
- SUMMARY AND EXPLANATION OF THE TEST
- PRINCIPLES OF THE PROCEDURE
- PRINCIPLES OF THE PROCEDURE
- REAGENTS
- REAGENTS
- Materials Provided:
- Materials Provided:
- Optional Equipment:
- Optional Equipment:
- WARNINGS AND PRECAUTIONS
- WARNINGS AND PRECAUTIONS
- STORAGE
- STORAGE
- SPECIMEN COLLECTION AND HANDLING
- SPECIMEN COLLECTION AND HANDLING
- Specimen Transport and Storage
- Specimen Transport and Storage
- Nasal Swab Specimen Collection
- Nasal Swab Specimen Collection
- DOs and DON’Ts of Sample Collection
- DOs and DON’Ts of Sample Collection
- TEST PROCEDURE
- TEST PROCEDURE
- This BD Veritor System assay kit is only intended for nasal swab specimens that are collected and tested directly (i.e., swabs that have NOT been placed in transport media). The kit includes a pre-diluted processing reagent in a ready to use “unitized...
- This BD Veritor System assay kit is only intended for nasal swab specimens that are collected and tested directly (i.e., swabs that have NOT been placed in transport media). The kit includes a pre-diluted processing reagent in a ready to use “unitized...
- Step 4:
- Step 4:
- Step 5:
- Step 5:
- NOTE: Do not use tubes or tips from any other product, including other products from BD or other manufacturers.
- NOTE: Do not use tubes or tips from any other product, including other products from BD or other manufacturers.
- NOTE: Squeezing the tube too close to the tip may cause leakage.
- NOTE: Squeezing the tube too close to the tip may cause leakage.
- If a printer is not connected, record the result before removing the assay device.
- If a printer is not connected, record the result before removing the assay device.
- INTERPRETATION OF RESULTS
- INTERPRETATION OF RESULTS
- REPORTING OF RESULTS
- REPORTING OF RESULTS
- QUALITY CONTROL
- QUALITY CONTROL
- EXTERNAL POSITIVE AND NEGATIVE CONTROLS
- EXTERNAL POSITIVE AND NEGATIVE CONTROLS
- If the kit controls do not perform as expected, do not report patient results. Contact BD Technical Services at 1.800.638.8663.
- If the kit controls do not perform as expected, do not report patient results. Contact BD Technical Services at 1.800.638.8663.
- CONDITIONS OF AUTHORIZATION FOR THE LABORATORY
- CONDITIONS OF AUTHORIZATION FOR THE LABORATORY
- CLINICAL PERFORMANCE
- CLINICAL PERFORMANCE
- ANALYTICAL PERFORMANCE
- ANALYTICAL PERFORMANCE
- CROSS REACTIVITY (ANALYTICAL SPECIFICITY)
- CROSS REACTIVITY (ANALYTICAL SPECIFICITY)
- HIGH DOSE HOOK EFFECT
- HIGH DOSE HOOK EFFECT
- TECHNICAL SUPPORT
- TECHNICAL SUPPORT
- REFERENCES
- REFERENCES

I
f the BD Veritor Plus Analyzer is connected to an LIS, a steady ENVELOPE symbol will appear to indicate that
results
are awaiting transmission. If a network connection is not detected while the ENVELOPE symbol is still displayed, the
BD Veritor Plus Analyzer will queue all untransmitted results and attempt to transmit them when reconnected. If it is
powered off during this time, it will attempt to transmit as soon as power is restored, and connection is re-established.
A flashing envelope indicates that data are in the process of being transmitted.
9
D
Using the BD Veritor Plus Analyzer In “Walk Away” mode
with the BD Veritor InfoScan module installed
To use Walk Away mode - connect the AC power adapter to the BD Veritor Plus Analyzer and a power source
Step 6D: Starting Walk Away mode
•
Turn on the BD Veritor Plus Analyzer by pressing the blue power button once. The
display window will briefly show “SCAN CONFIG BARCODE”. This is an opportunity
to change the configuration of the BD Veritor Plus Analyzer. Please refer to the
BD Veritor Plus Analyzer Instructions for Use for configuration steps. Ignore this
message and postpone this process when an assay is awaiting analysis.
•
When the display window reads: INSERT TEST DEVICE OR DOUBLE-CLICK FOR
WALK AWAY MODE, double -click the blue power button.
Step 7D: Using the barcode scanner
•
Follow the prompts on the display screen to complete any required barcode scans of:
–
OPERATOR ID
–
SPECIMEN ID and/or
–
KIT LOT NUMBER
•
Prompts for each scanning step appear in the display window for only 30 seconds. Failure to complete scans during
that time will cause the BD Veritor Plus Analyzer to default to the beginning of step 8C. To restart this step, remove
and reinsert the test device to initiate a new reading sequence.
•
Move barcodes slowly toward the window until a confirmation tone sounds. The scanned barcode value appears in
the next display window.
•
The BD Veritor Plus Analyzer can record the Kit Lot Number and expiration date in the test record but does not restrict
the use of expired or inappropriate reagents. Management of expired materials is the responsibility of the user.
Step 8D:
Adding the specimen to the test device
•
When the display window reads: ADD SPECIMEN TO TEST DEVICE AND
INSERT IMMEDIATELY:
–
Invert the tube, holding it vertically (approximately one inch above the BD Veritor
System SARS-CoV-2 device sample well).
–
Gently squeeze the ridged portion of the tube, dispensing three (3) drops of the
processed specimen into the sample well.
–
Excess volume remains for retesting if necessary.
NOTE: Squeezing the tube close to the tip may cause leakage.
CAUTION: A countdown timer displays the time remaining for test insertion. Walk Away mode must be activated again
when this timer expires. Confirm timer is visible and Walk Away mode is activated before inserting test device.
Step 9D: Starting the development and reading sequence
•
Insert the test device into the slot on the right side of the BD Veritor Plus Analyzer. The test
device must remain horizontal to prevent spilling the specimen out of the sample well.
•
“DO NOT DISTURB TEST IN PROGRESS” appears in the display window. Automatic
timing of the assay development, image processing and result analysis begins.
•
The display window shows the remaining analysis time.
Do not touch the BD Veritor Plus Analyzer or remove the test device during this process.
Doing so will abort the assay analysis.
•
When analysis is complete, a result appears in the display window. If configured to display, the Specimen ID barcode
value also appears. If a printer is connected, specimen ID and result are automatically printed.
If a printer is not connected, record the result before removing the assay device.
Step 10D: Removing the test device
• Remove and then discard the test device appropriately. The display will show INSERT TEST DEVICE OR
DOUBLE-CLICK BUTTON FOR WALK AWAY MODE to indicate the BD Veritor Plus Analyzer is ready to perform another
test. Note that the BD Veritor Plus Analyzer returns to Analyze Now mode at the conclusion of each read sequence.