AC153 PORTABLE AIR operation manual CAUTION READ THIS MANUAL CAREFULLY before operating or servicing this air compressor, to familiarize yourself with the proper safety, operation, and standard operating procedures of this unit. FAILURE TO COMPLY WITH INSTRUCTIONS IN THIS MANUAL COULD RESULT IN THE VOIDING OF YOUR WARRANTY, AND PERSONAL INJURY, AND/OR PROPERTY DAMAGE. THE MANUFACTURER OF THIS AIR COMPRESSOR WILL NOT BE LIABLE FOR ANY DAMAGE BECAUSE OF FAILURE TO FOLLOW THE INSTRUCTIONS IN THIS MANUAL.
table of contents Introduction 4 Using the Operator’s Manual 4 Specifications Product Identification 5 Record Identification Numbers Safety 6 Receipt and Inspection 7 Safety Instructions 7 Hazard Symbols and Meanings 8 Air Tank Warning 8 Fire Warnings 8 Breathable Air Warning 9 Electric Shock Warning 9 Air Tools and Accessories Warning 10 General Safety Information 11 Spraying Precautions 11 Hose Precautions Installation & Grounding 12 Installation and Location 12 Grounding Instructions 13 Extension Cords
table of contents Maintenance 18 Maintenance 18 Daily 18 Weekly 19 Monthly 19 3 Months or 500 Operating Hours 19 12 Months or 1000 Operating Hours Caution 19 Caution Exploded View 20 Exploded View Diagram 21 Exploded View List List of Goods 22 List of Goods Troubleshooting 23 Troubleshooting Chart 3
introduction Attention: Read through the complete manual prior to the initial use of your compressor. Using the Operator’s manual Thank you for purchasing a BE Air Compressor. Your machine is designed for long life, dependability, and the top performance you demand! Please take time now to read through this manual so you better understand the machine’s operation, maintenance and safety precautions. Everyone who operates this machine must read and understand this manual.
product identification Record Identification Numbers Compressor If you need to contact an Authorized Dealer or Customer Service line (1-866-850-6662) for information on servicing, always provide the product model and identification numbers. You will need to locate the model and serial number for the machine and record the information in the places provided below.
safety Receipt and Inspection Before signing the delivery receipt, inspect for damage and missing parts. If damage or missing parts are apparent, make the appropriate notation on the delivery receipt, then sign the receipt. Immediately contact the carrier for an inspection. All material must be held in the receiving location for the carrier’s inspection. Delivery receipts that have been signed without a notation of damage or missing parts are considered to be delivered “clear.
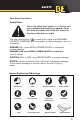
safety Save these Instructions Safety Rules This is the safety alert symbol. It is used to alert you to potential personal injury hazards. Obey all safety messages that follow this symbol to avoid possible injury or death. The safety alert symbol ( ) is used with a signal word (DANGER, CAUTION, WARNING), a pictorial and/or a safety message to alert you to hazards. DANGER WILL cause DEATH, SEVERE INJURY or substantial property damage. WARNING CAN cause DEATH, SEVERE INJURY or substantial property damage.
safety warning AIR TANK WARNING: Drain liquid from air tank daily, or after each use, using the drain valve located on the bottom of the lower air tank. Failure to properly drain liquid from the tank will cause rust from moisture buildup, which weakens the tank and could lead to a violent tank explosion, Periodically inspect the tanks for unsafe conditions such as corrosion. Never attempt to repair or make modifications to the tank or its attachments.
safety warning ELECTRIC SHOCK WARNING: When using electric powered tools, machines or equipment, basic safety precautions should always be followed to minimize the risk of electrical shock or personal injury to yourself and others. This air compressor is powered by electricity and should never be used without properly grounded electrical connections. Do not use in wet or damp locations or expose to rain.
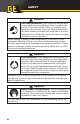
safety General Safety Information Do not operate unit if damaged during shipping, handling or use. Damage may result in bursting and cause injury or property damage. Since the air compressor and other components (filters, lubricators, hoses, etc.) used, make up a high pressure pumping system, the following safety precautions must be observed at all times: 1. 2. 3. 4. 5. 6. 7. 8. Read all manuals included with this product carefully.
safety 12. Never attempt to repair or modify a tank! Welding, drilling or any other modification will weaken the tank resulting in damage from rupture or explosion. Always replace worn or damaged tanks. Drain liquid from tank daily. 13. Tanks rust from moisture build-up, which weakens the tank. Make sure to drain tank daily and inspect periodically for unsafe conditions such as rust formation and corrosion. 14. Fast moving air will stir up dust and debris which may be harmful.
installation & grounding Installation and Location The compressor must be used on a stable level surface. The air compressor must be used in a clean and well-ventilated area. The compressor requires an unobstructed airflow and must be located a minimum of 18 inches from any walls or other obstructions. Grounding Instructions This product should be grounded. In the event of an electrical short circuit, grounding reduces the risk of electric shock by providing an escape wire for the electric current.
installation & grounding Extension Cords We do not recommend the use on an extension cord with this product as this may result in the loss of power and overheating of the motor. An additional air hose should be used instead of an extension cord. However, if the use of an extension cord is unavoidable, use only UL listed wire extension cords that have three-pronged grounding type plugs and three prong receptacles that accept the tool’s plug.
air compressor components Read this operator’s manual and safety rules before operating your compressor. 2. 1. 3. 4 7. 5. 6. 1. 2. 3. 4. 5. 6. 7.
assembly Assembly Read all safety instructions before using air compressor. warning The compressor is shipped without oil in the crankcase. Add oil as indicated below. Check Oil Level Daily Oil Level OK Refill Oil Immediately 1. After opening the carton, please remove all parts and check against photograph on carton. If any parts are missing, please call at 1-866-850-6662. 2. Place air compressor on a flat, level surface. 3.
operation operation Breather Cap Initial Start Up Initial Start Up 1. The place to setisthe compressor clean, dryand and ventilated. 1. Pump shipped with oil.should Removebethe oil cap check pump oil 2. Keep the level. use voltage within±5% of rated.pump oil (Part #4043), if necesAdd SAE 30 non-detergent Hand tighten cap. 3. Keep the sary. oil level in the red breather circle leveler 2. Turn pressure relief knob to engine start position. on/off Engine Start Engine Run knob discharge valve 2 3.
operation OPERATION AND ADJUSTMENT 1. The compressor is controlled by pressure switch when normal working. It can be stopped automatically as pressure increasing to the max and restart as pressure decreasing to the min. The rated pressure has been adjusted when produced. Don’t change it carelessly. As soon as motor switched off the compressed air in the discharge pipe should be released through the release valve under the switch. This is the necessary condition for restart, or the motor will be damaged.
maintenance Maintenance 1 Clean crankcase and renew lubricating oil after the first 10 working hours. 2 Clean the oil level daily, and replenish if necessary (Fig.4) 3 Open drain cock under the tank to exhaust condensate daily. 4. Clean crankcase and renew the oil, clean air filter, and check safety valve and pressure gauge after every 120 working hours. fig. 4 warning Disconnect electrical cord from outlet and release air pressure from system before performing maintenance.
caution Monthly ·· Inspect for air leaks. Squirt soapy water around joints during compressor operation and watch for bubbles. Tighten fittings if necessary. ·· Clean exterior. 3 months or 120 hours ·· Change petroleum lubricant in pump while crankcase is warm. 12 months or 1000 hours ·· Replace air filter element. Caution 1. 2. 3. 4. 5. 6. 7. 8. 9. Put the cover off first and put on the breath pipe and air filter before the compressor run (Fig.5).
exploded view 20
exploded view list Item Description Qty Item Description Qty 1 Bolt M6×35 4 35 Screw M4 1 2 Spring washer 8 36 Spring washer 5 4 3 Cylinder head 1 37 bolt M5 4 4 Cylinder seals 1 38 Circlip 1 5 Right-angle connecter 1 39 Fan 1 6 Valve plate subassembly 1 40 M5 2 7 Valve slice δ 1 41 Centrifugal switch 1 8 Locating pin 2 42 Fan cover soleplate 1 9 Valve gasket 1 43 Fan cover 1 10 Bolt M6×20 4 44 Screw 4 11 Cylinder Φ 1 45 Bolt M5 4 12
list of goods 22 NO Designation Qty 1 Air compressor 1 2 Air filter 1 3 Breath pipe 1 4 Operation manual 1
troubleshooting Troubleshooting Chart If you are experiencing a problem that is not listed in this chart, or have checked all the possible cause listed and you are still experiencing the problem, see your authorized dealer Trouble Possible causes Remedies Motor unable running, Running too Slow, or Getting hot 1. Fault in line, or voltage insufficient 2. Power wire too thin or too long 3. Fault in pressure switch 4. Fault in motor 5. Sticking of main compressor 1. Check the line 2.
If you need assistance with the assembly or operation of your Compressor please call 1-866-850-6662 24